
Taskflows in IICS
There are 6 types of Taskflows available in Informatica IICS as shown below:

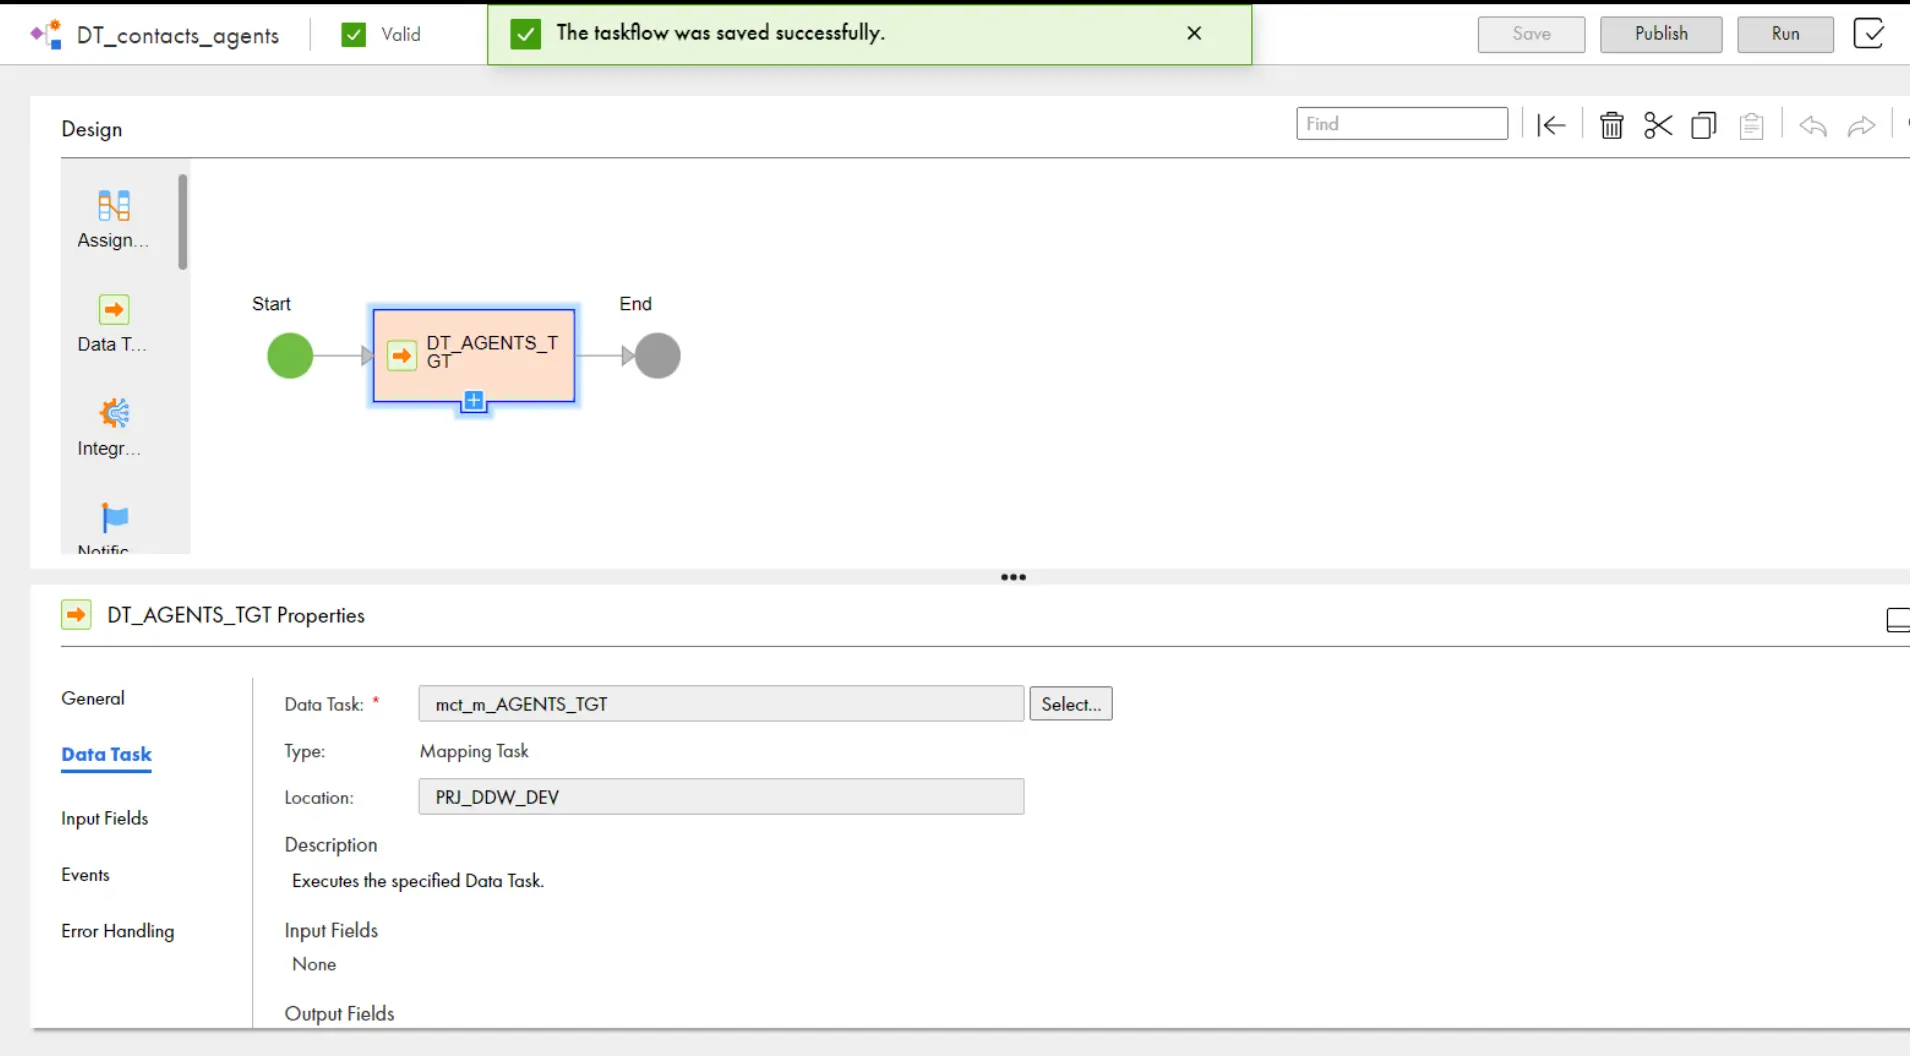
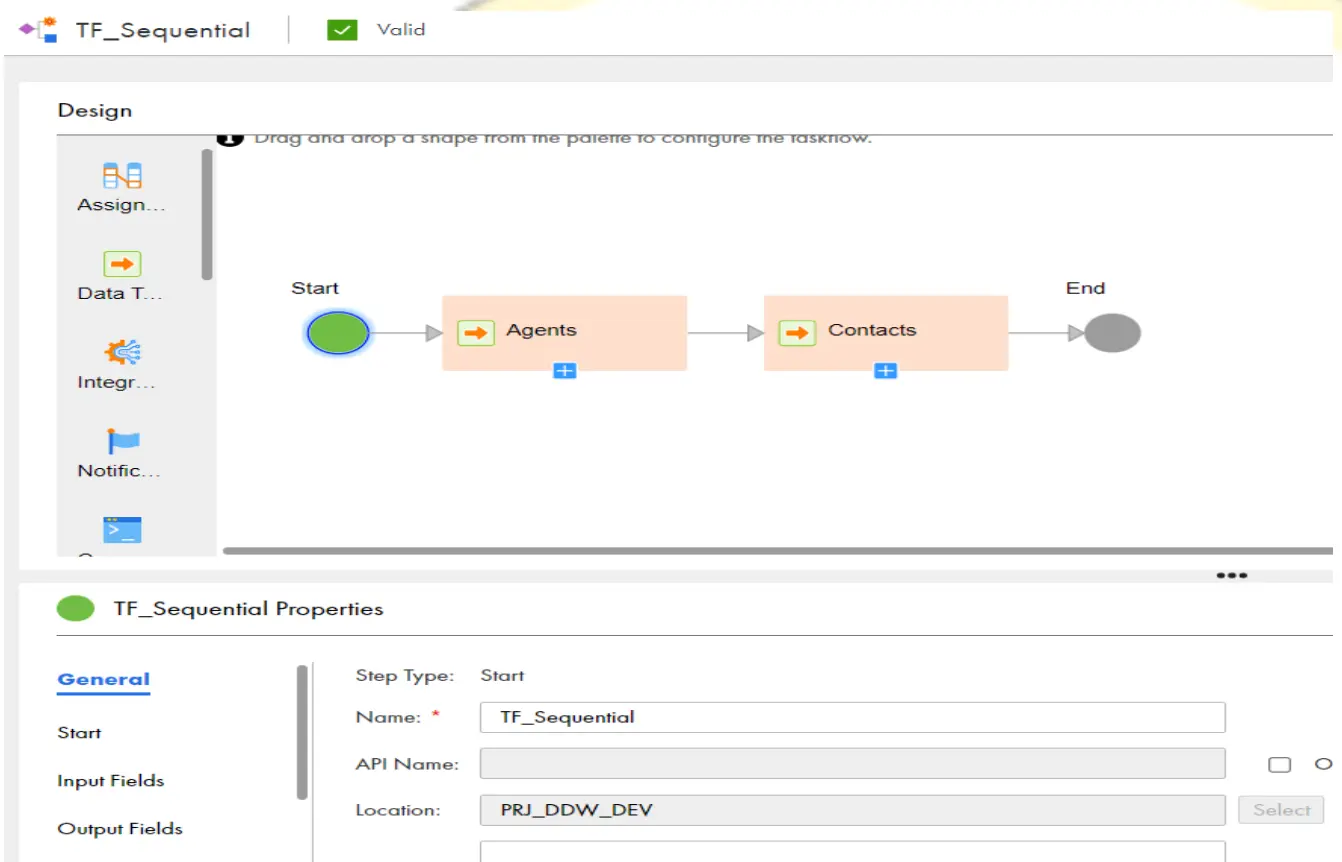
Taskflow:
- We will use Taskflow to control the execution sequence of a data transfer task, dynamic mapping task, mapping task, PowerCenter task, or synchronization task based on the output of the previous task.
- Select Taskflow when you need a basic canvas with a Start step and an End step. You can create and configure a Taskflow that suits your needs.
- From Left pane, drag any type of Task (Data Task) in between Start and End Step as shown in below:
Linear Taskflow:
- We will use a linear Taskflow to run multiple tasks serially in the order that you specify.
- Create a Linear Taskflow and Add as many tasks (Mapping Task / Synchronization Task/Replication task) as you want to run as shown below:
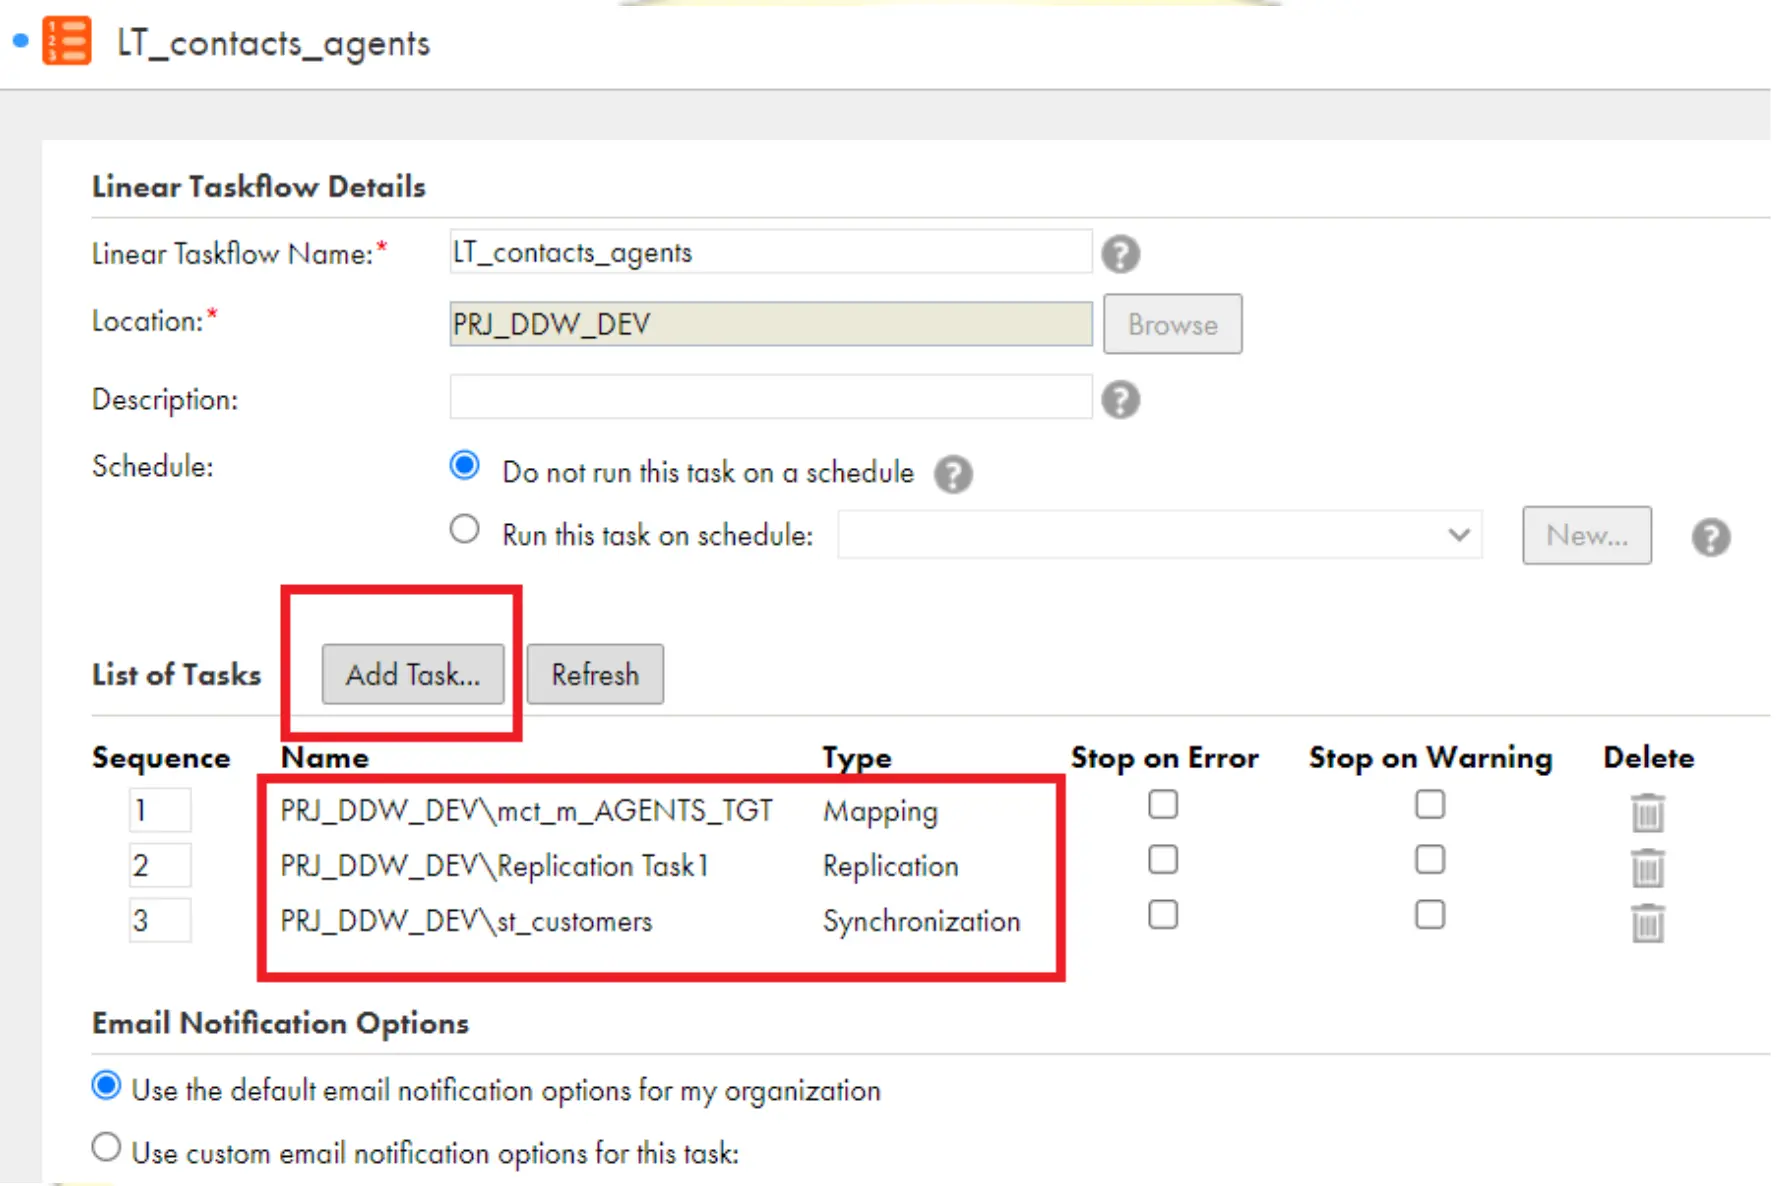
- When you run the above Taskflow, The Above Three jobs run one by one Like the sequence numbers mentioned in the above image.
- Linear Taskflows can include the following task types:
a) Synchronization task
b) Replication task
c) Mapping task
d) Masking task
e) PowerCenter task - If you stop a task other than the last task in the linear Taskflow, whether the linear Taskflow job stops or continues depends on whether the Stop on Error property is enabled:
- If Stop on Error is enabled, if any of the task is failed, the other tasks will not run and the linear Taskflow job stops running. The status of the job is Failed.
- If Stop on Error is not enabled, the linear Taskflow job resumes with the next task in the flow. When the job completes, the status of the job is Warning because all of the tasks in the linear Taskflow didn’t complete.
Parallel Tasks:
- We will use the Parallel Tasks template If we want to run two or more data integration tasks in parallel. You start with a Taskflow that contains a Start step, a Parallel Paths step, and an End step as shown below:

- To Add one more Data task in the parallel task, click on the Purple + symbol, click on Parallel paths, and click on ‘Add’ as shown below:
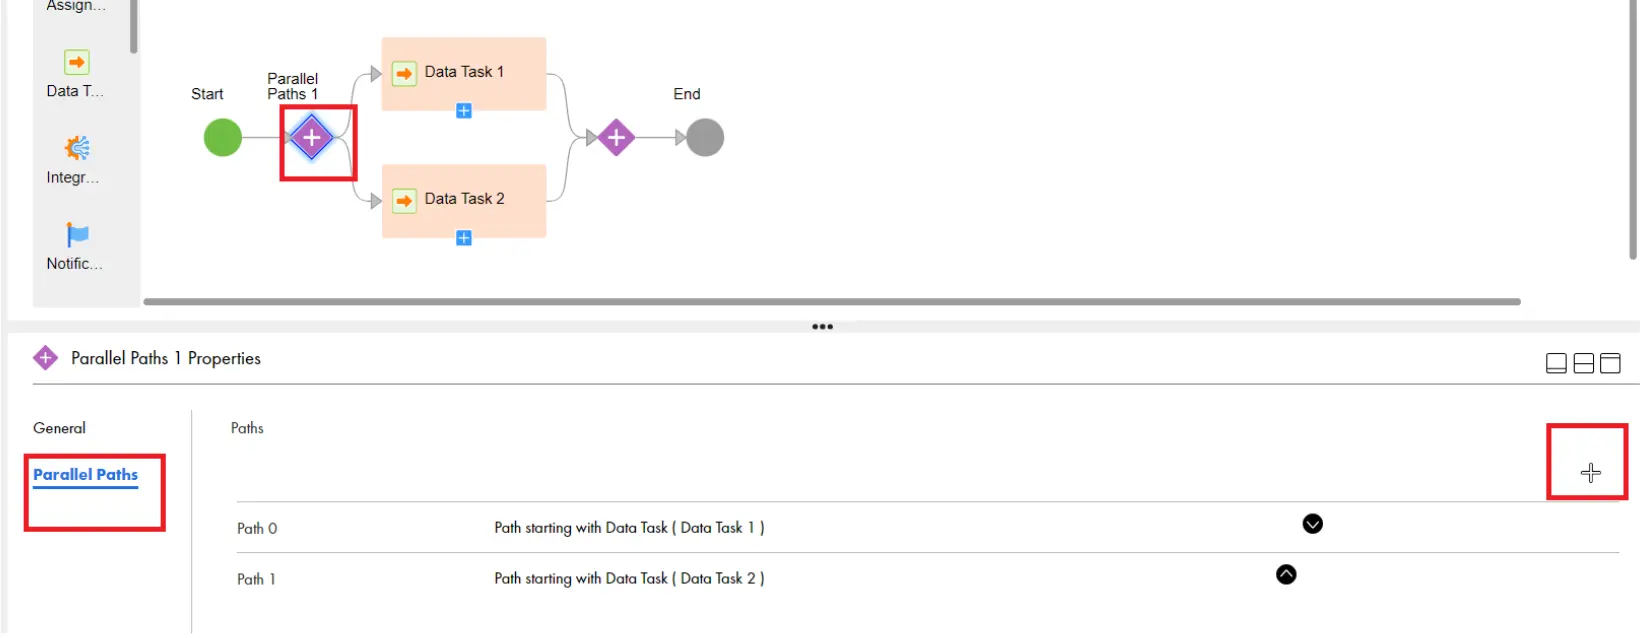
- After Clicking on Add, drag the Data integration task to the third flow.

- In the Above task, all the above three tasks will start at a time parallelly.
- We will use this method when we want to load all the stage tables at a time without being dependent on each other.
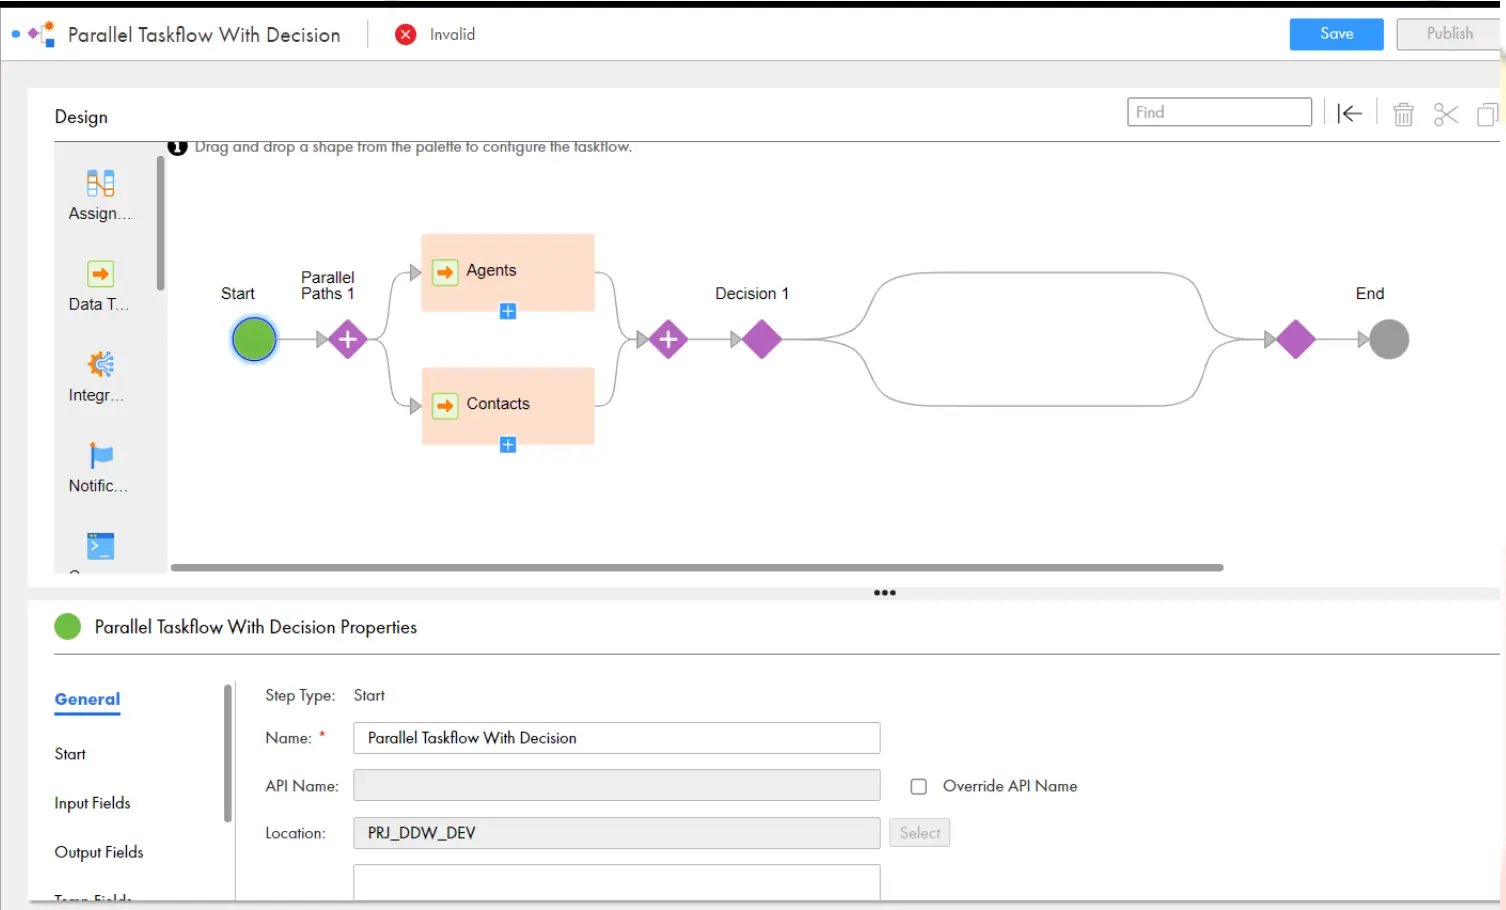
Parallel Tasks with Decision:
- We will use Parallel Tasks with Decision template if our major requirement is to run two or more data integration tasks in parallel and then make a decision based on the outcome of any task.
- Create a parallel task with Decision and Select any tasks for Data task1 and Data task2. Then it will create as shown in the below:
- TASK STATUS:
a – IF JOB IS COMPLETED SUCCESSFULLY
b – IF JOB GIVING WARNING
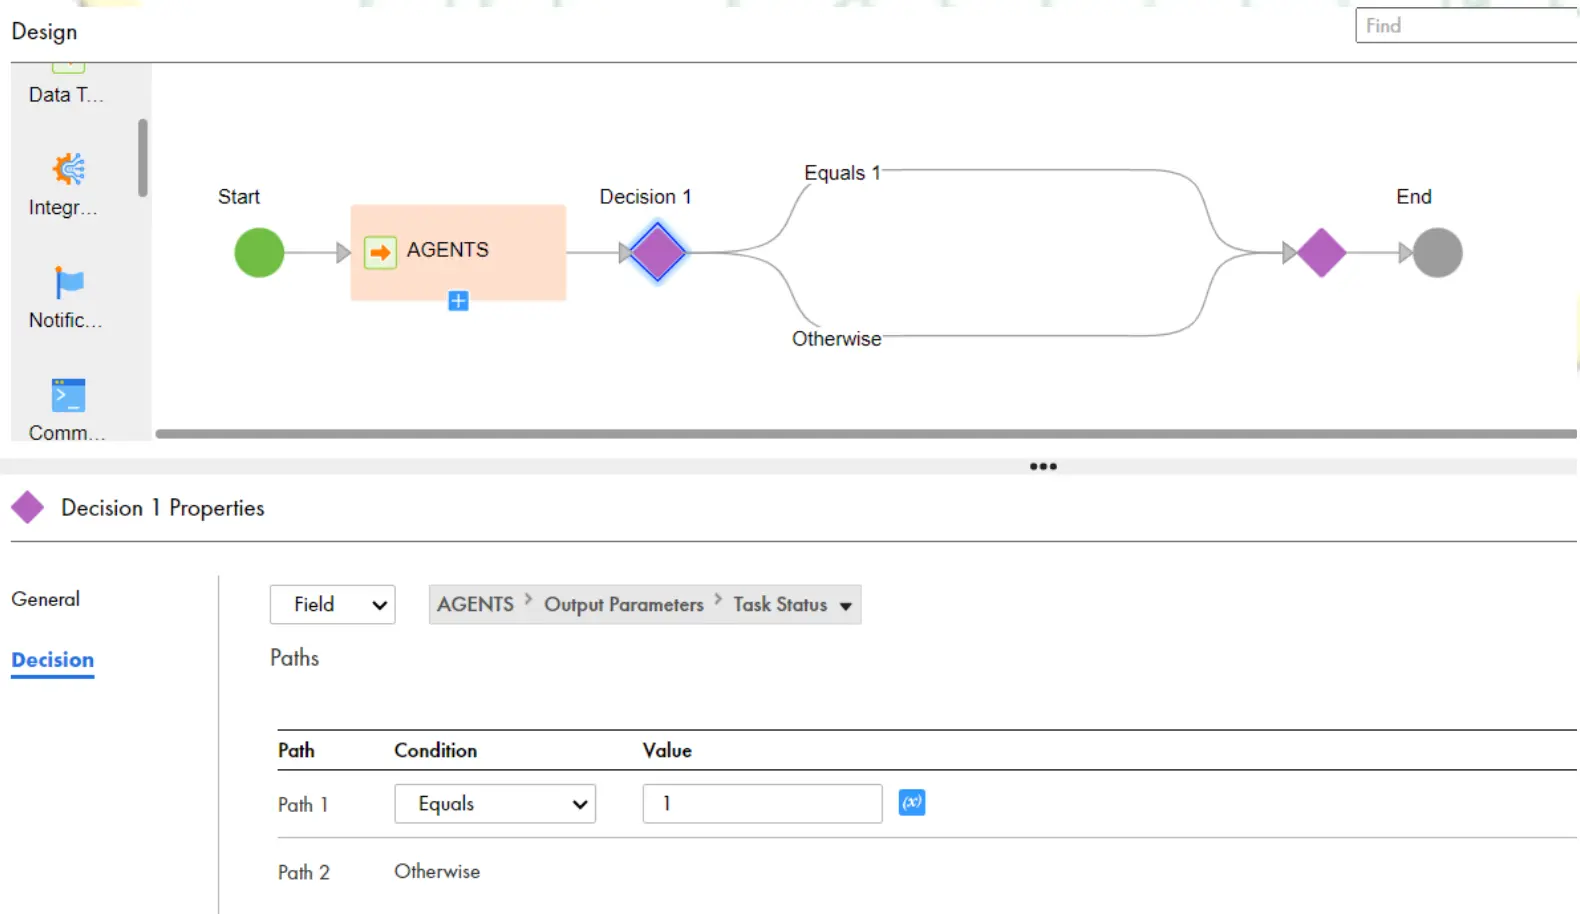
c – IF JOB IS FAILED - Click on Decision step, under properties Click on Decision, “Click on Click to select filed” Click on Agents -> Click on output Parameters – > select task Status Under the below properties, give as Parth1 Equals 1 as shown below:

- Drag The two Data Tasks to Decision step and configure them as shown below:

- Make sure that, Click on Agents, Contacts data Tasks, and then Under Error Handling property, select “on Warning “, “on Error” properties as ignore, as shown in below. Click on Save and Run the Taskflow.

- In the Below Taskflow execution, Agents Tasks is failed, due to that DSS_Saved_Query Task does not run. But, As Contacts Task is run and successful, then DSS_CUST executed and succeeded.

Sequential Tasks:
- We will use Sequential Tasks template if our requirement is to run two data integration tasks, one after the other.
- We start with a Taskflow that contains a Start step, two Data Task steps, and an End step as shown in the below:
- Make sure that under Agents, contacts tasks properties, enable “If this task fails” also “If this does not run” as shown in the below:
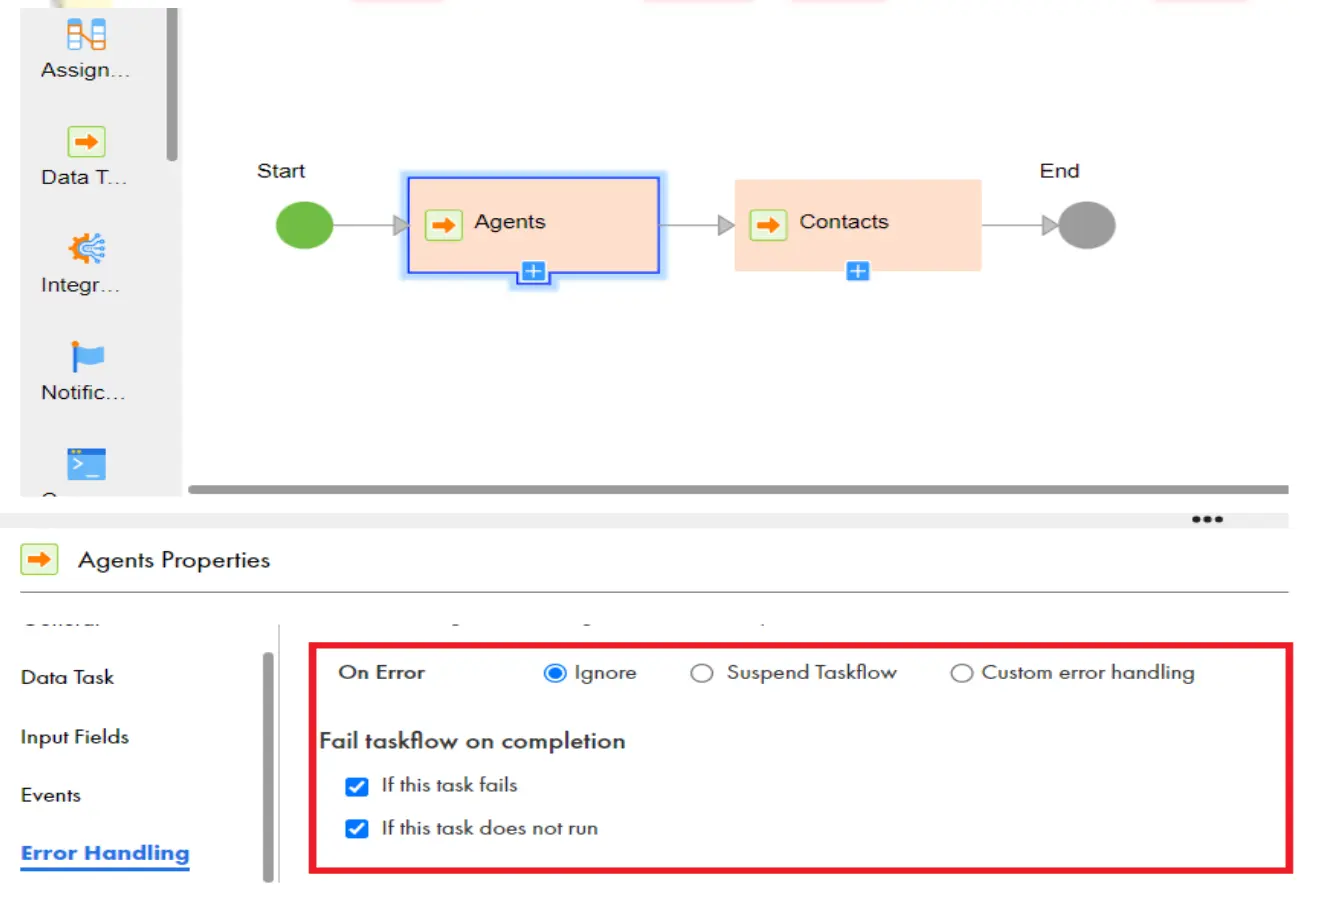
- Run the Taskflow. As per the below screenshot, First Agents Data task is executed but its failed and then Contacts data task is executed and succeeded.

Sequential Tasks with Decision:
- We will use the Sequential Tasks with Decision template if our requirement is to run two data integration consecutive tasks and then make a decision based on the output of either task.
- We start with a Taskflow that contains a Start step, two Data Task steps, a Decision step, and an End step as shown in the below:
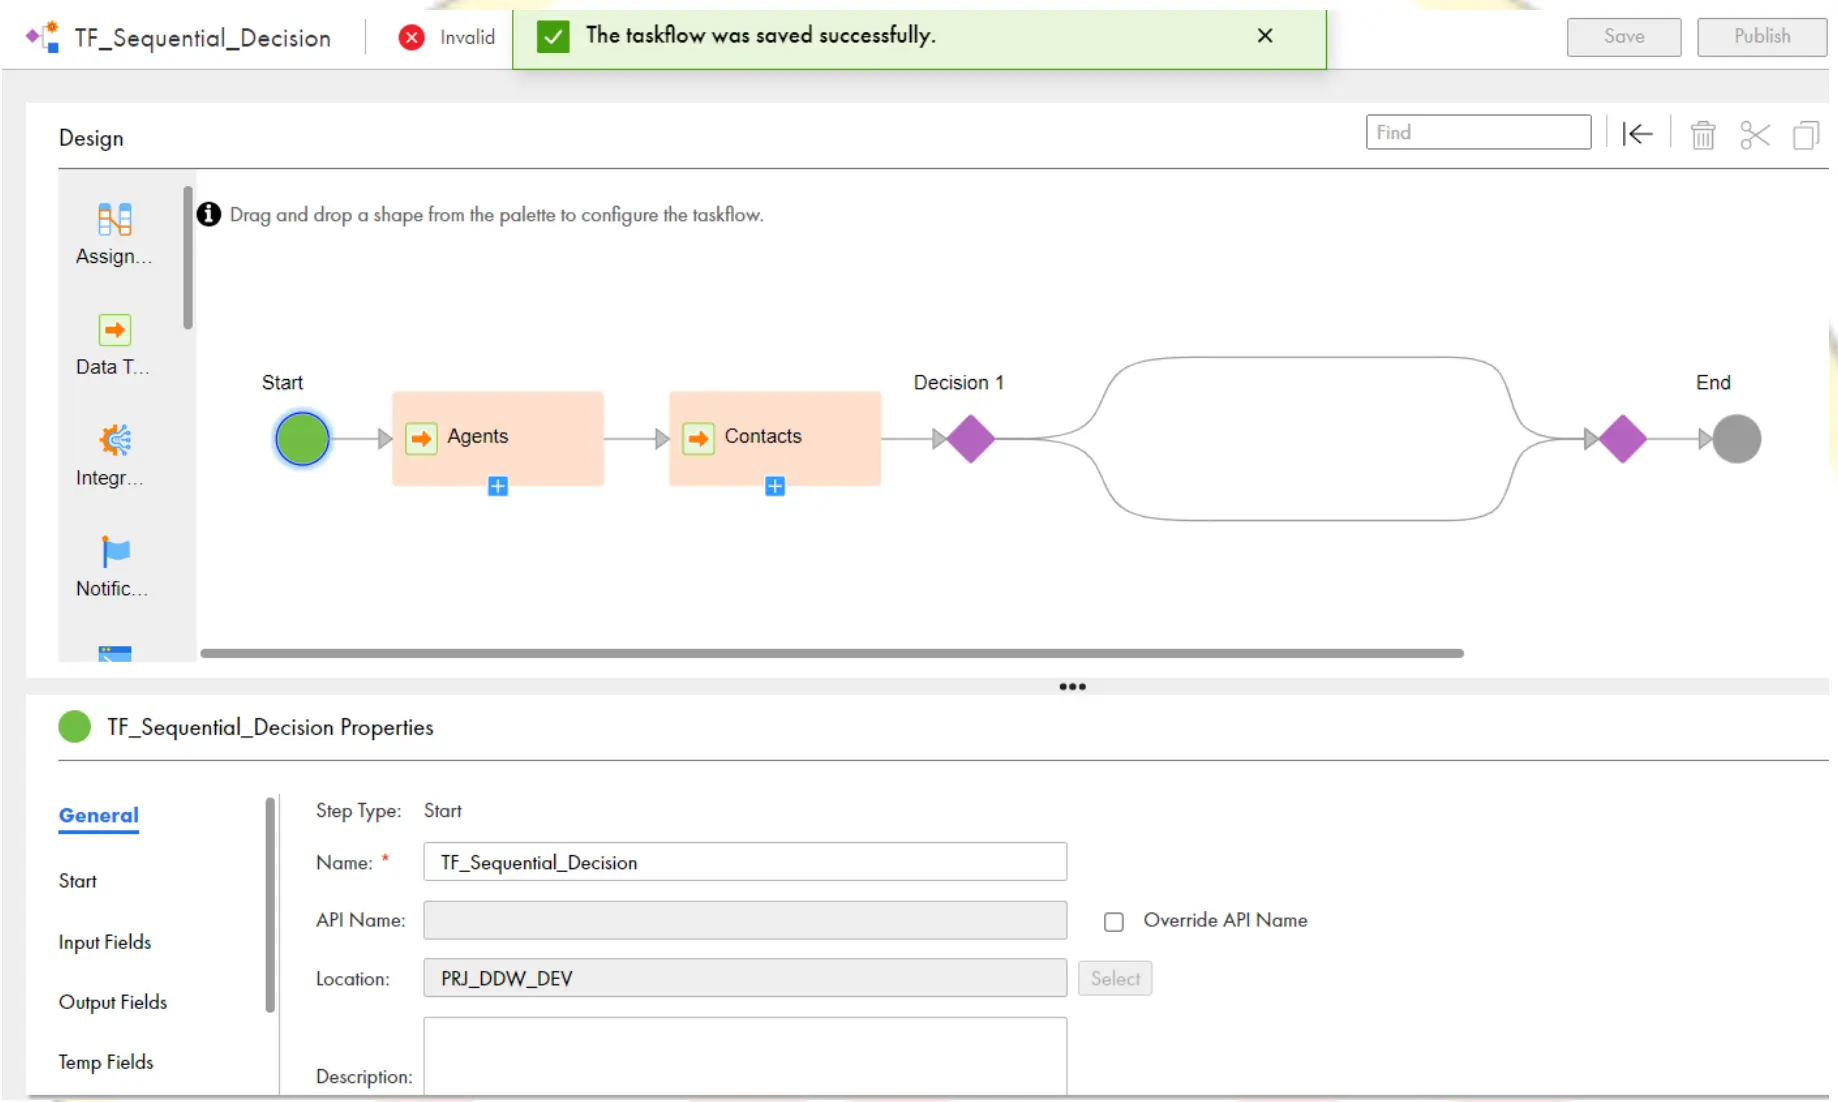
- Drag a Data task to after Decision step and Configure the Decision step as formula as shown below:

- Write the formula as If Agents and Contacts both the status is succeeded, then only go to the Equals flow as shown in the below:

Note: But the Above formula will not work when both the Data tasks are succeeded. Solution will be given in the later slides. - As per the below screenshot, Because Agents Data task is failed, it didn’t go to the next step and Data task1 didn’t execute.

Single Task:
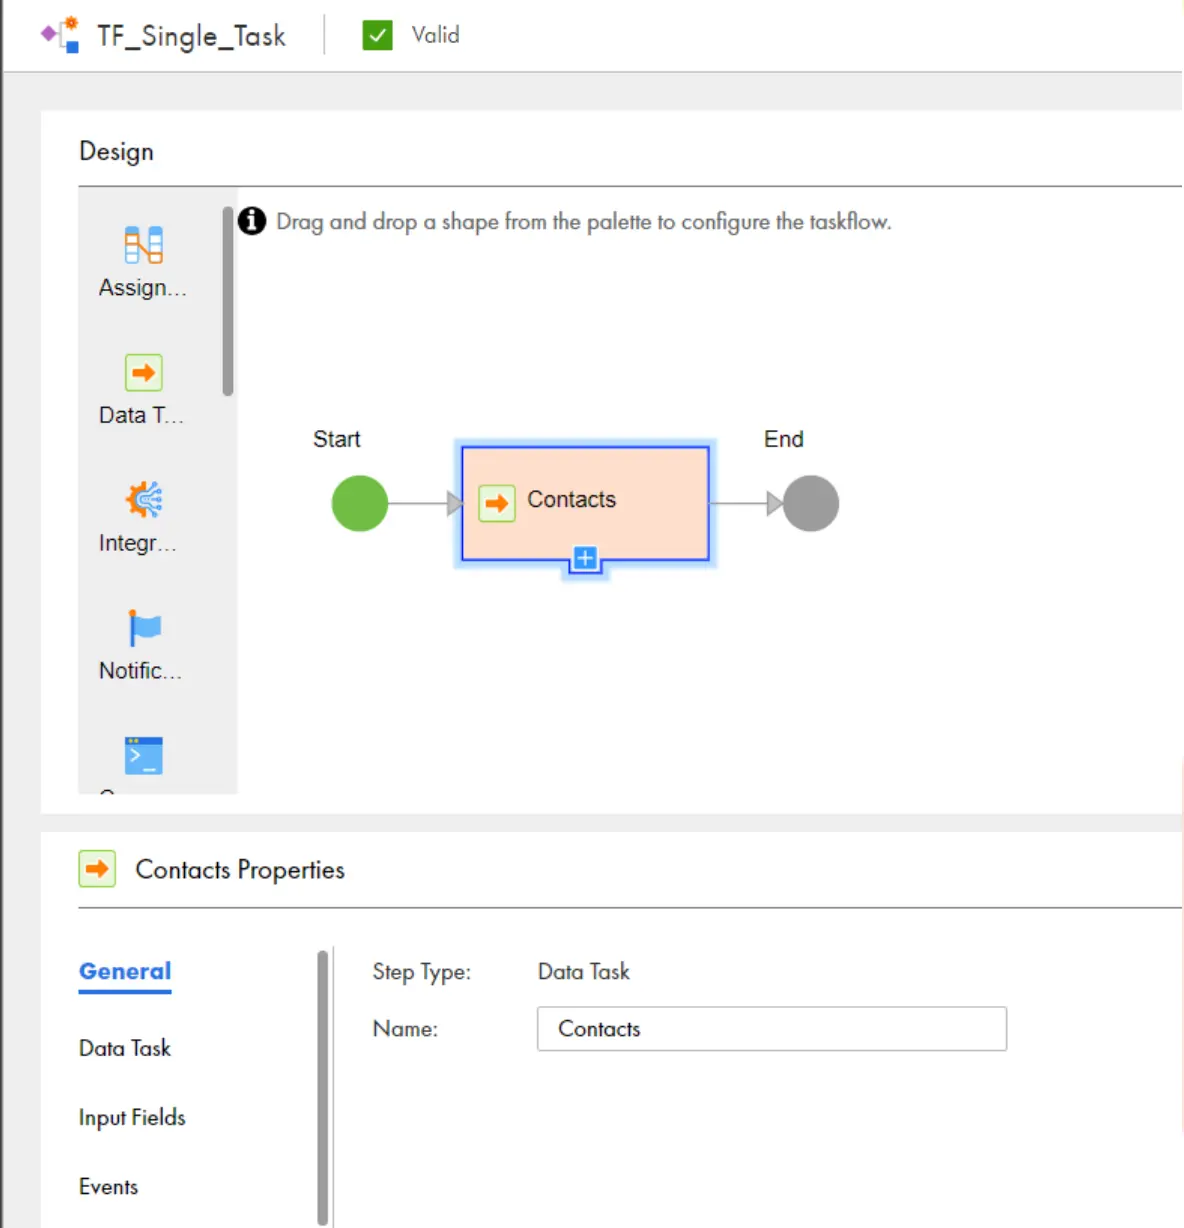
- We will use the Single Task template if our requirement is to run one data integration task on a daily or weekly schedule.
- We start with a Taskflow that contains a Start step, a Data Task step, and an End step as shown in the below:
- After successful run, Taskflow with single task will show in monitor below:

Different scenarios with Taskflows:
Scenario 1: Call in-out Parameter in Taskflow and Jump Step
Let’s Take a Scenario, we have a mapping variable $$Max_Salary in mapping. Our Taskflow should continuously keep triggering the mapping task until $$Max_Salary variable becomes 70000
This can be Achieved by using Decision with Jump Step as explained below.
- Create a Task flow and take a Data task and assign the mapping to the task. After the data task, Drag a Decision Step.
- Under decision Step properties, click on click to select filed -> select the mapping task ->InOut parameters – > Max_Salary as shown below:

- Under Path-1 select the condition greater than equal to 70000 and save.
- Take a jump step in the otherwise path in Decision Task and assign the jump step to Data task as shown in the below.
- In the above Example we have see how to call the in-out parameter from Taskflow and also, we have seen how to work with Jump-Step.

In the Above Example, When you run the task flow, Jump task will keep triggering the Data task until $$Max_Salary value becomes 70000.
Scenario 2: Decision Task with Notification Step.
- Let’s Take a Scenario, If the Data task failed, then need to send an email to team members. Create a Taskflow and take a data task and assign the MCT, then take Decision Step.
- Click on the Decision and give Path 1 equals 1 as shown in below:

- Add a Notification Step in otherwise path as shown in below:
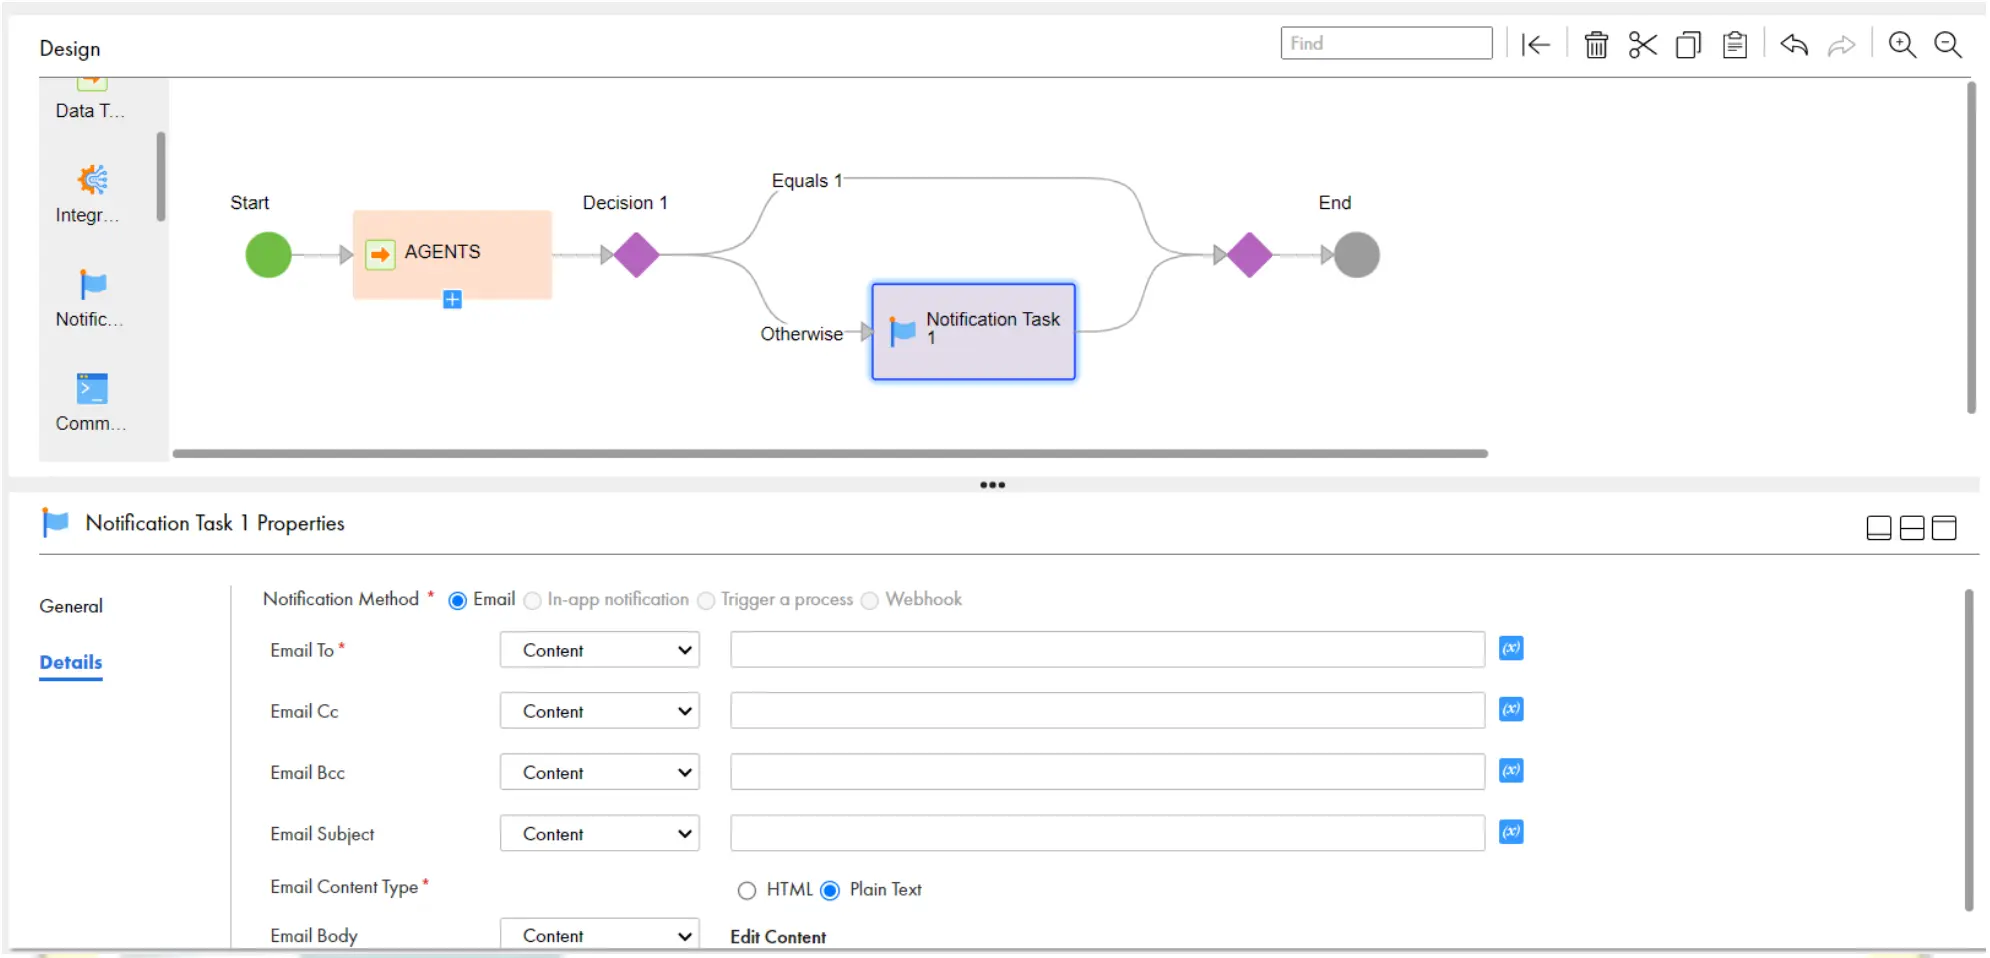
- Rename the notification task, and give the values of the below properties as below.
Email to: raj.informatica1@gmail.com
Email Subject: ‘Job Failed: ‘ || $temp.AGENTS[1]/fault[1]/detail[1]/errOutputDetail[1]/Object_Name
Email Body:
Hi Team,
The Job is failed with the reason mentioned below.
Job Name: {$temp. AGENTS[1]/fault[1]/detail[1]/errOutputDetail[1]/Object_Name}
Reason for Failure: {$temp.AGENTS[1]/fault[1]/detail[1]/errOutputDetail[1]/Error_Message}
Regards,
Raj
- The Screenshot shown in below:

Scenario 3: When we have two sequential Data jobs, based on the outcome of the result of both the jobs, take a decision and send an email
Method 1: With Decision Step
- Take Two decision tasks, Give the status as 1 for each decision as shown below.
Customers.task_Status=1
Agents.task_status=1
- But the Disadvantage of the above approach is, if we have 5 sequential Data tasks, we need to take 4 Decision steps, which leads the Taskflow to complex.
- To overcome this, we can use temp variables concept of Taskflow
Method 2: With Temp Variable and Assignment Step
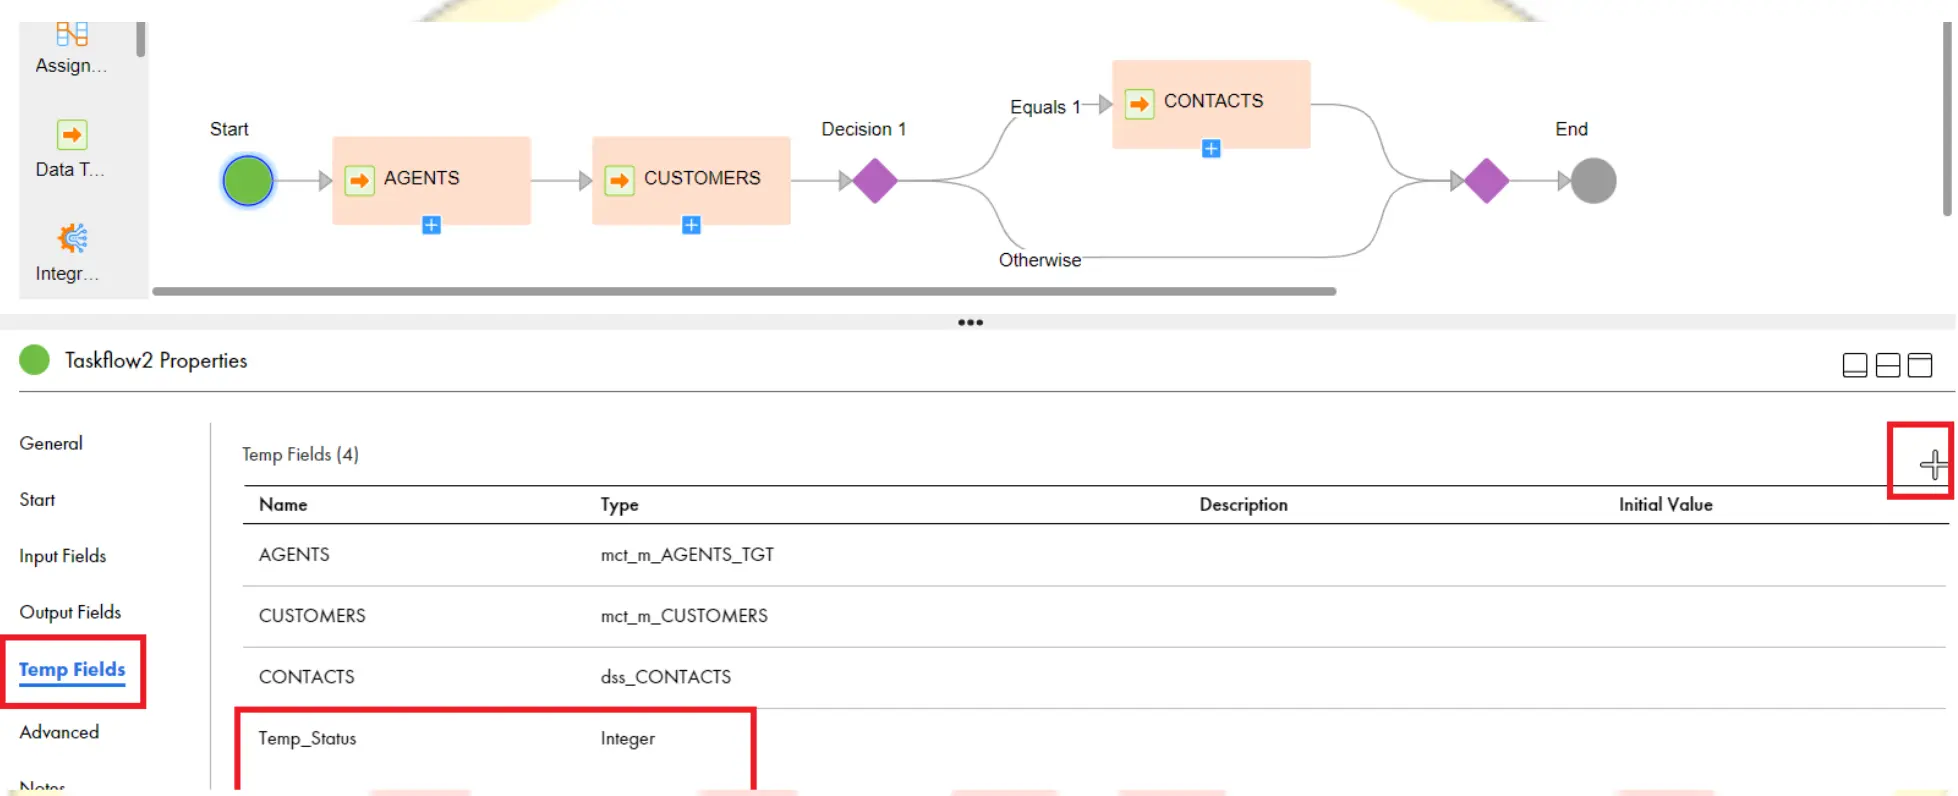
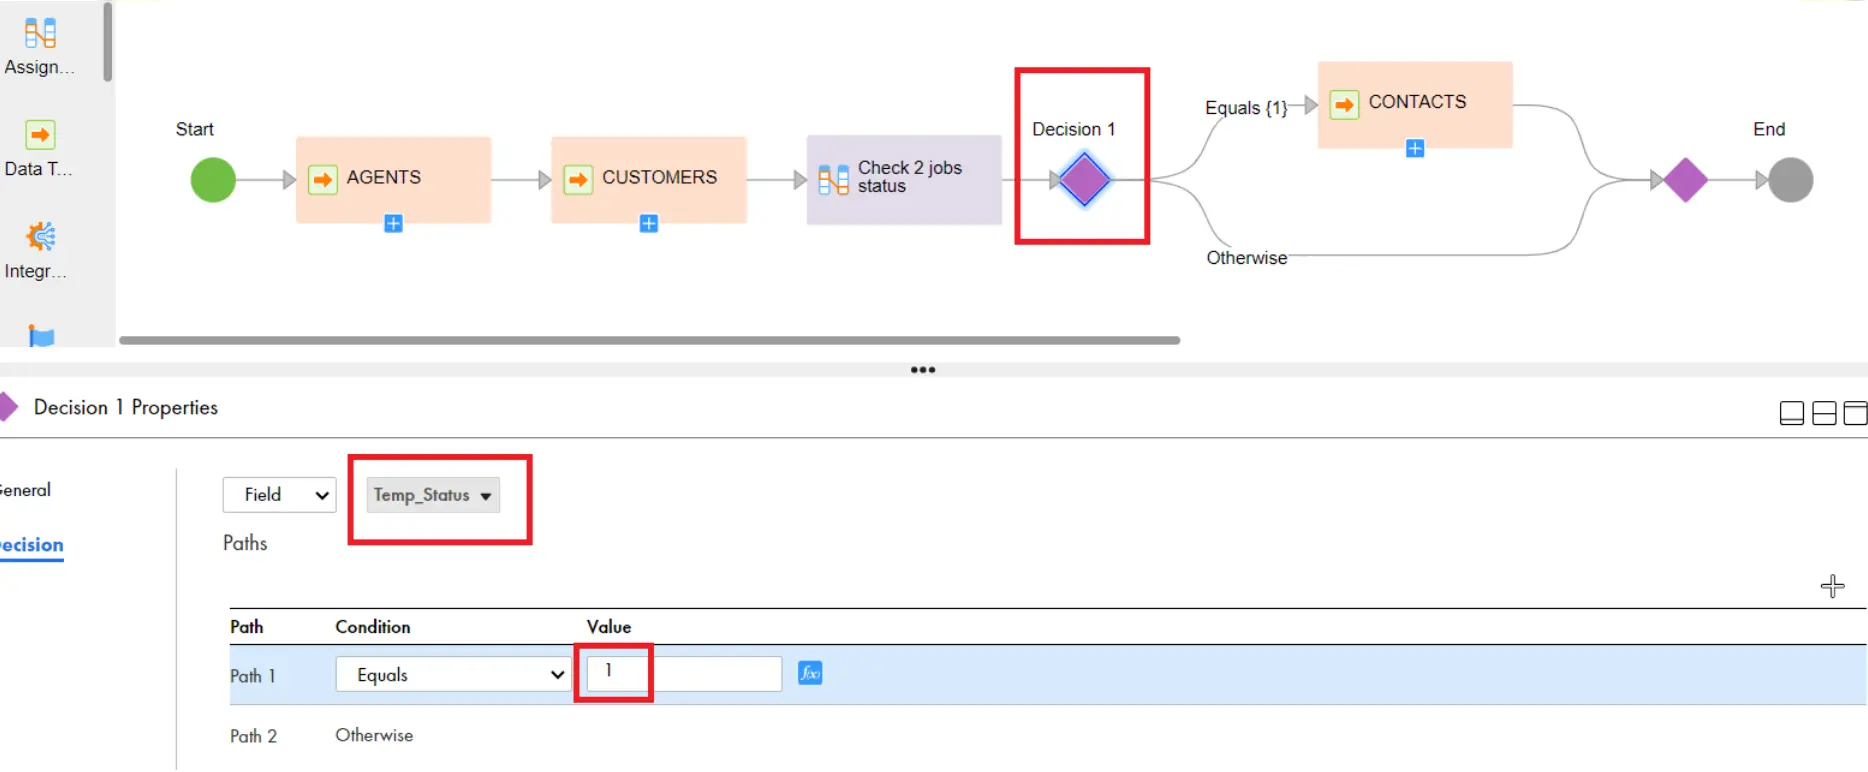
- Click on the Start Step, go to Temp fields and create a new Temp field called Temp_Status with integer type.
- Take An Assignment Step before the Decision step, rename it and create a filed as shown below:
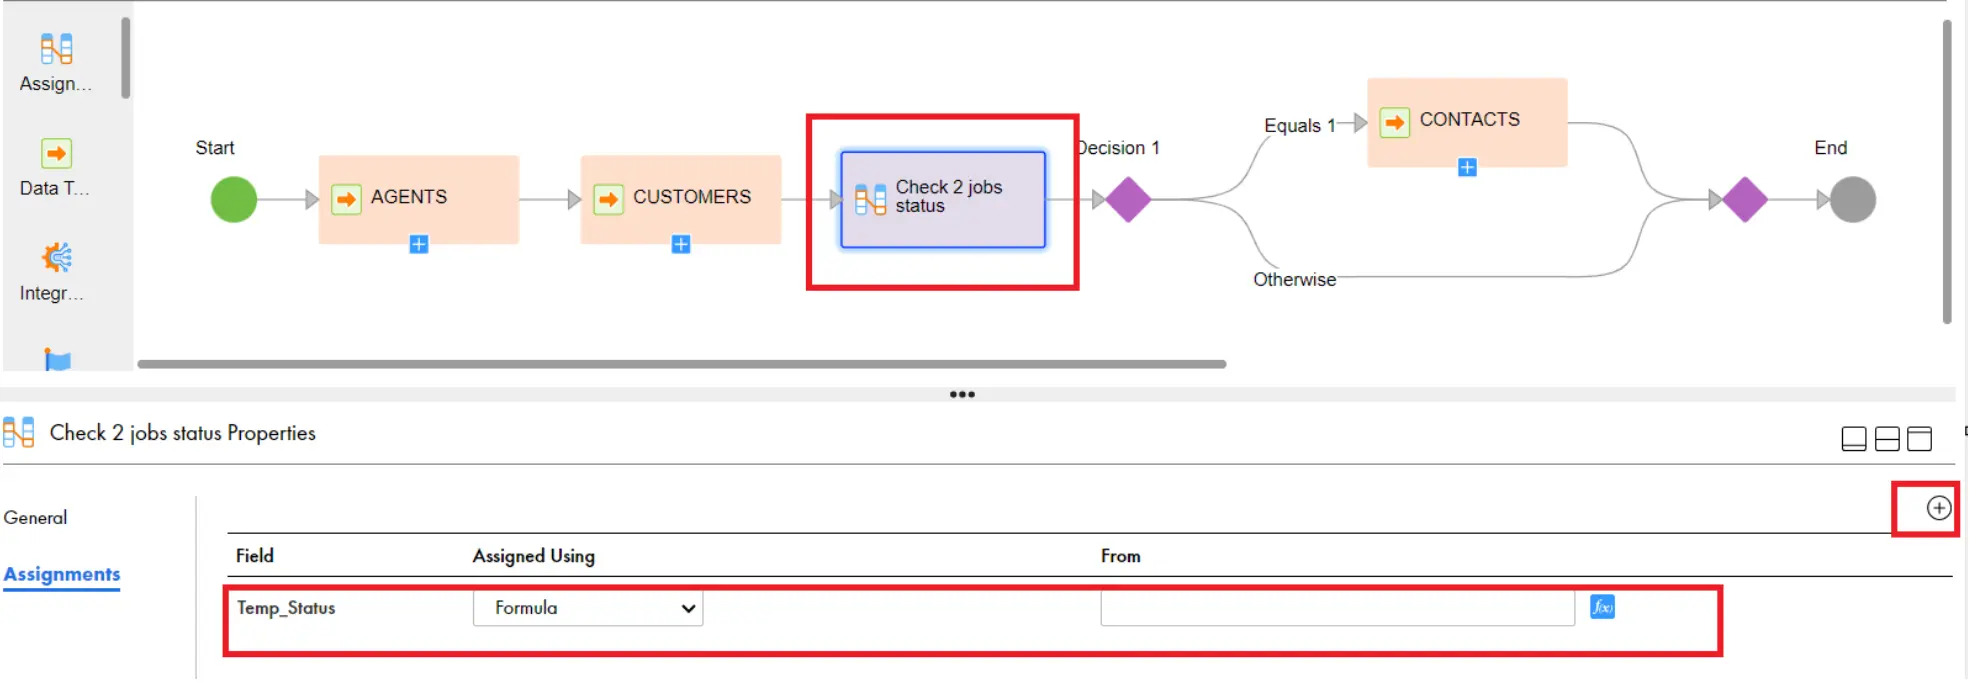
- And give the formula in the assignment task as below:

- The meaning of the above formula is, if both statuses are succeeded (1), then Return 1, otherwise Return 0.
- Then click on Decision, Select Temp Status and Give Path1 Equals 1.
Scenario 4: Whenever a Source file called Orders.csv arrived in my source location, My Taskflow should execute and the mapping should pick this source file and load to target, then move this file to backup file directory
- This can be achieved by File Listener and & Command Task Steps.
- Go to New -> Components and select File Listener and Create
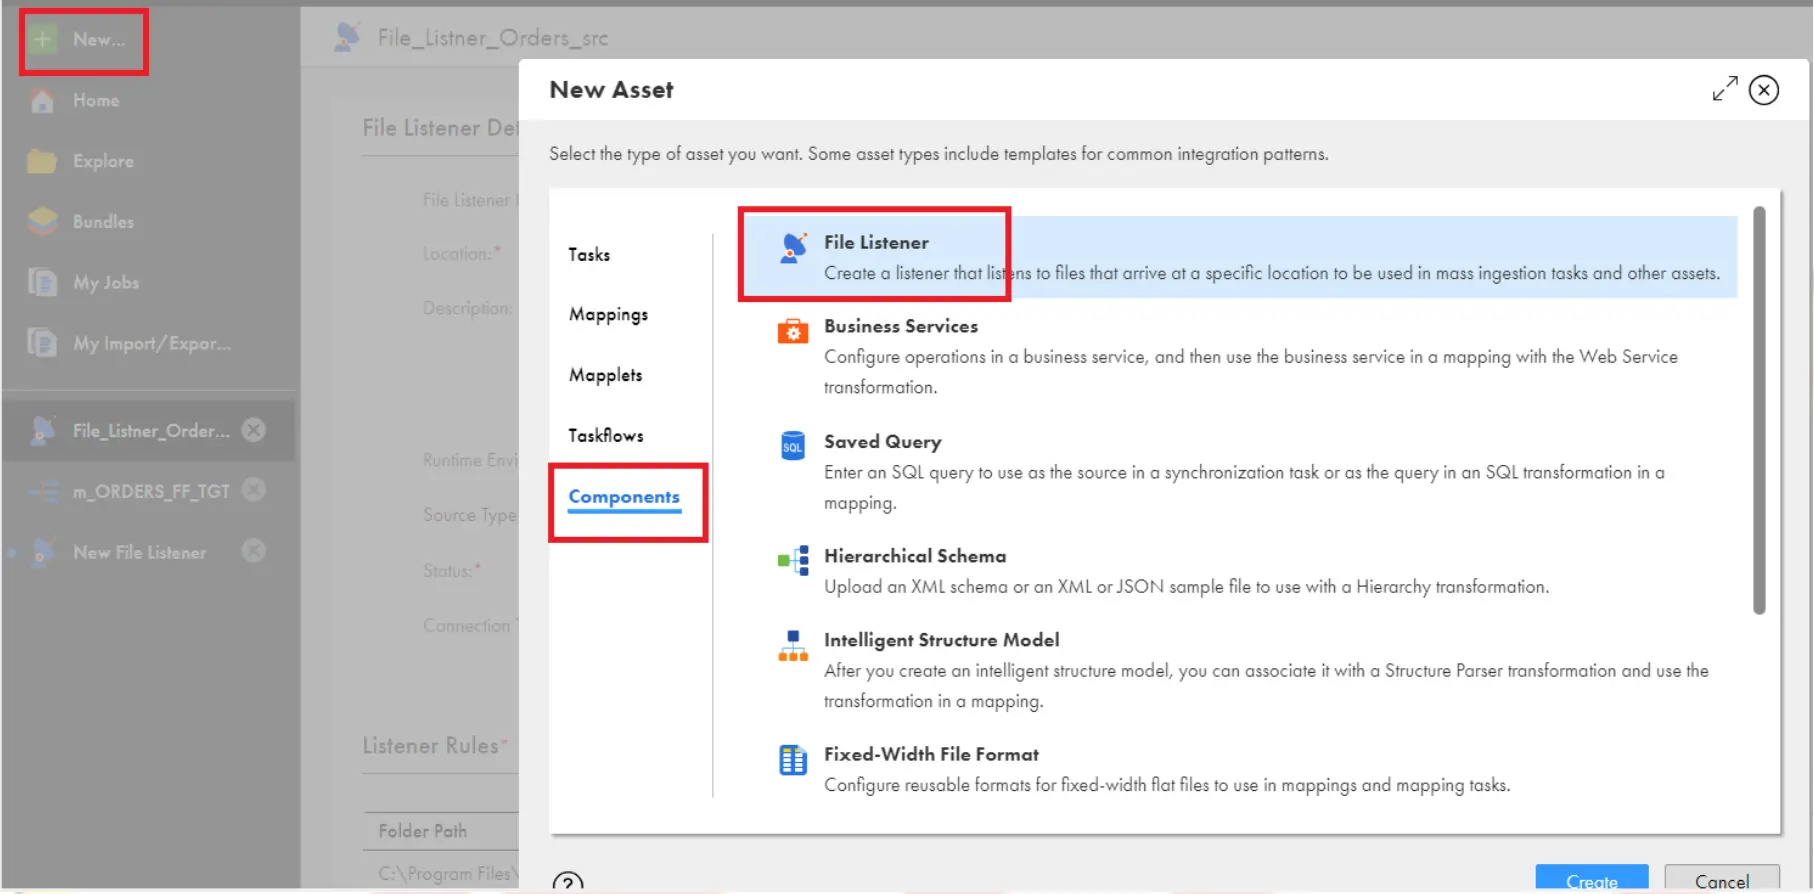
- Choose the below properties which are highlighted in the below image. Give the Folder path as Source file relative path (C:\Program Files\Informatica Cloud Secure Agent\apps\Data_Integration_Server\data\SrcFiles)


- Then Click on Save and Save the file Listener.
- Create a Taskflow and select Start Step and give the properties as below:

- Then assign the MCT which is loading the data from Orders_Src.csv file to target to the data task and then Save and Publish the Taskflow.
- Open the File listener and start the file listener.
- Now file Listener will be indefinitely checking for the file Orders_Src.csv under the source location which mentioned in it.
- You can check the running status under File Transfer Logs in Monitor as shown below:
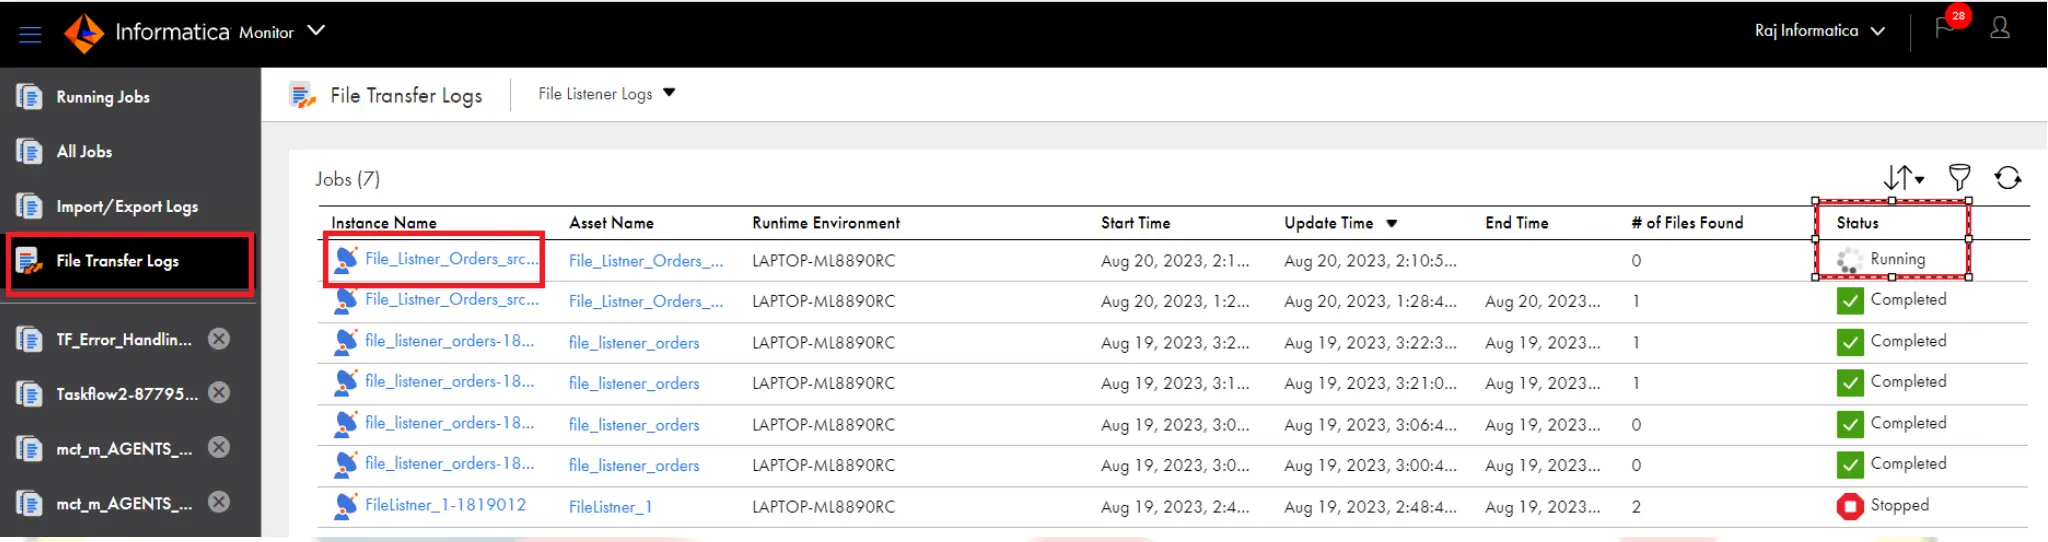
- Now Place the File Orders_Src.csv in source file path and observe the monitor. As soon as File listener find this file under source file location , Taskflow will automatically trigger and run the MCT.
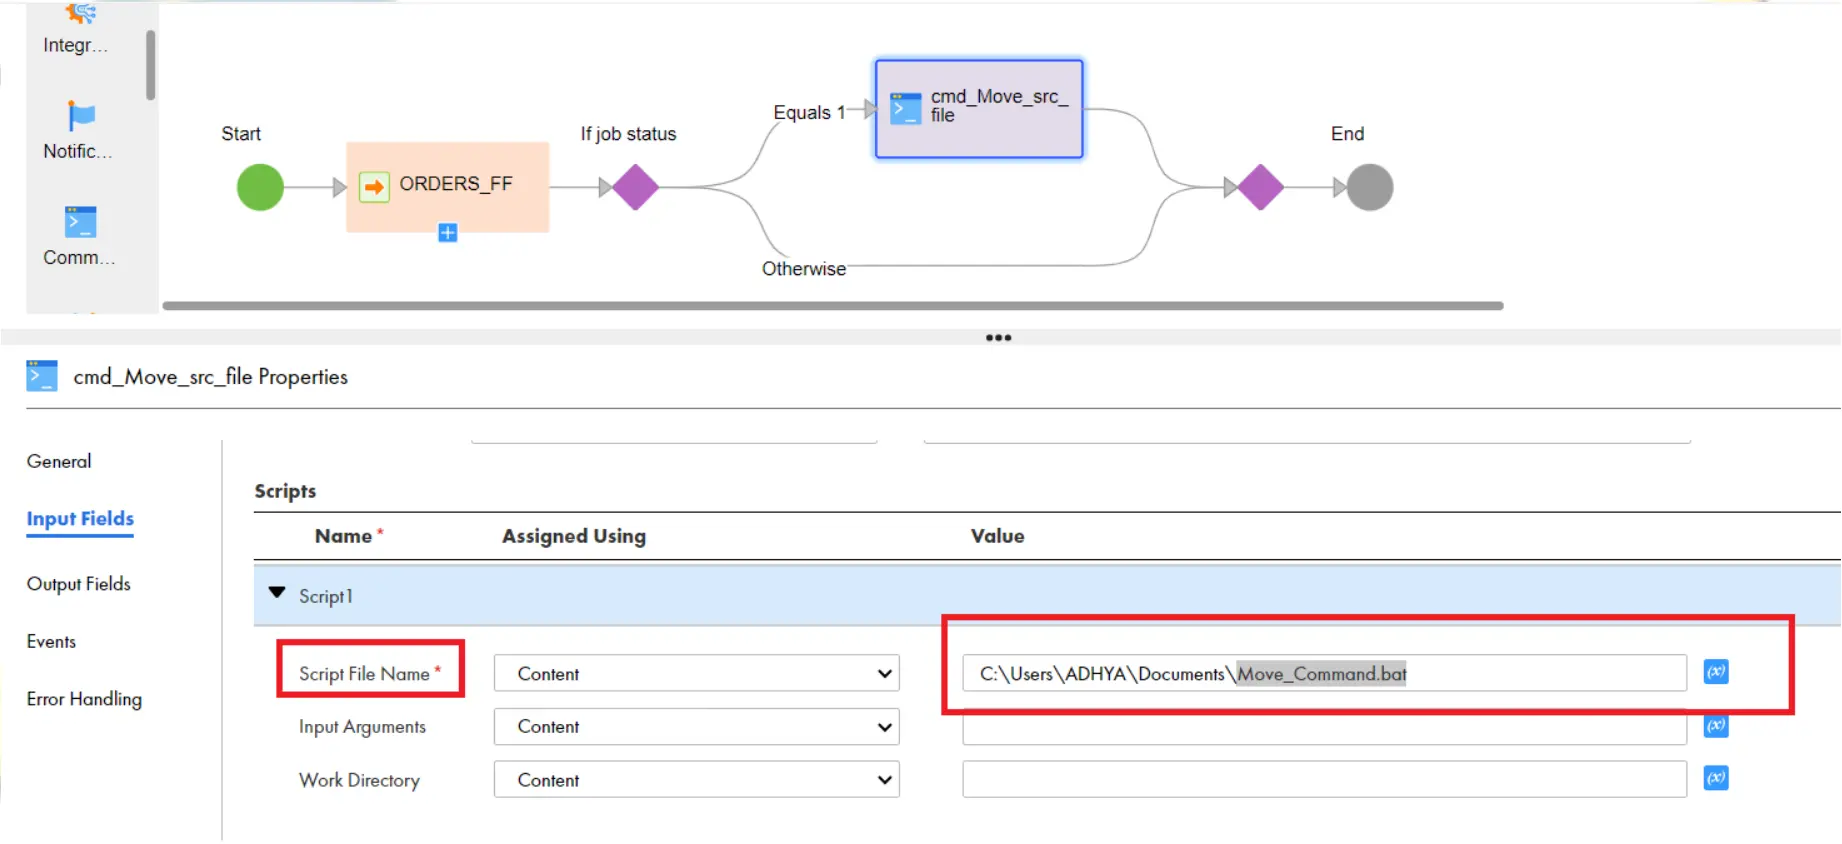
- Create a decision Step and Drag the Command task to Decision step and select the below properties under command task.

- Create a batch file with name Move_Command.bat and save under My documents. Write a windows command to move the orders_src.csv file from source file directory to backup file directory as below:
move C:\”Program Files”\”Informatica Cloud Secure
Agent”\apps\Data_Integration_Server\data\SrcFiles\orders_src.csv C:\”Program
Files”\”Informatica Cloud Secure
Agent”\apps\Data_Integration_Server\data\Backup
- Select Command task, and under script1 property give your batch command and give the script file name.
Scenario 5: My Workflow will be waiting for a file called Orders_src.csv Once my workflow finds the file orders_src.csv in the source file location, immediately run the workflow and process the records.
- This can be achieved by File Listener Task Steps. (Another way using file listener).
- Create a Taskflow, and drag File listener and Data task to the Taskflow. In this case, file listener will be waiting for the file only for 5 mins, you can increase this time by setting a property called Timeout under file listener. we can set maximum time to this property.

Scenario 6: Exception Handling in IICS (Failure or Success email based on the task status)
- We can do the custom error handling by selecting the Error handling property ->Custom error Handling, then task flow looks like below:

- We can add Success email and Failure email tasks in this Taskflow looks like below:


Leave a comment