Parameterization in IICS
Types of Parameters in IICS: There are two types of Parameters in Informatica IICS:
▶ In-Out Parameters
▶ Input Parameters
In-Out Parameters:
- This is equivalent to Mapping parameters/Variables in informatica PowerCenter.
- When you want to change a field value multiple times in a mapping, instead of hard-coding the field value in the mapping, we will define the In-Out Parameters in the mapping, and give the value of the filed in the parameter File.
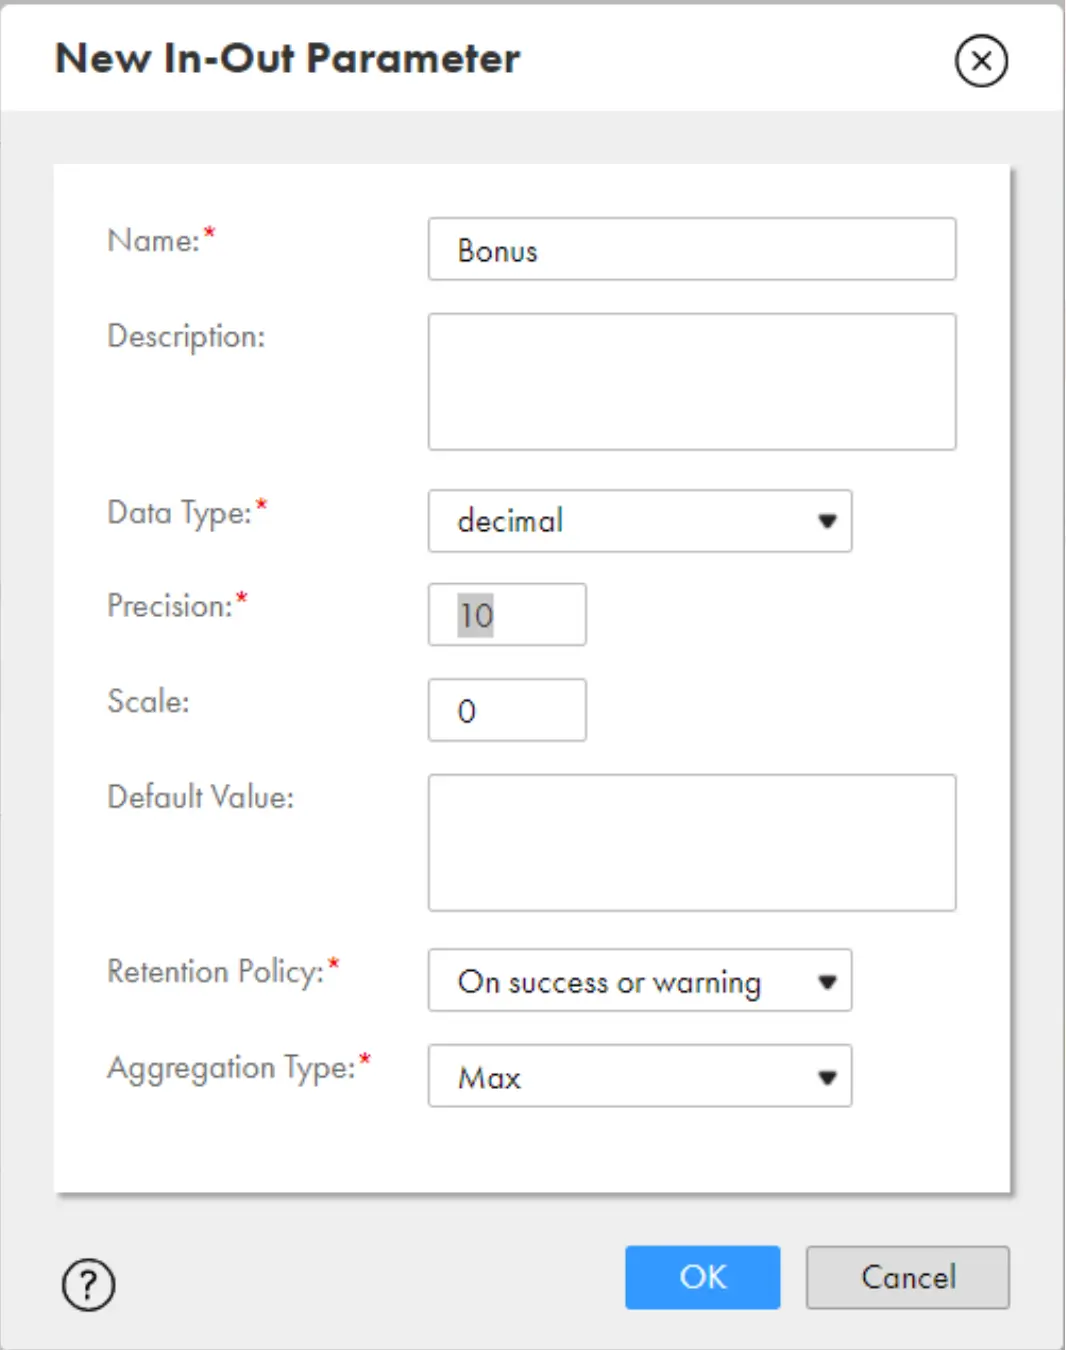
- For Example, Employee bonus Will change every year. Instead of hardcoding and changing the value in a mapping which is running in production every time, create a In-Out Parameter in the IICS Mapping and Define the value in Parameter file.
- Whenever you want to change the Value of Bonus, Just Change the value in Parameter File instead of changing in the mapping level.
Below Screenshot of creating the In-Out Parameter in mapping:
Use $$Bonus parameter in any transformation in the mapping like below:
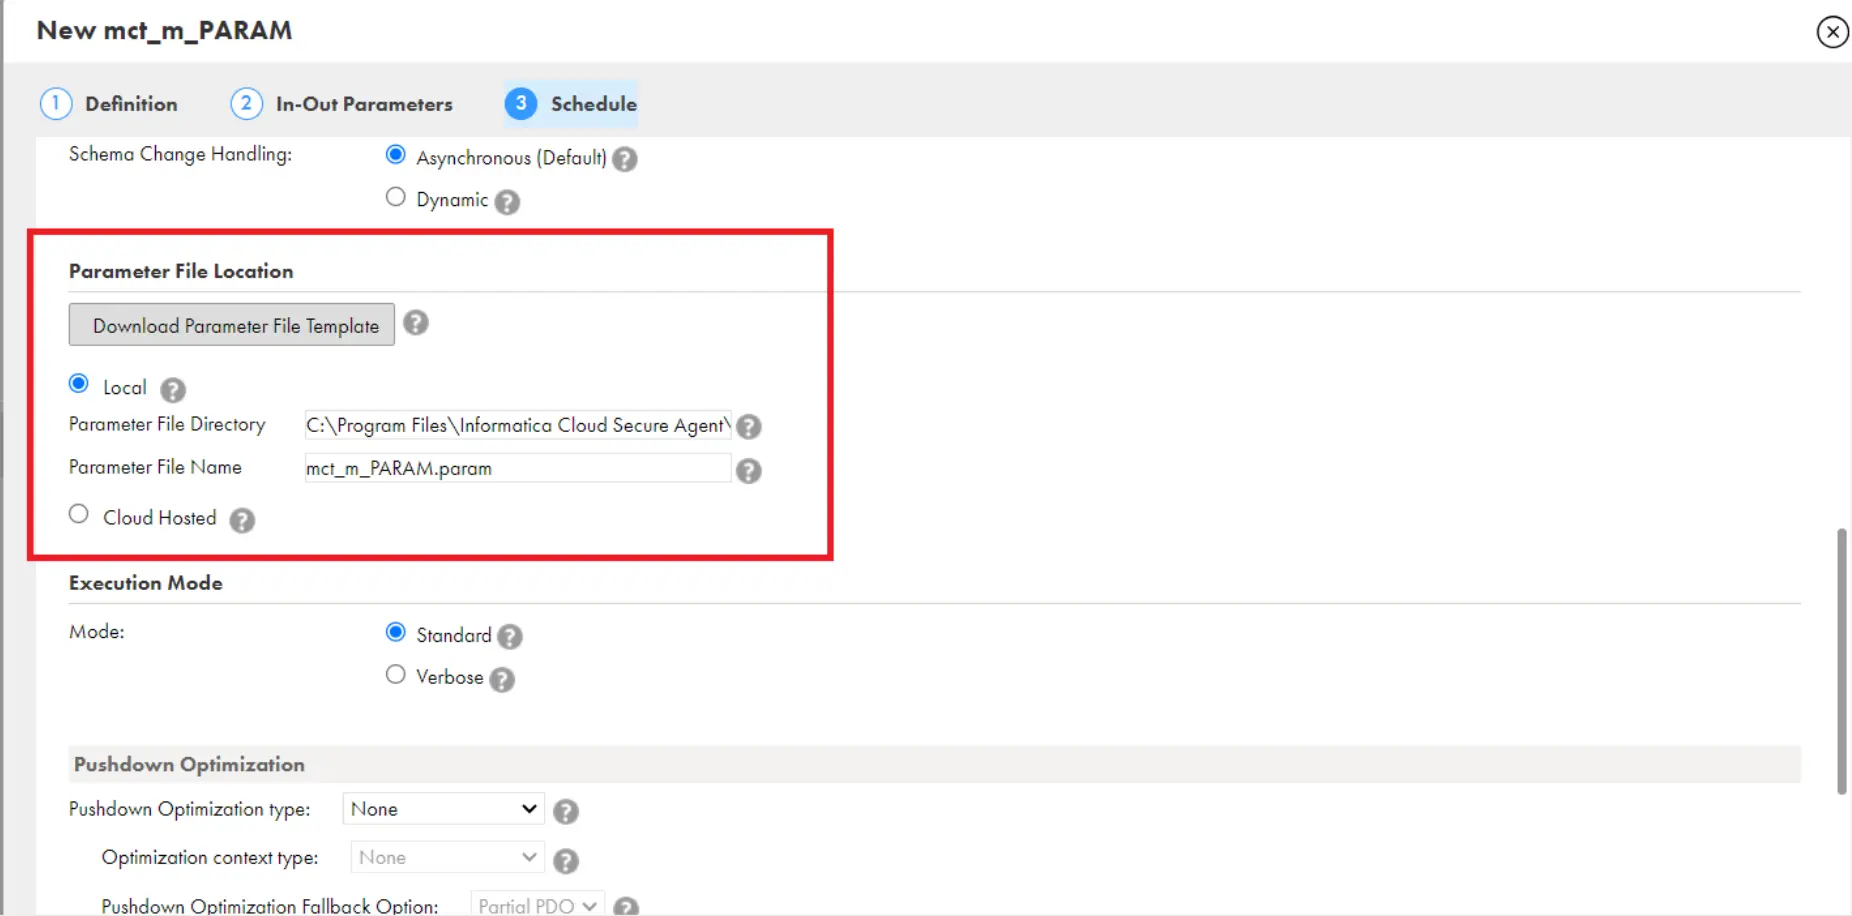
5. Give the Parameter file Path and Name in Mapping Configuration Task (MCT) as below. By Default, Parameter File path will take as below directory.
C:\Program Files\Informatica Cloud Secure Agent\apps\Data_Integration_Server\data\ userparameters
6. You Can download the Parameter File for you MCT by clicking on Download Parameter file Template in MCT like below:
7. Once you Download the Parameter file, you have to place the parameter file under secure agent installed directory, also give the Parameter File directory and Parameter file name in MCT.
C:\Program Files\Informatica Cloud Secure Agent\apps\Data_Integration_Server\data\ userparameters directory
8. Mention the $$Bonus Value in Parameter File as below:
9. You can Create any number Parameters with Standard datatypes under In-out Parameter Section.
10.Example of most used Parameters in real time are Bonus, discount ,Tax , GST etc.
Usage of Mapping variable Concept ($$incremental_TS) as In-out Parameter in IICS :
Or
Incremental Loading in IICS:
- Also, we can use In-out Parameter in IICS same like a Mapping variable Concept in Informatica PowerCenter.
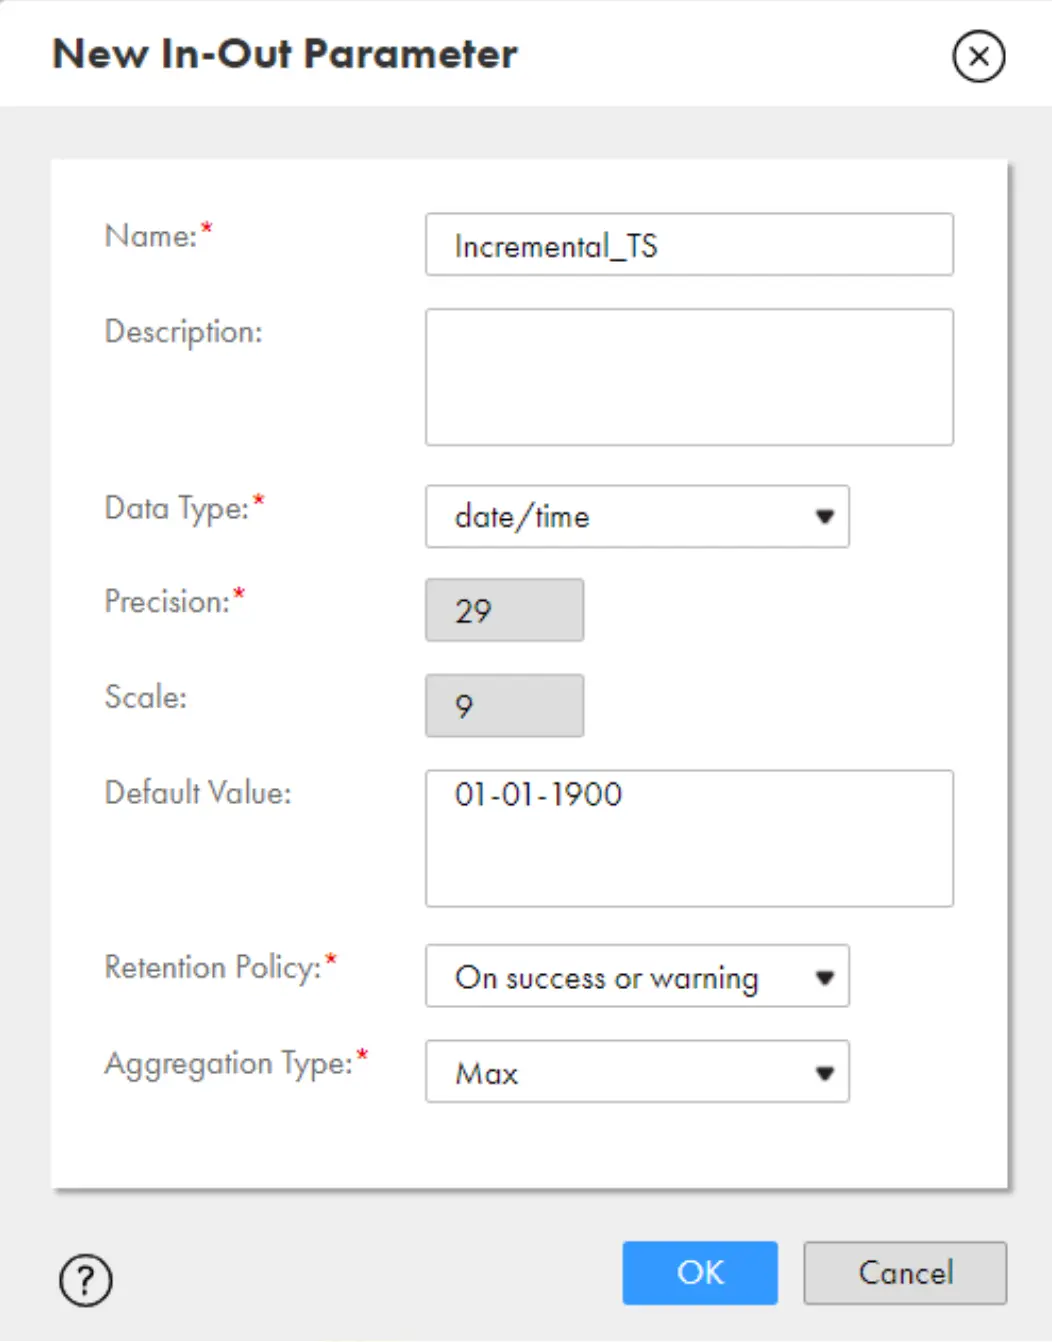
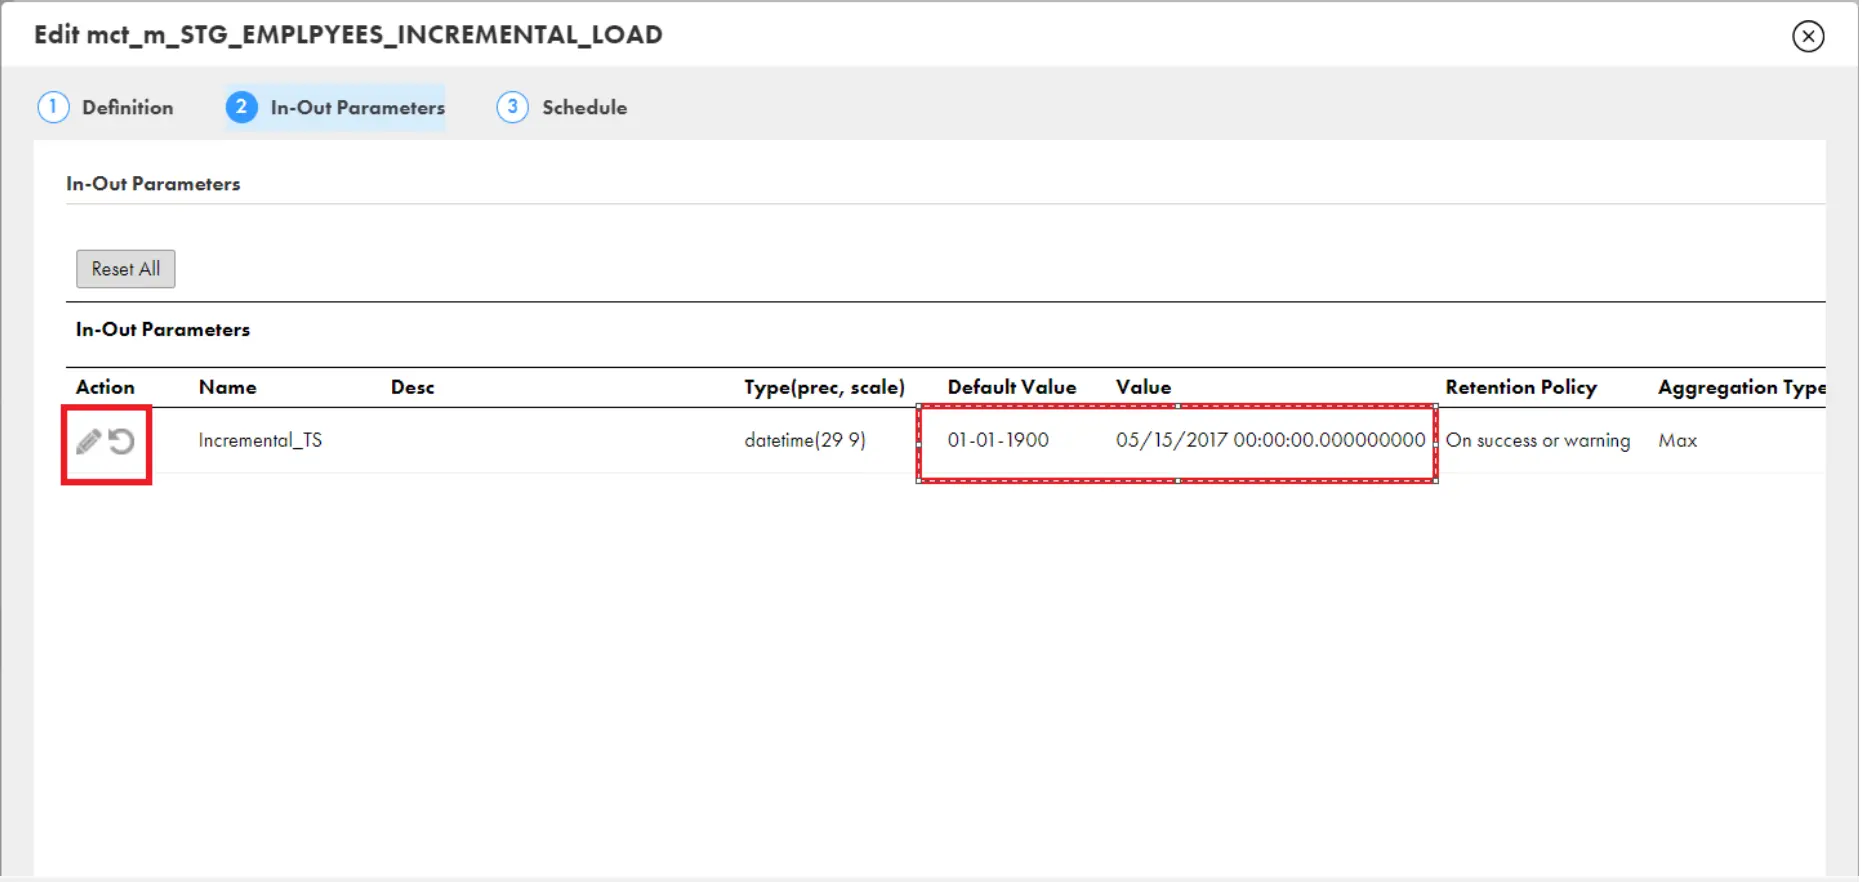
- Create an In-out Parameter Incremental_TS and Give the default values as 01-01-1900
3. Use $$Incremental_TS in Filter Condition or Override query in Source Transformation.
4. Use $$Incremental_TS in setmaxvariable() in Expression Transformation.
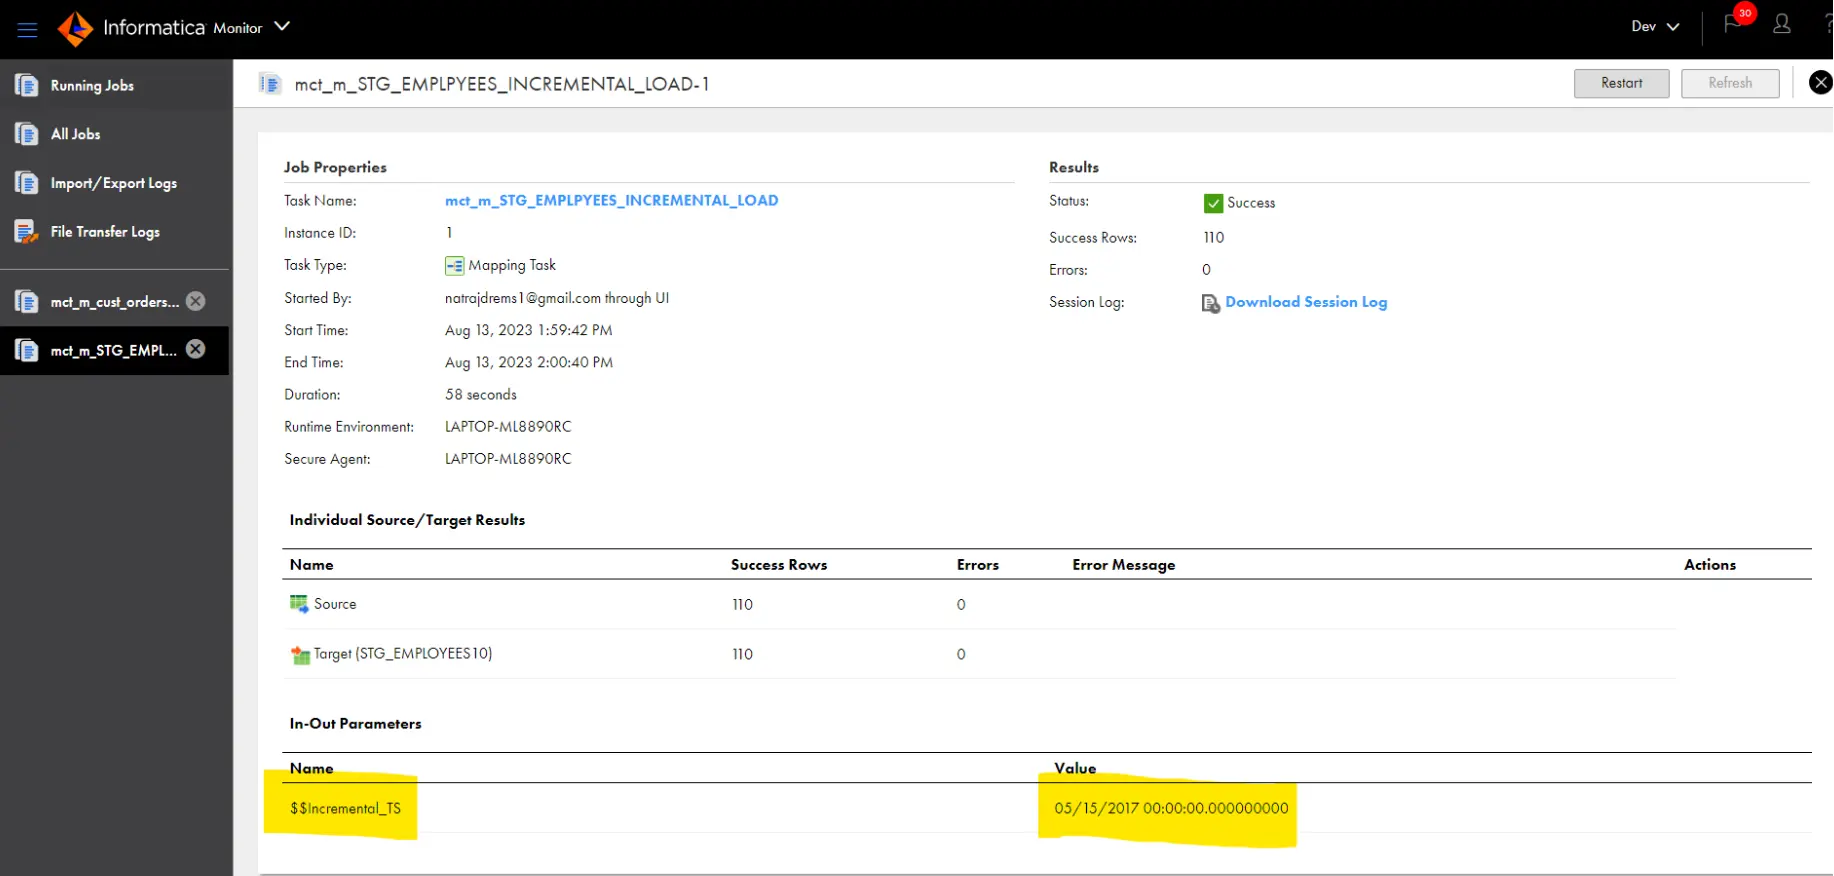
5. The value of the $$Incremental_TS value will be saved under IICS cloud at the end of each successful session run and uses that value the next time when you run the session.
6. You can check the latest value of $$Incremental_TS when you click on MCT in Monitor.
7. Alternatively, you can check in the MCT by click on Edit MCT under data Integration. Also you can Reset to initial value under MCT.
Input Parameters:
- Input parameters are mainly used if you want to parameterize Source, Stage or Target connections or to parameterize Source, Stage or Target Objects.
- Always Remember that, first finish all your mapping development and then create and configure the input parameters. otherwise, mapping will become invalid.
- Create the source and Target connection parameters in the mapping like below.
4. If you check “Allow Parameter to be overridden at run time”, Informatica will take always the value defined in the Parameter file . Value given in the MCT will ignore.
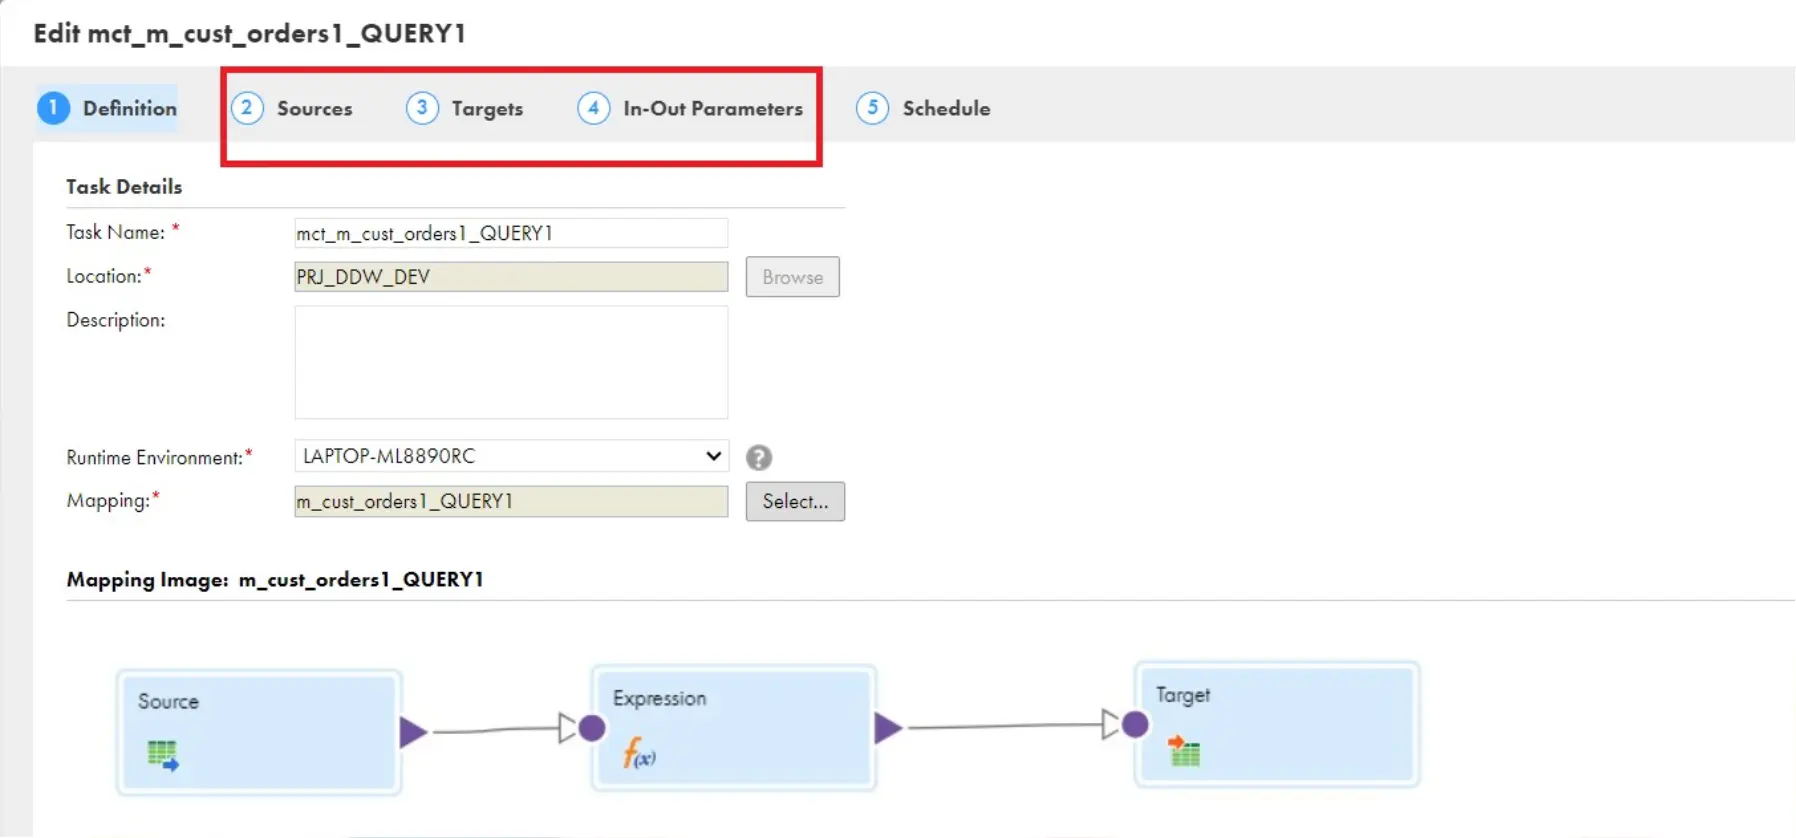
5. When you create and use input parameters in the mapping , you have give the values of the input parameters in MCT as like below.
6. You must give the source and Target Connection (input parameters) values of in MCT as like below.
7. But, If you check “Allow Parameter to be overridden at run time” in mapping level, Informatica will take always the value defined in the Parameter file. Value given in the MCT will ignore.
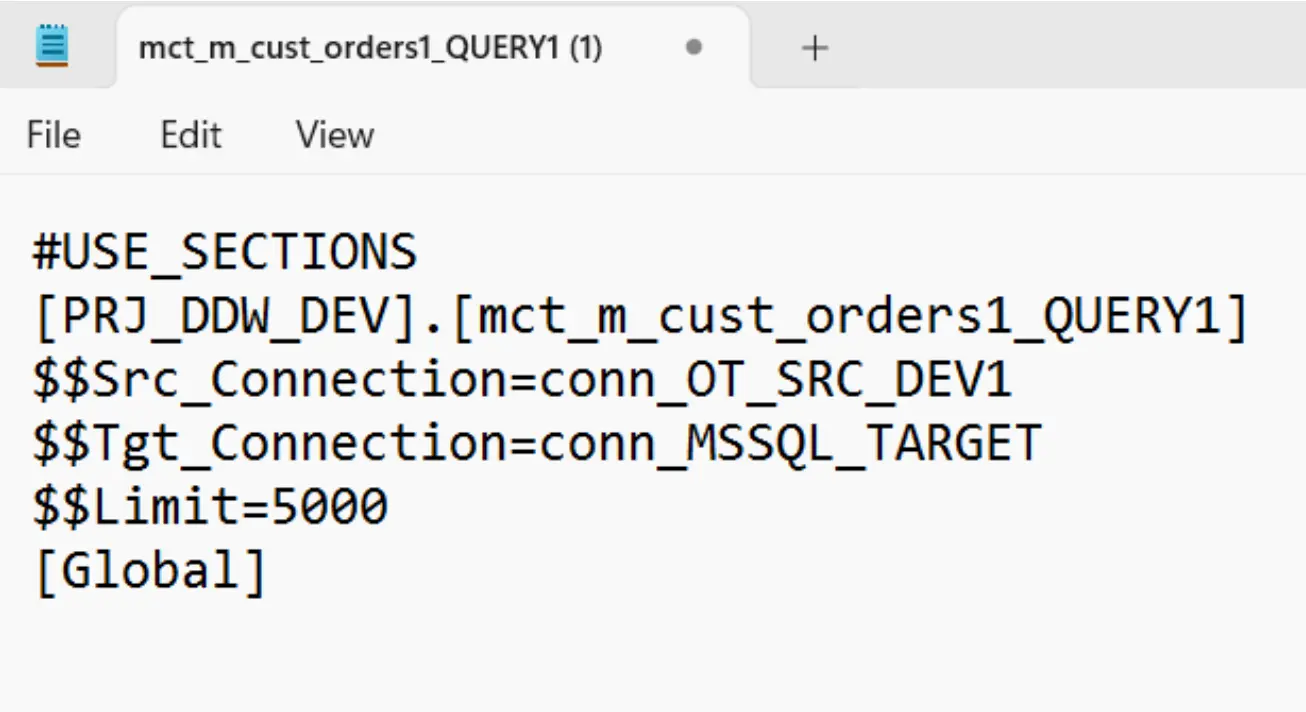
8. We should give the Source, Target Connection parameter values in param file if you check the above property as shown in the below screenshot.
9. You can use the single parameter file for all the tasks. you can use the Global section, in which you can use the parameters in all the tasks.
Deploy the Code from DEV to Test (How to handle the Source and Target connections during the migration?)
- When we migrate the code from one environment to other, by default the connection details also gets migrated. For example, if you are migrating the code from DEV to QA, the connection associated to those mappings gets created in QA if it is not existing already.
- However, the password details are not migrated and needs to be entered manually in QA (You can change the other connection details like Host Name etc., according to QA environment).
- If you are using different connection names across environments like OT_SRC_DEV in DEV and OT_SRC_TEST in QA environments etc.,
Then Do it as below:
a) While migrating the code into QA, change the connection name.
b) The connection OT_SRC_TEST should already be created in QA environment.
c) In the Import wizard, you can change the connection from like OT_SRC_DEV to OT_SRC_TEST under Review Connections tab while migrating.
d) This will be reflected in all the mappings which are using Oracle_DEV connection and the connection name is modified to OT_SRC_TEST once code is imported.
Parametrize the Custom Query:
- You can also use a parameter under Custom Query as below.
SELECT A.CUSTOMER_ID,A.NAME,A.ADDRESS,A.CREDIT_LIMIT,
B.ORDER_ID,B.CUSTOMER_ID,B.STATUS,B.SALESMAN_ID,B.ORDER_DATE FROM ot_src_dev1.CUSTOMERS A,
ot_src_dev1.ORDERS B
WHERE A.CUSTOMER_ID=$$Cust_id
Note: When you use query option, you should change the datatypes of the filed in source transformation.
- Create in-out parameter cust_id and give any default value (Eg.10) to validate the query. otherwise, query will be invalid. Later you can give user-defined values in parameter file.
- You can also Parametrize the entire query in parameter file. Simply Create an In-out Parameter as Query, and use that in SQL Override. But you must use a Sample query under Query Options with the same filed as like below. Otherwise, Mapping will become Invalid.
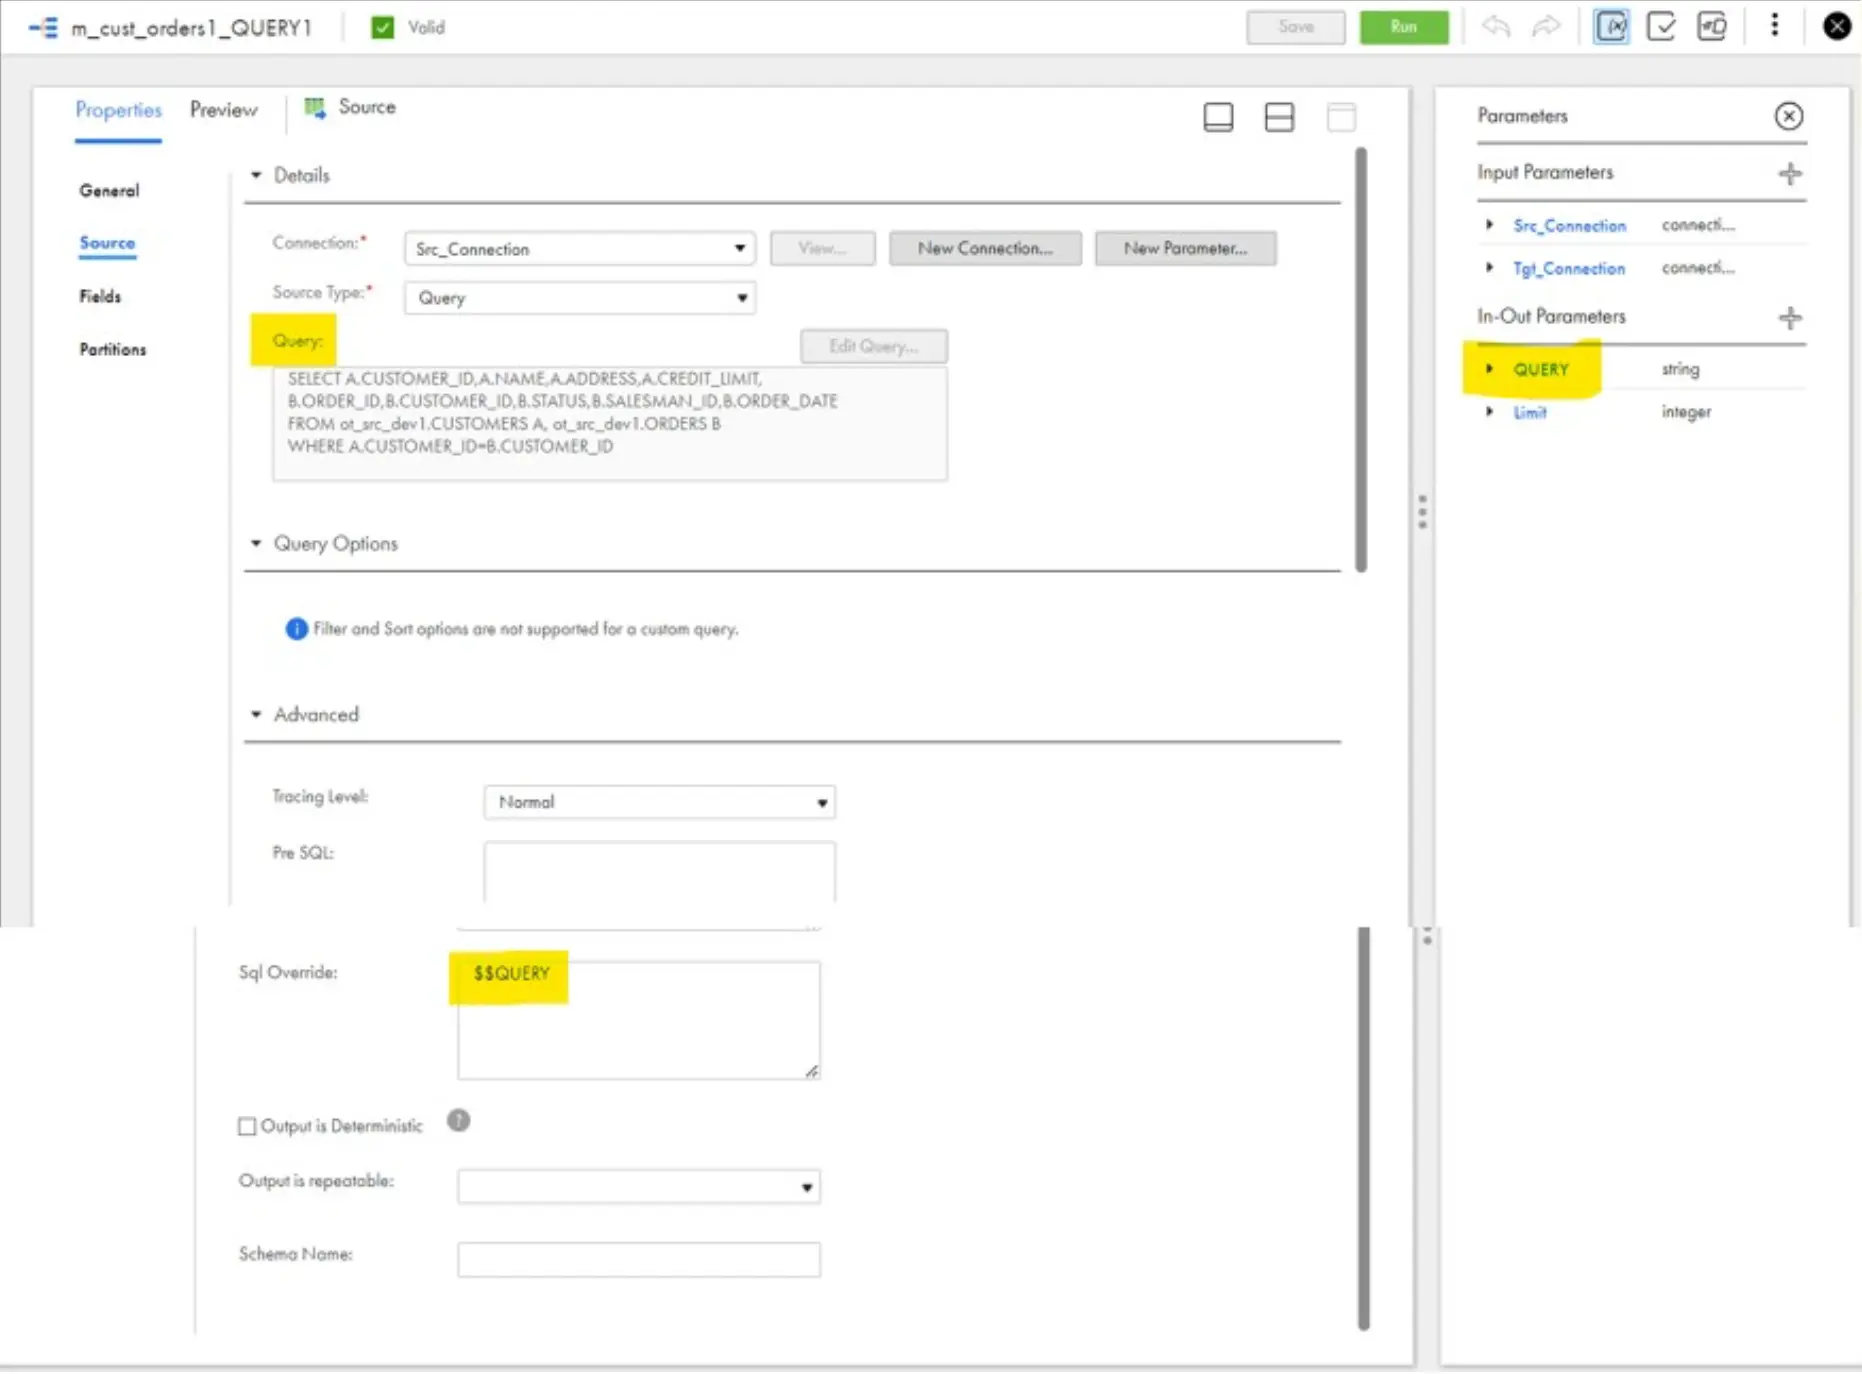 4. You must Write the entire Query in the single line when you define the value of the Query in Parameter file as shown in below.










Leave a comment