Task 1:
Run Taskflow as an API: To Run Taskflow as an API, follow the below steps.
- Create a Taskflow with MCT.
- Select Start Step, under Allowed users, Give the IICS usernames, only these users can run this Taskflow as an API.
- Save and publish as shown in the below screenshot.
What is Publish in IICS?
Before you run a taskflow as an API or schedule a taskflow, you must first publish the taskflow as a service. When you publish a taskflow, Data Integration generates the service (REST) URL and the SOAP service URL. You can use these endpoint URLs to run the taskflow as an API.
When you run a taskflow from the taskflow designer, Data Integration automatically publishes the taskflow, and generates the service (REST) URL and SOAP service URL.

4. Click on the three dots and Select Property detail and Copy the URL as shown in below.
 5. The URL looks like below.
https://apse1.dm-ap.informaticacloud.com/active-bpel/rt/Taskflow2-1
6. When you execute this URL in any Browser, Taskflow will automatically run and you can check under the monitor and it will generate Taskflow Run id.
 Task 2:
Pass the parameters to the URL: Send an Email:
- Create a Taskflow with MCT.
- Select Start Step, under Allowed users, Give the IICS usernames, only these users can run this Taskflow as an API.
- Go to Start Step, Select Input fields and Create Input field as email.

- Drag the Notification Step after MCT, Select Notification Step, Select Details, Then for Email field , Select Email as shown in the below. Give the Emai subject as Test Email.

- Save and publish.
- Now take the URL and Pass the Email as parameter in the url as shown in the below.
https://apse1.dm-ap.informaticacloud.com/active-bpel/rt/Taskflow2-1?Email=raj.informatica4@gmail.com - Execute the above URL in any browser and check your inbox, automatically taskflow will trigger and you might get an email as shown in the below.

- You can Give n number input fields under start step, and you can use these fields as the parameters in the URL
What is Process in CAI? The Design of API is called a Process.
Services for CAI: To work on CAI, we need the below Services.
- Application Integration: To create and design the process
- Application Integration Console: All the processes will monitor
- Api Manager and API Portal: it is used to Manage the API
Task 3: Create our own API & and Expose the API.
Take an input from user like user_id , and message back the user hello user <username>
- Go to Application Integration, and Create a Process as shown in the below.

- Give any name like PROC_User.
- Go to Start Step , Allow anonymous access , This means Anyone in the internet can use this process. Also Select Run on “Cloud Server” as shown in the below.

- I wanted to take userid as input from the user who are executing. you can do the below. Go to Input fields, create a new input field, Give the name as UserID and select Required filed

- Output should come as hello user <username> . To achieve this, do the below. Go to output fields, create a new output filed as User_Message as shown in the below.

- Assign these input and output fields by using the assignment step.
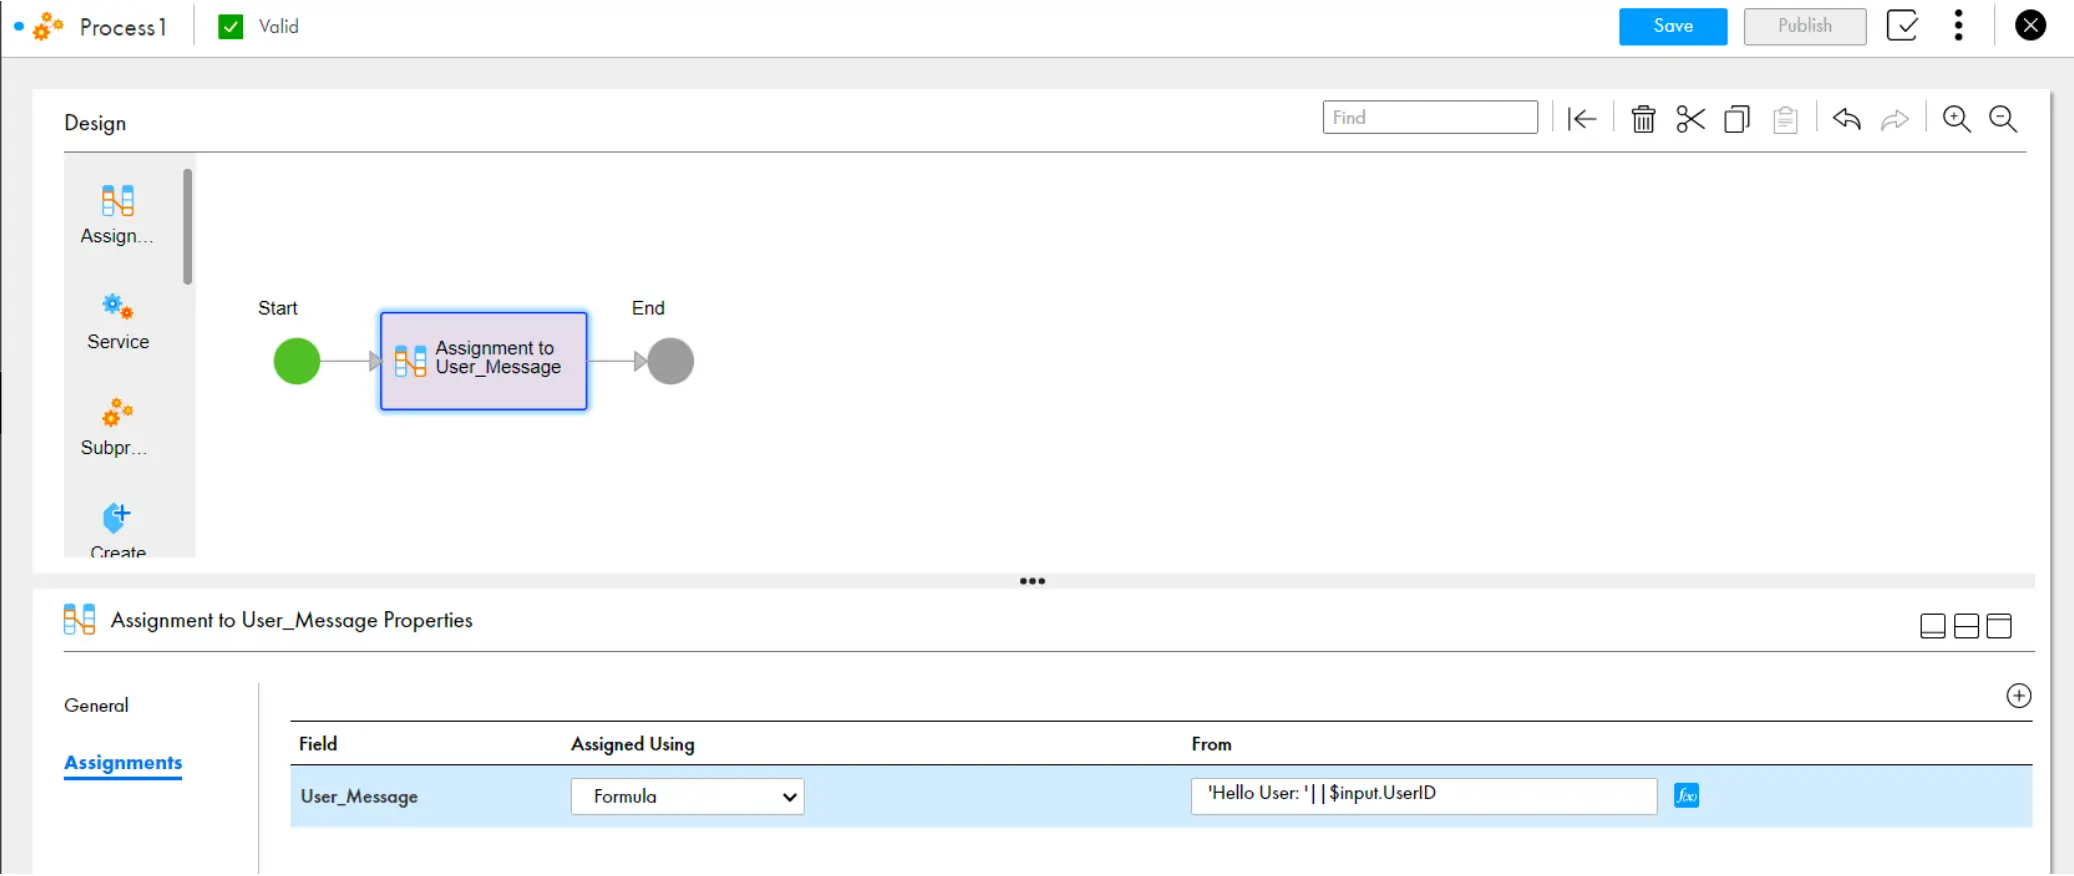
Drag the Assignment step, go to Assignments, create a new by clicking + , Select User_message and give the value as shown in the below.
‘Hello User: ‘||$input.UserID
- Save and publish the process.
- Get the URL from proper detail and copy the service (REST) URL

- Copy the url as below and pass the input as username. Anyone can execute this URL from anywhere.
https://apse1-cai.dm-ap.informaticacloud.com/active-bpel/public/rt/cYQkIWovYWOhgzhG2zYBSD/PROC_User?UserID=RajInfa - When you execute the above URL in the browser , you will get an output in json format as like below.

- When you execute the above URL in the browser, internally a process will start in IICS, and you can monitor the process under Application Integration console as shown below.

Task 4: Integration of CDI and CAI – Call any Task which created under Data Integration from CAI
The above method can be Implemented by using Service Step.
- Go to application Integration and Create new and select Process, Rename the process as
PROC_INTEGRATE_CDI_CAI - Go to Start Step , Allow anonymous access , This means Anyone in the internet can use this process. Also Select Run on “Cloud Server” as shown in the below.
- Go to Input fields, create a new input field, Give the name as UserID and select Required filed
- Go to output fields, create a new output filed as User_Message as shown in the below.
- Drag the service Step to the process as shown in the below.
- Select the service and Select service type as System Service and action as Run cloud Task as shown below.

- Go to input fields, Select Task name and select any Task. also check Wait for task to complete. As shown below.

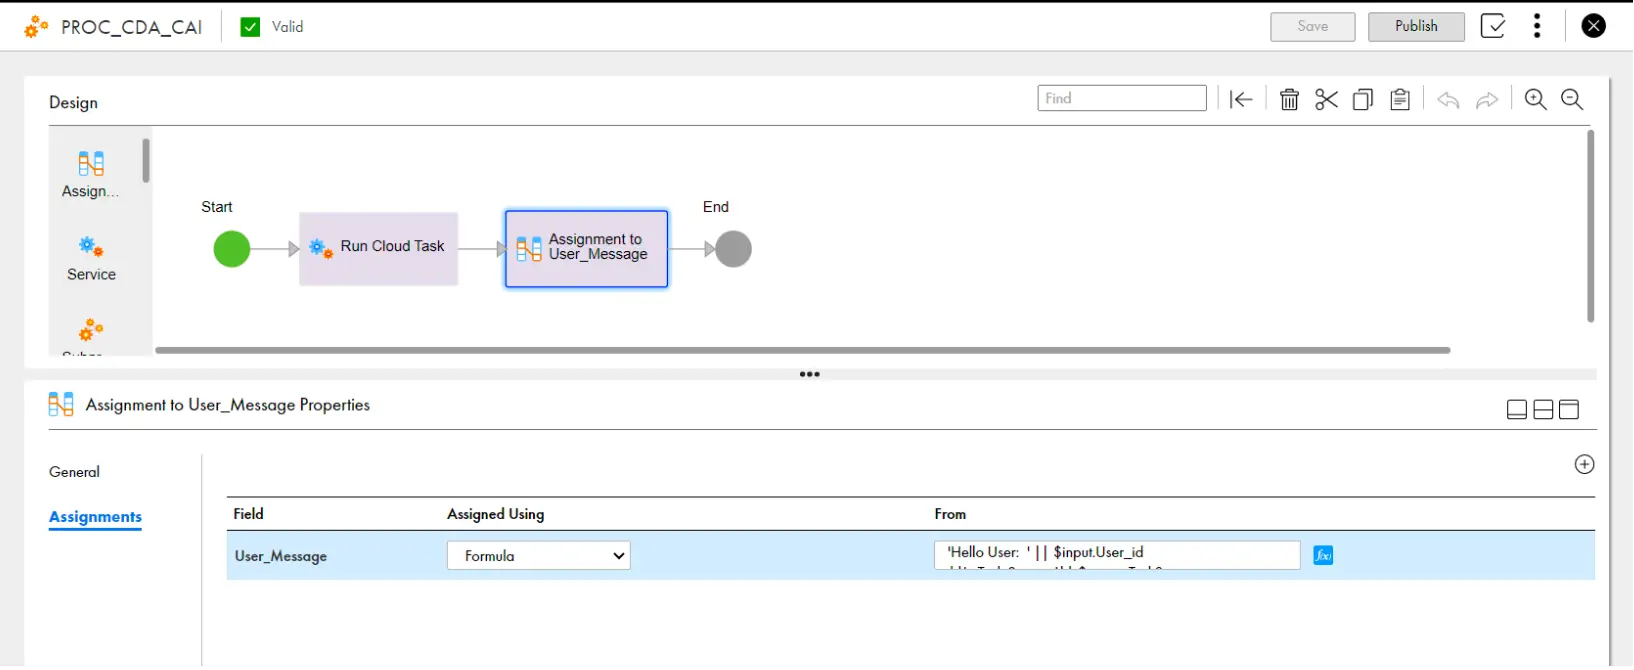
- Drag an assignment step to Process and Configure the assignment step as below.
Under user_message configure as
‘Hello User: ‘||$input.UserID
||’ Task Status: ‘||$output.TaskStatus
- Save and publish.
- Get the URL from proper detail and copy the service (REST) URL
https://apse1-cai.dm-ap.informaticacloud.com/active-bpel/public/rt/cYQkIWovYWOhgzhG2zYBSD/PROC_INTEGRATE_CDI_CAI - Copy the url as below and pass the input as username. Anyone can execute this URL from anywhere.
https://apse1-cai.dm-ap.informaticacloud.com/active-bpel/public/rt/cYQkIWovYWOhgzhG2zYBSD/PROC_INTEGRATE_CDI_CAI?UserID=RajInfa
you will get the output Response in the below format.

Task 5:
Call any Task which created under Data Integration from CAI Pass MCT as a Parameter
- Go to application Integration and Create new and select Process, Rename the process as PROC_INTEGRATE_CDI_CAI_new
- Go to Start Step, allow anonymous access, this means Anyone in the internet can use this process. Also Select Run on “Cloud Server” as shown in the below.
- In Start Step, Go to Input fields, create Two input fields with the names, Task_Name and Task_type as like below.

- Go to output fields, create a new output filed as User_Message.
- Drag the service Step to the process as shown in the below.
- Select the service and Select service type as System Service and action as Run cloud Task as shown below.
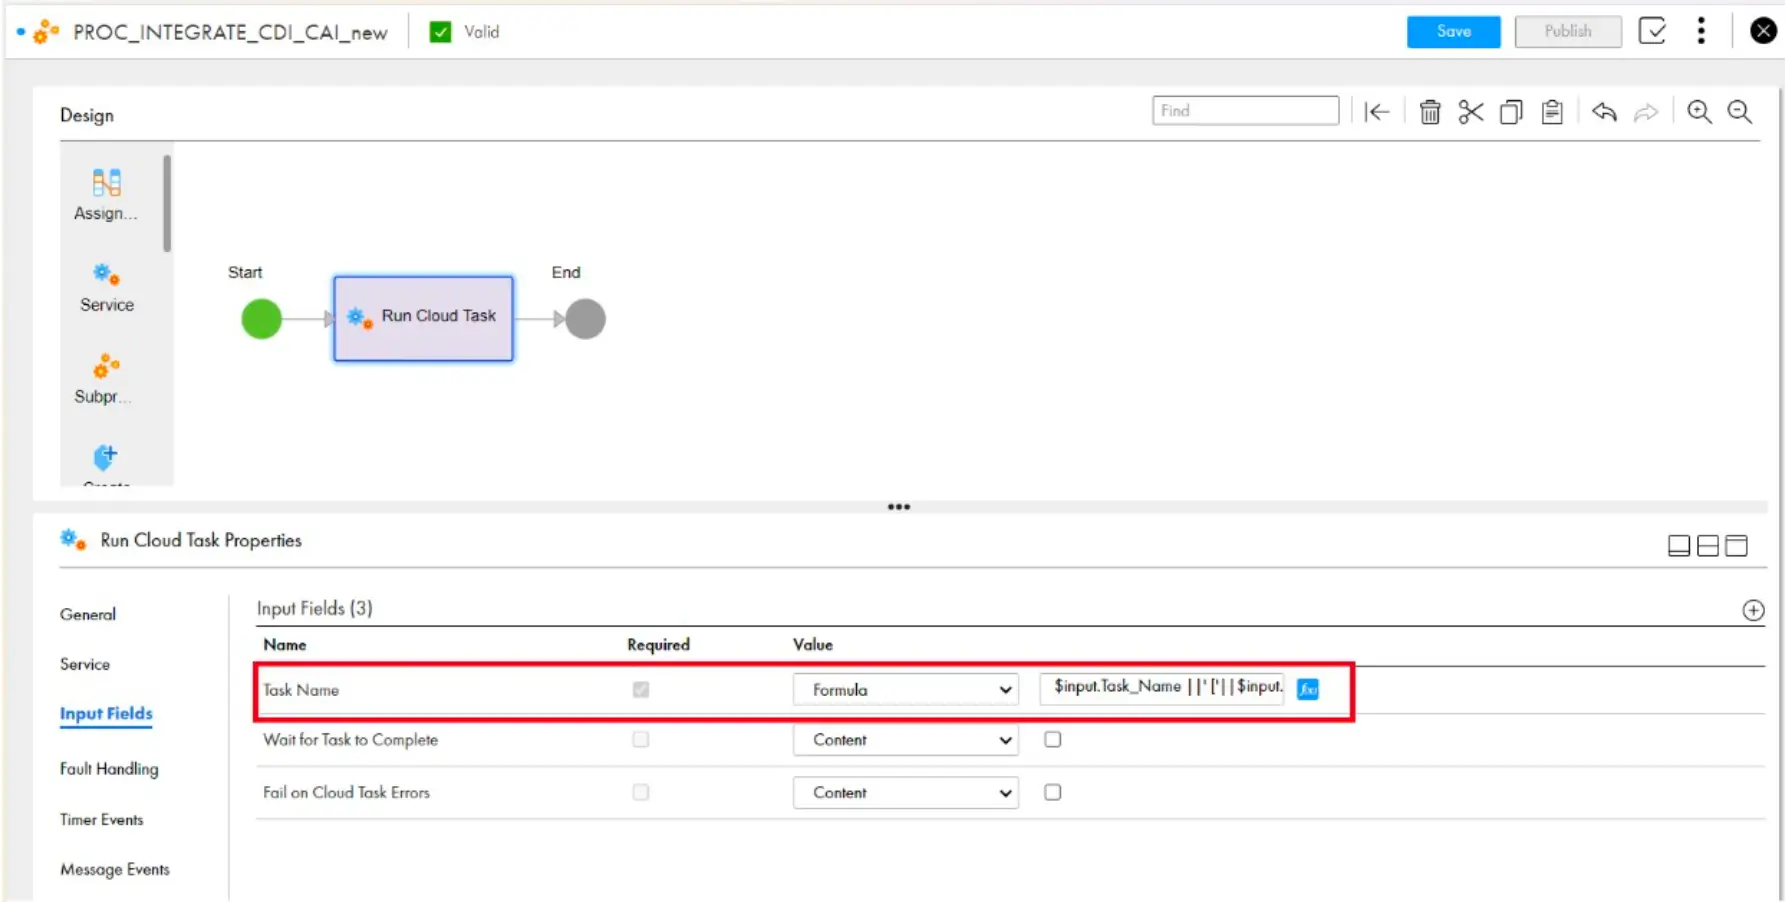
- Select Input and Configure Task as shown in the below.
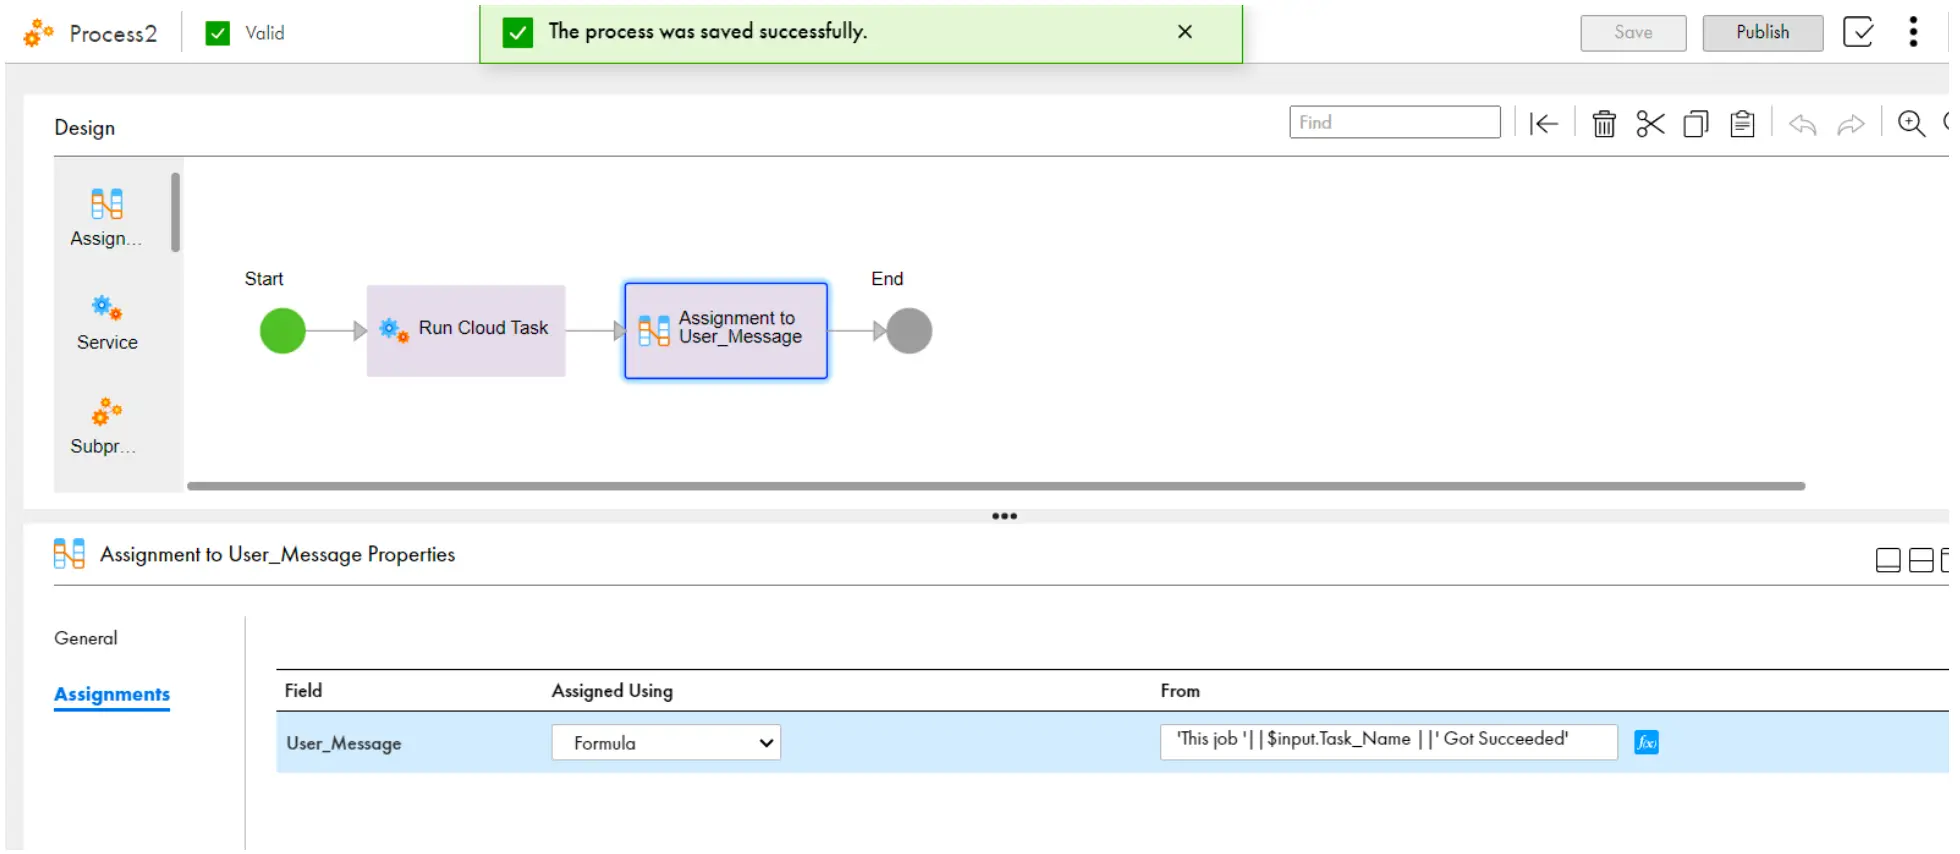
$input.Task_Name ||’ [‘||$input.Task_Type ||’]’ - Drag an assignment step to Process and Configure the assignment step as below. Under user_message configure as
‘This job ‘||$input.Task_Name ||’ Got Succeeded’
- Save and publish.
- Get the URL from proper detail and copy the service (REST) URL
https://apse1-cai.dm-ap.informaticacloud.com/active-bpel/public/rt/cYQkIWovYWOhgzhG2zYBSD/Process2 - Pass Task_Name & Task_Type parameters and values in the above link.
https://apse1-cai.dm-ap.informaticacloud.com/active-bpel/public/rt/cYQkIWovYWOhgzhG2zYBSD/Process2?Task_Name=mct_generic_EMP_LOC&Task_Type=MCT - Execute the Above URL in any browser or in postman tool. When you Execute this Process and MCT will be running in IICS and you will get the output in the postman tool as below.
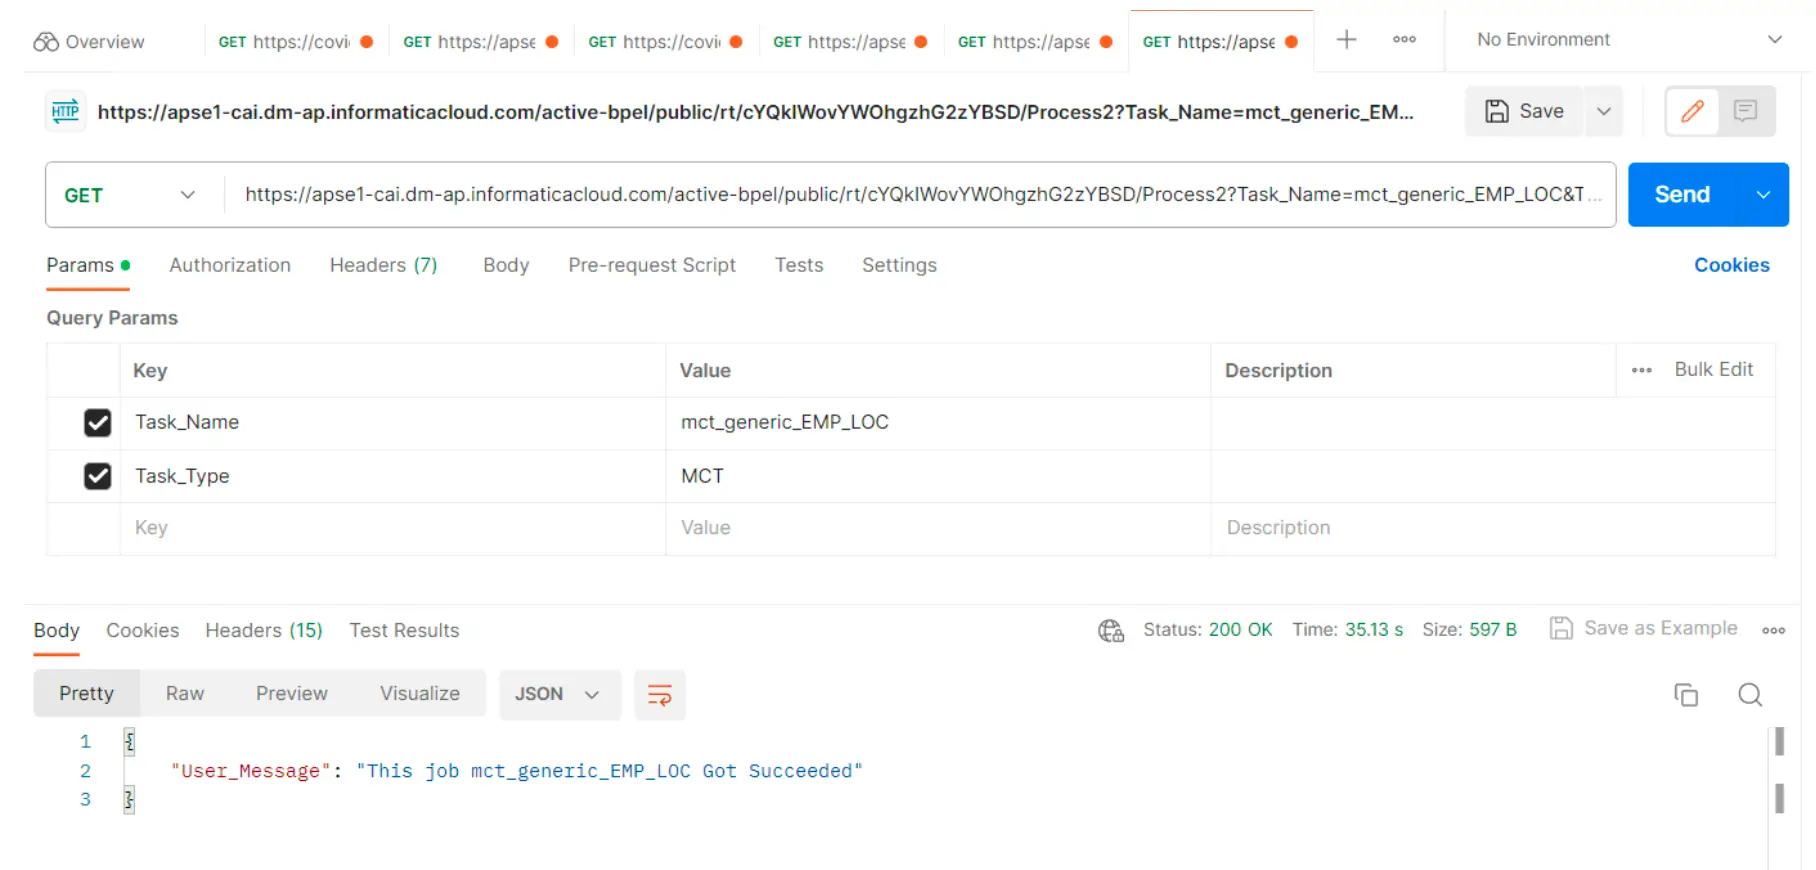
- You can pass any Task like Mapping Task , Data Synchronization Task , Data Replication or Mapping task using the below Task types.
Mapping Task – MCT
Synchronization Task- DSS
Replication Task- DRS
Masking Task- DMASK
PowerCenter Task -PCS - Pass Data Synchronization Task_Name & Task_Type as DSS parameters and values in the above link or in postman Tool.
https://apse1-cai.dm-ap.informaticacloud.com/active-bpel/public/rt/cYQkIWovYWOhgzhG2zYBSD/Process2?Task_Name=dss_CONTACTS&Task_Type=DSS

Task 6.
Read the Data from COVID API , And load the data to Table or File Flow: Service Connector -> App Connecttion -> Create Process -> Service File/DB
What is Service Connector in IICS? Service Connector is used to Connect to third-party services using REST or SOAP APIs.
To Read the data from Covid API, and load the data to table or file, follow the below steps.
- Go to application Integration, create new, and Select Service Connectors, and select Service Connector using form.

- Rename the Service Connector as, ServiceConnector_ReadCovidData3
- Under Service Connector , Under Actions , we have 5 tabs , with the names – Actions, Input, Binding , Output, Test Results .
- Go to Actions, create a new action by clicking + symbol and give the action name as GetCovidData (you can use name)
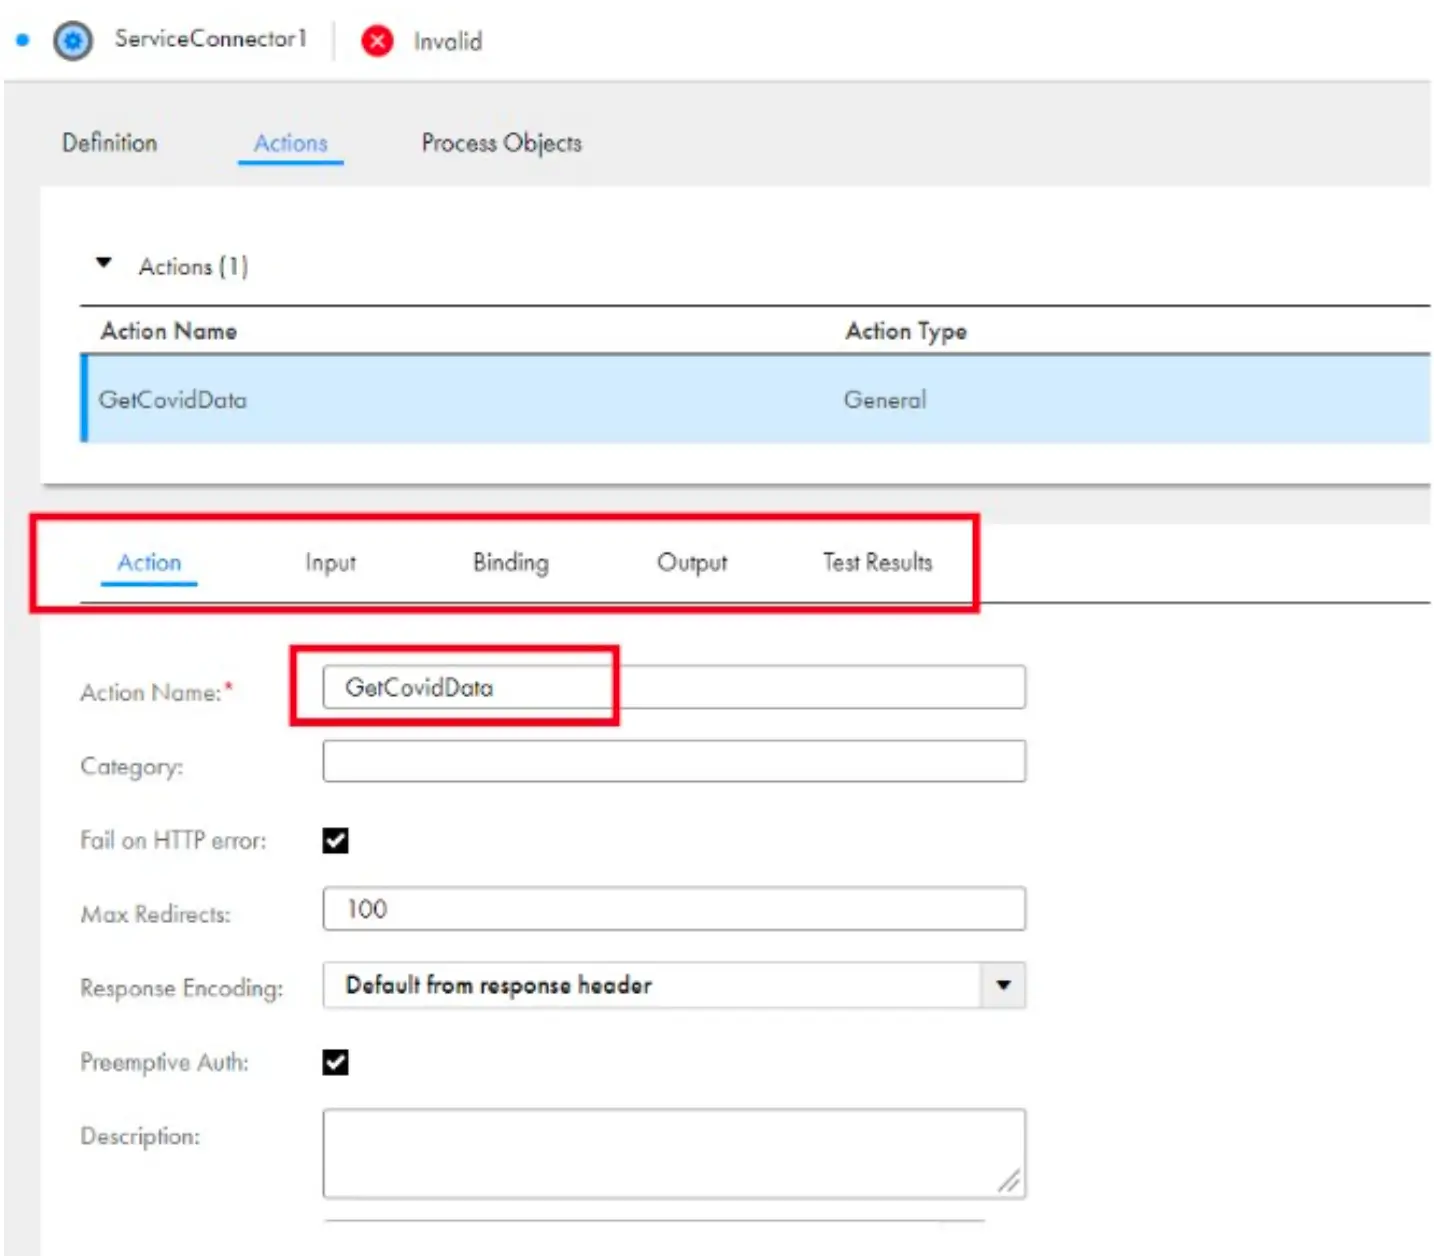
- Go input tab and give the input details( will be used input parameters ) which the API is taking As shown on the below. Give the sample values under “Test With”

- Go to Binding Tab, Give the API URL (In this case Covid API URL) and select Verb as GET

- Go to output and configure the output fields in which we need the values as output from the API.

- You can Test the data in service connector by going to “Test Results” tab. And click on Test. You will get the output (response) from API as shown in below.

Create an App Connection in Application Management Console.
What us is App Connection in IICS?
Ans: App Connection is used to create any type of connection in CAI The app connection contains the credentials that the connector uses to perform the action with third-party applications. It used to update metadata of Service connector. - Go to application Management Console , Click on New and Create a New App Connection. Rename as AppConnection-For-SC3. Go to Type, then select and expand the Project as “Raj Informatica Dev” and Open the folder CAI and select your Service Connector “ServiceConnector_ReadCovidData3” As shown in below.

After selecting it looks like below.
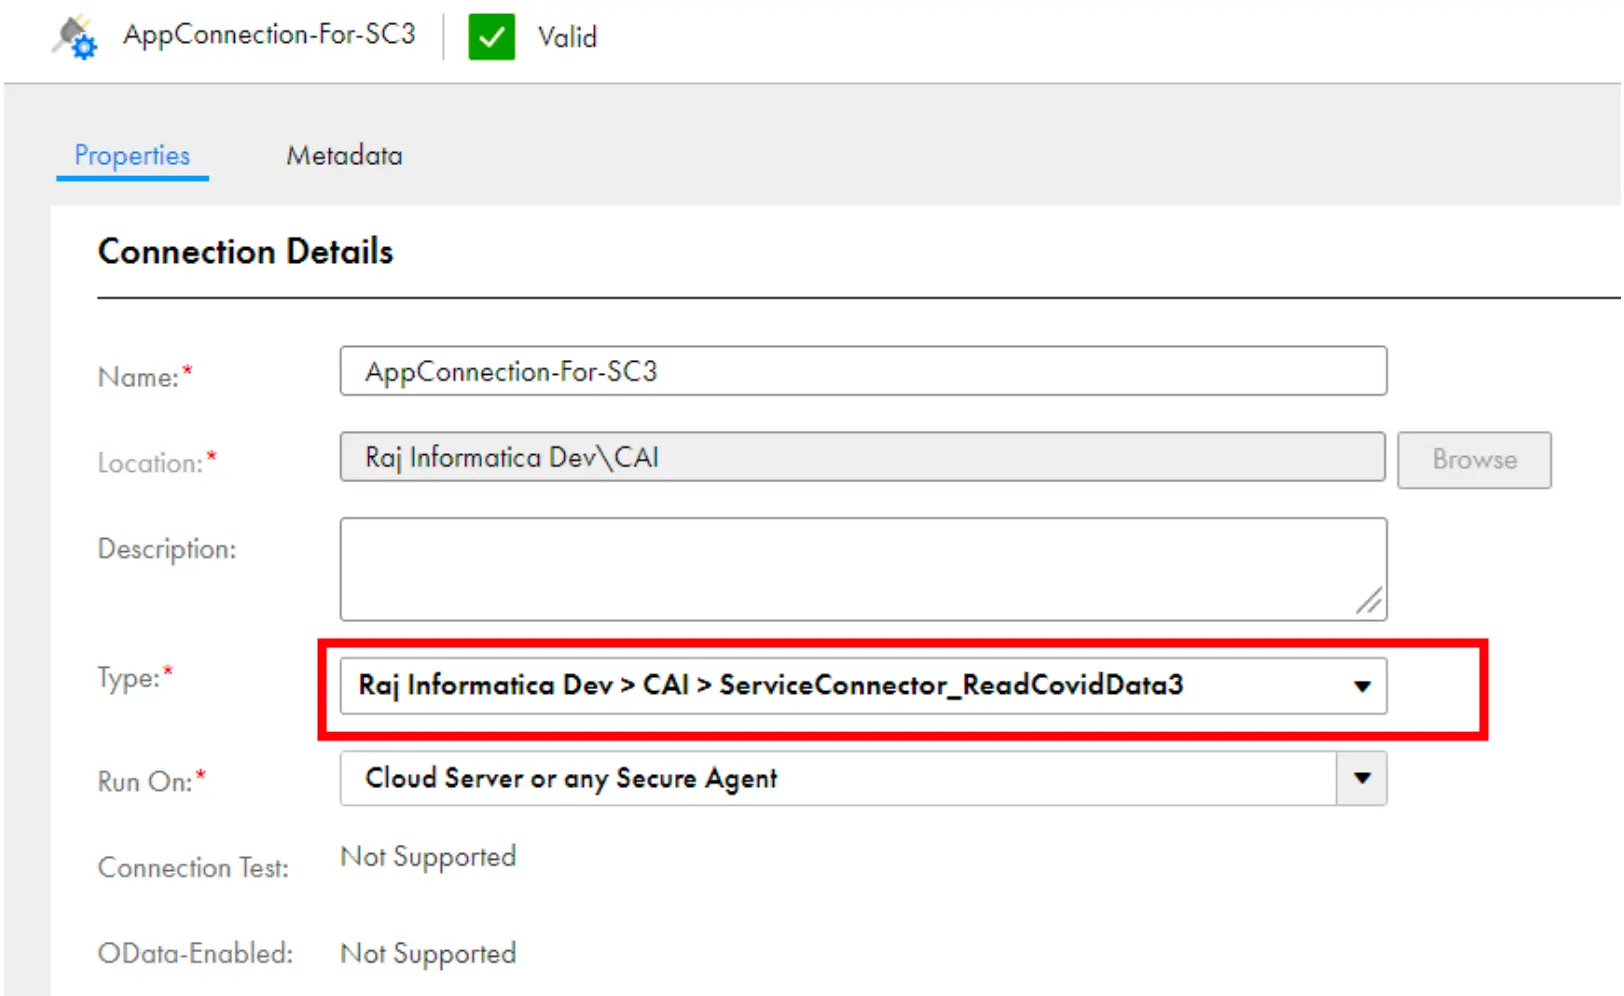
- Save and publish the app connection.Create a PROCESS.
- Go to application Management Console, Click on New and Create a new Process and Rename as Proc_ReadCovidData3.
- Go to Start Step , Allow anonymous access , This means Anyone in the internet can use this process. Also Select Run on “Cloud Server” as shown in the below.To Read the data from API, Use a Service Step
- Drag Service Step to Process and select service as app connection which we just created above. Select Service type as Connection and Then select Connection as App Connection, i.e AppConnection-For-SC3 as shown in below.

- Select the action as ReadCovidData. You can see the input and output fields which we create under Service Connector as shown in below.
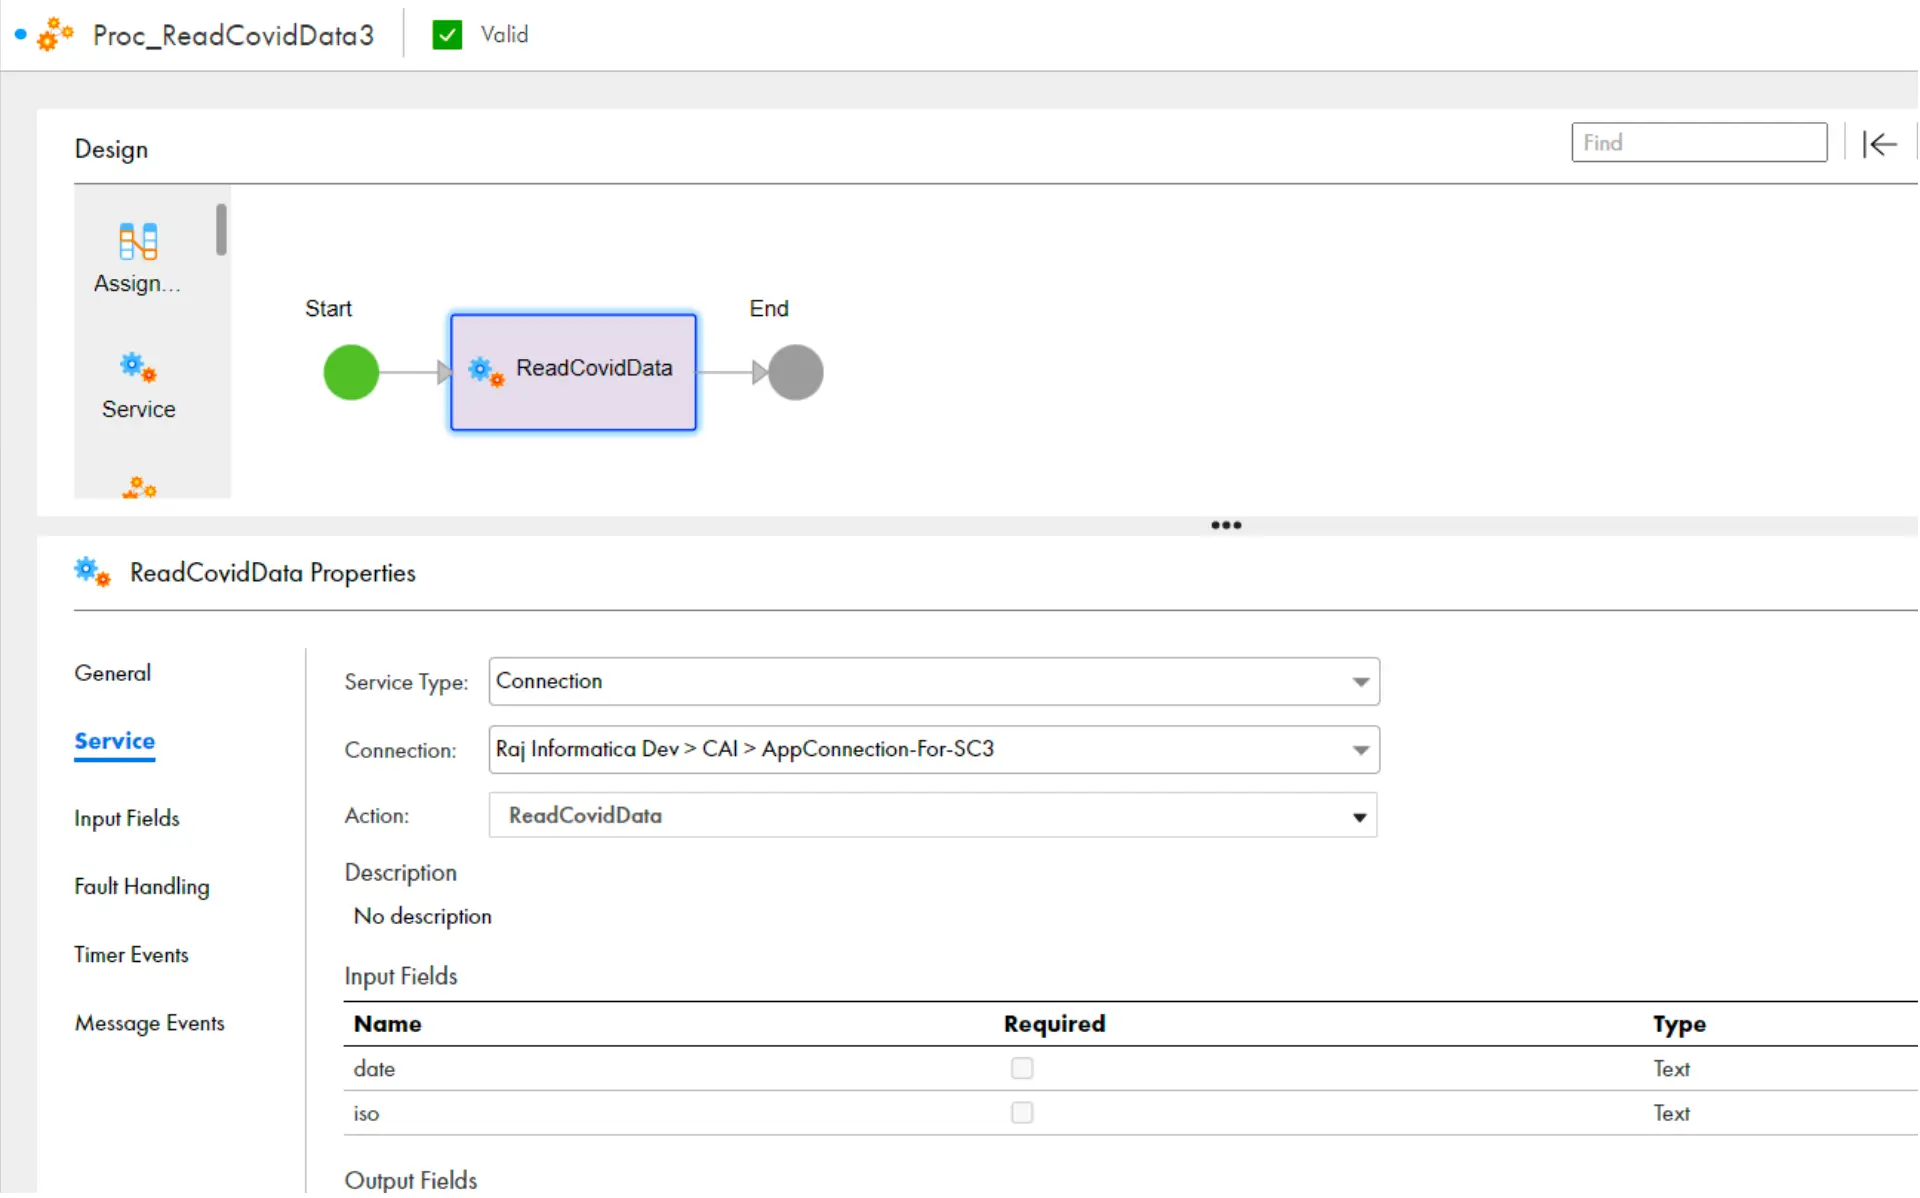
- Select Service Step, Go to input fields, click on + and select the input fields shown there and give the static values.

- Go to three dots and select Run. It will give message like Successful below.
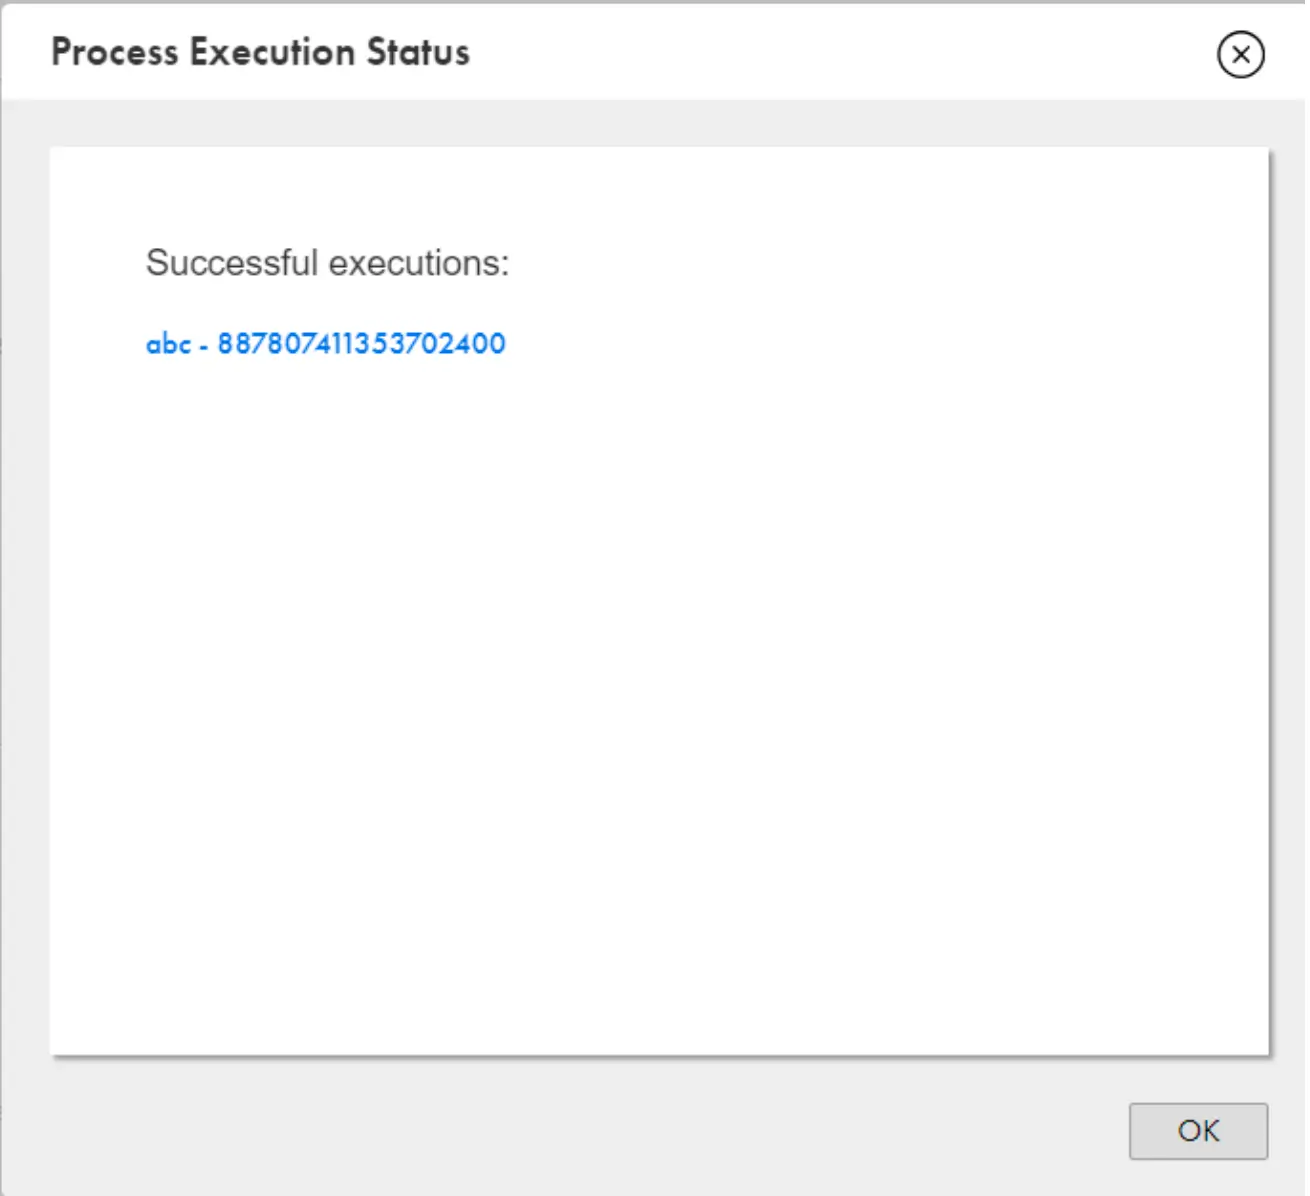
Click on the above link, and verify the process whether it is taking correct input or outputs.
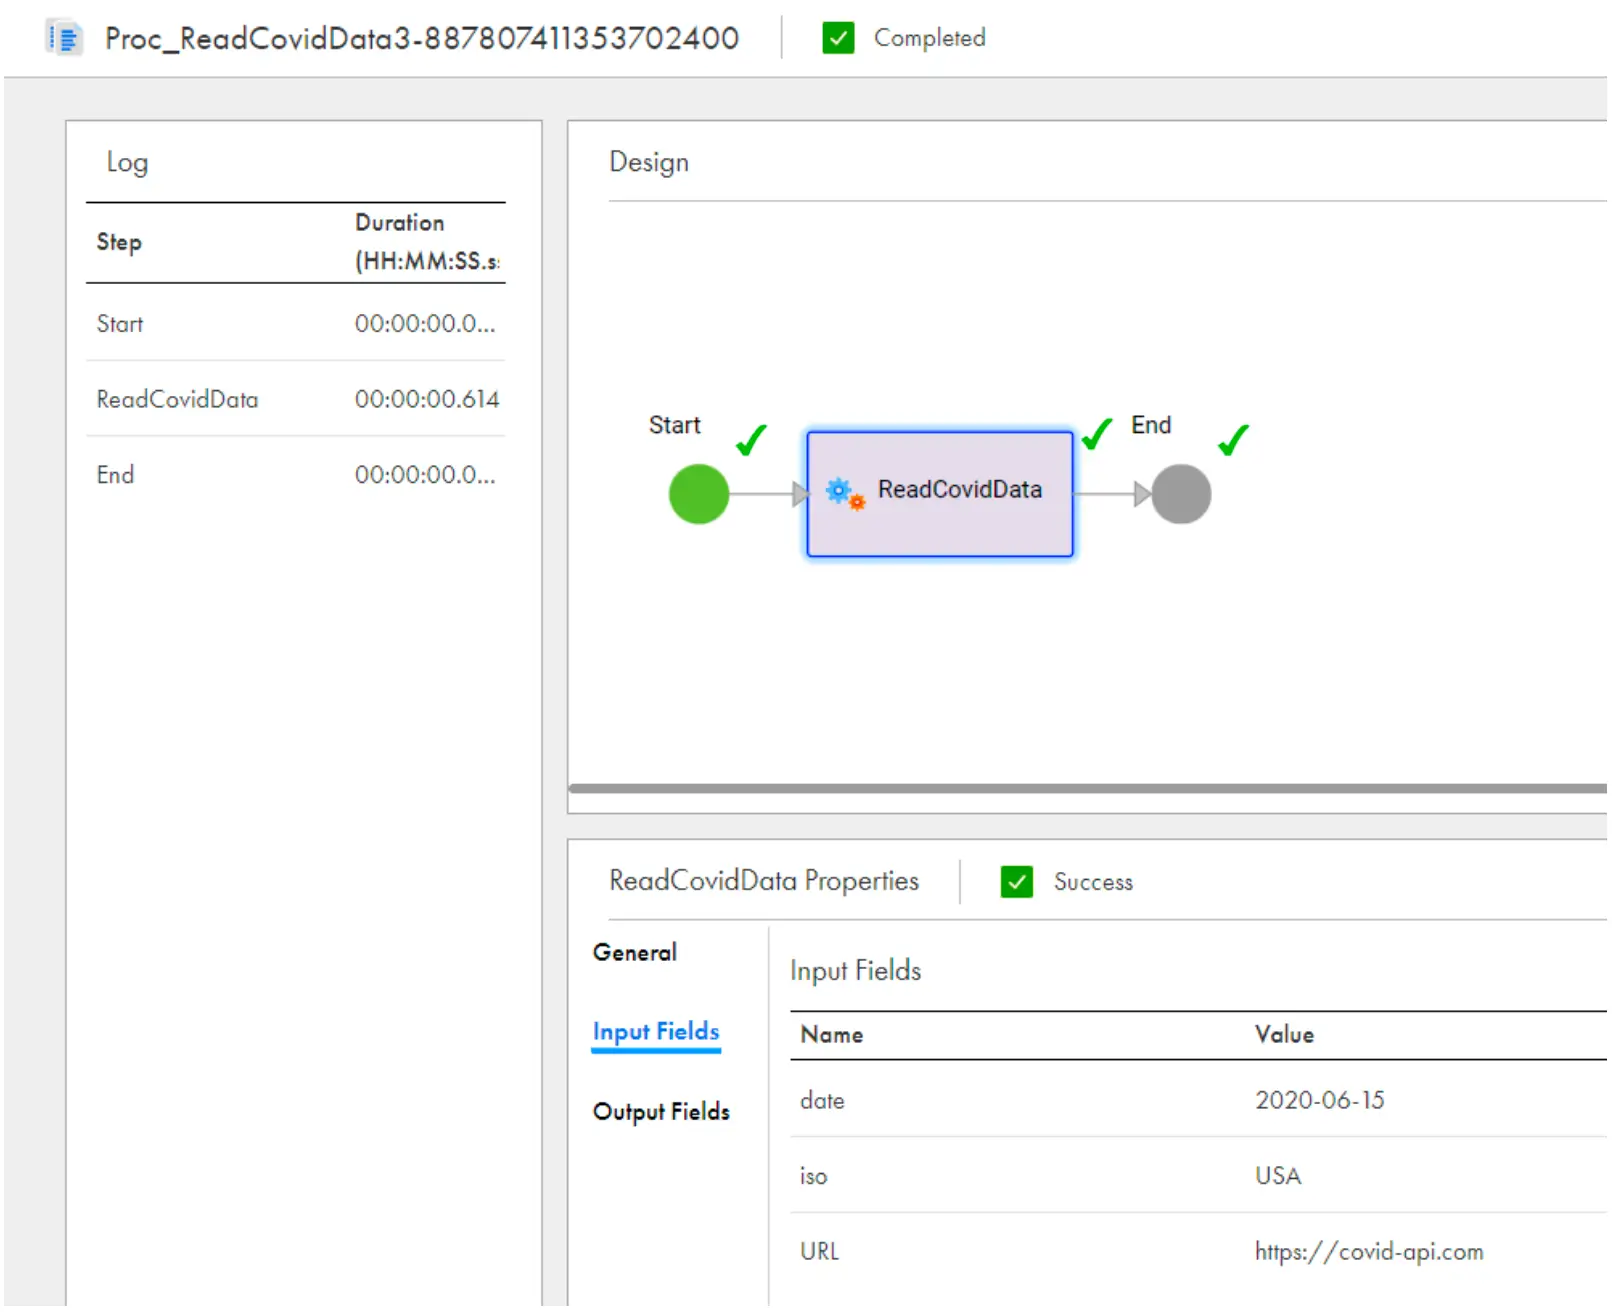
To Write the Data inside the file, we need create one more App Connection. - Go to application Management Console, Click on New and Create a New App Connection. Rename as AppConnection-FILE-WRITER3. Select Type as File and select your local secure agent.

- Go to Event Targets Click on “+Add Event Target” and select File Writer.

- Rename the File writer as FileWriter3 and Give the file path under Directory filed

- Click on Save and Test the connection. Select the Properties and check the Connection is Passed.

- Use this File Connection inside the process which we created. To do this, we have to go to Temp fields .
Go the Process Proc_ReadCovidData3 -> Go to Temp fields ,Add a new filed Temp_File_writer.
Select the Type ->More Types ->Connection Defined Types
Select the Connection as AppConnection-FILE-WRITER3 which we created
Check the option File Writer Task as shown in the below.
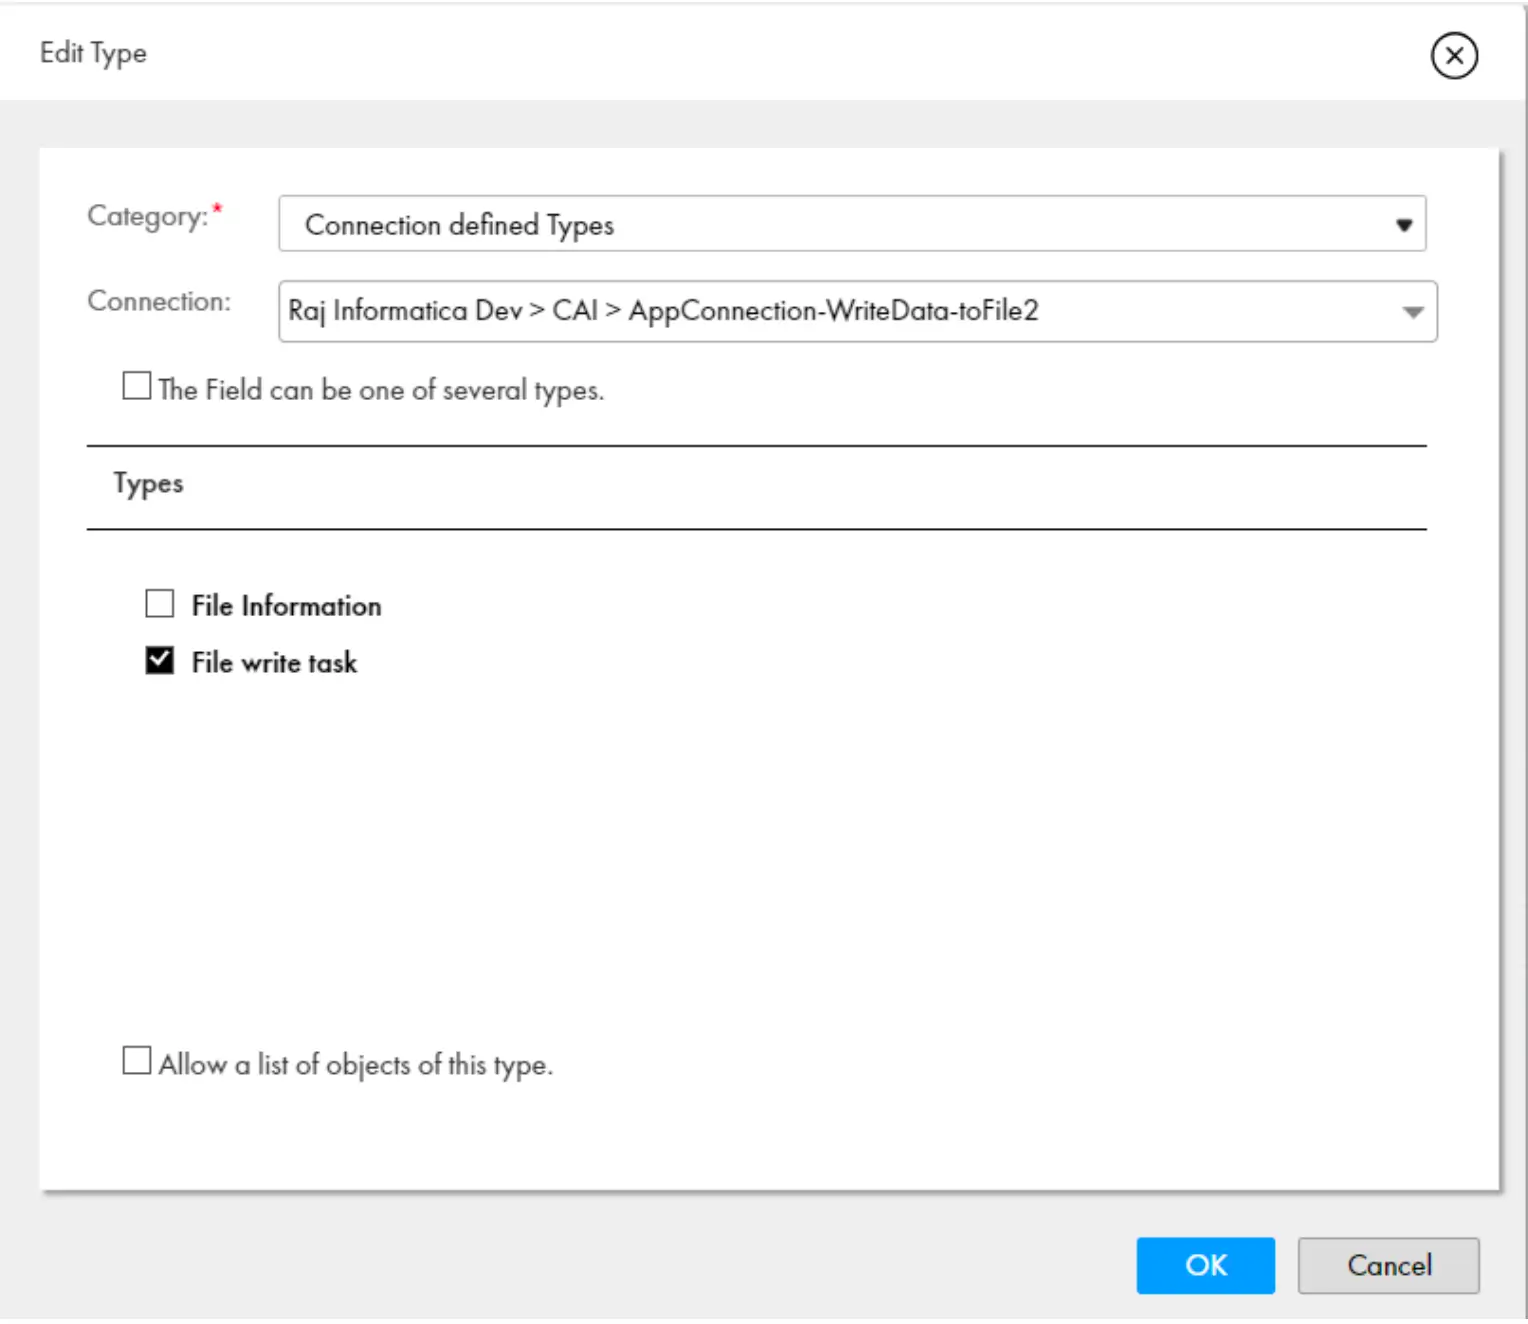
- We need to Configure the file name and File Content into the object Temp_FileWriter by using Assignment step.
Drag the Assignment step, go to Assignment Step click on + and select Temp_FileWriter ->File name
Also Create one more as Temp_FileWriter->Plain File Content as shown in the below.

- Configure the file name as below.
‘Covid_data_’||$output.date||’.csv’ - Configure the Content as below.
‘ Date : ‘||$output.date||
‘ Active: ‘||$output.active||
‘ Confirmed’||$output.confirmed||
‘ Recovered’||$output.recovered - To execute the above configuration, we need to create a service Step.
Drag the Service Step , go to service and select Service type as Connection, Under the Connection, select AppConnection-FILE-WRITER3, Select the Action as FileWriter3
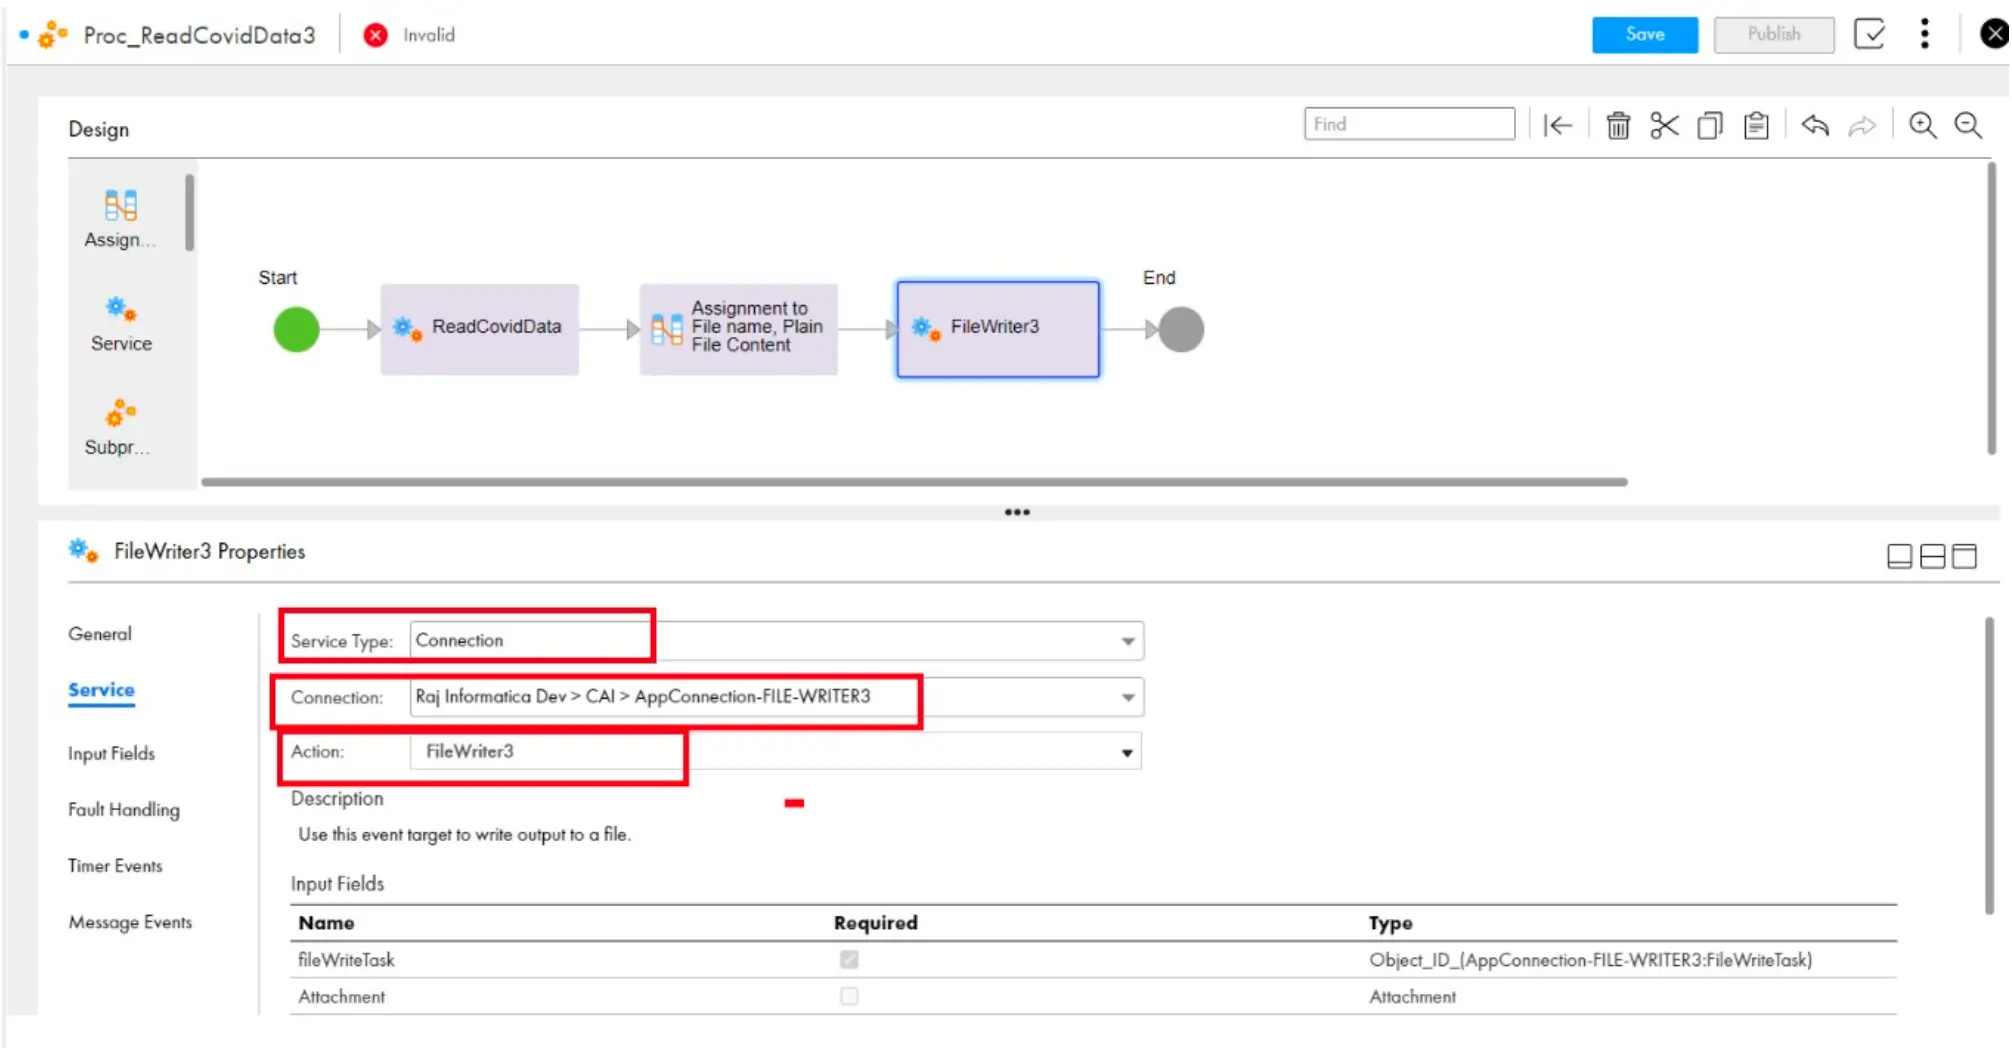
- Go to input fields ->select the filewritetask as Temp_File_Writer .

- Save and publish. Go to the three dots and Run the Process.
- After completion of the above Process, an output file is created under the C:\Program Files\Informatica Cloud Secure Agent\apps\Data_Integration_Server\data\TgtFiles

- And the Contend of the File is inside of the file.

- The above process explained about Read the data from Covid API and write the data to File.Task 7: Use Decision Step based on the Status code.
- Use the Status Code to decide whether, the Process Succeeded or not by doing the below.
Go to Service Connector ->output -> click on +
Give the Name as Status_Code, Type as Integer and select the property as HTTP Response Status Code

- Save and publish the Process. Also Publish the two app connectors which we have created.
- Now The Status_Code output filed is available in the service step under the process which I have shown below.
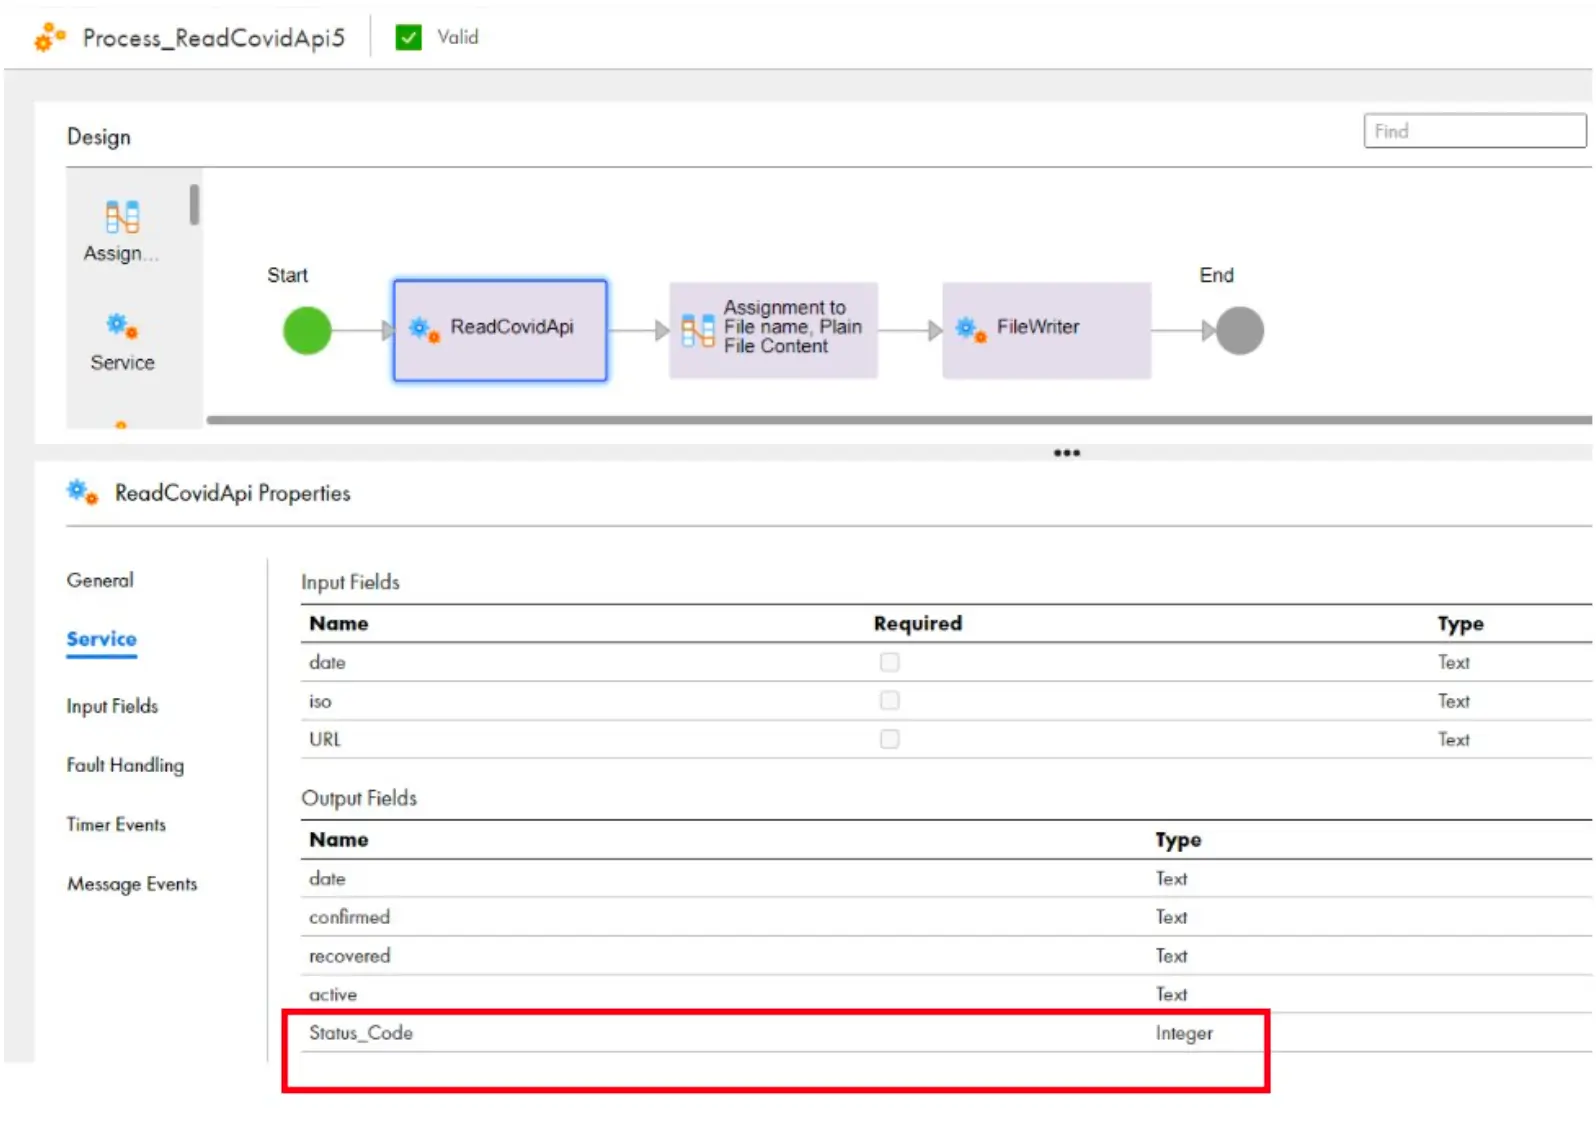
- We are implementing below scenario now.
If the process is getting succeed and give the status code as 200 , then only we need to the write the data to file otherwise , we should not write the data to the file . This can be achieved by doing the below steps. - Drag a Decision Step after Service step and give Status_Code – Path1 equals 200 as shown in the below.

- Save and publish and the Run the Process.
Task 8: Covid Data to the File. Read the Date and ISO fields from a table and write the particular dates - In the Above Process, we have just passed static Date and ISO to the process and we got the result as one csv file based on the date we have passed to Process.Instead of this we will have some dates and ISO values in table. We will read the data from this table and generate the Covid data of these and dates and ISO which are available from the table.For this I have created a table with the data as shown in below.
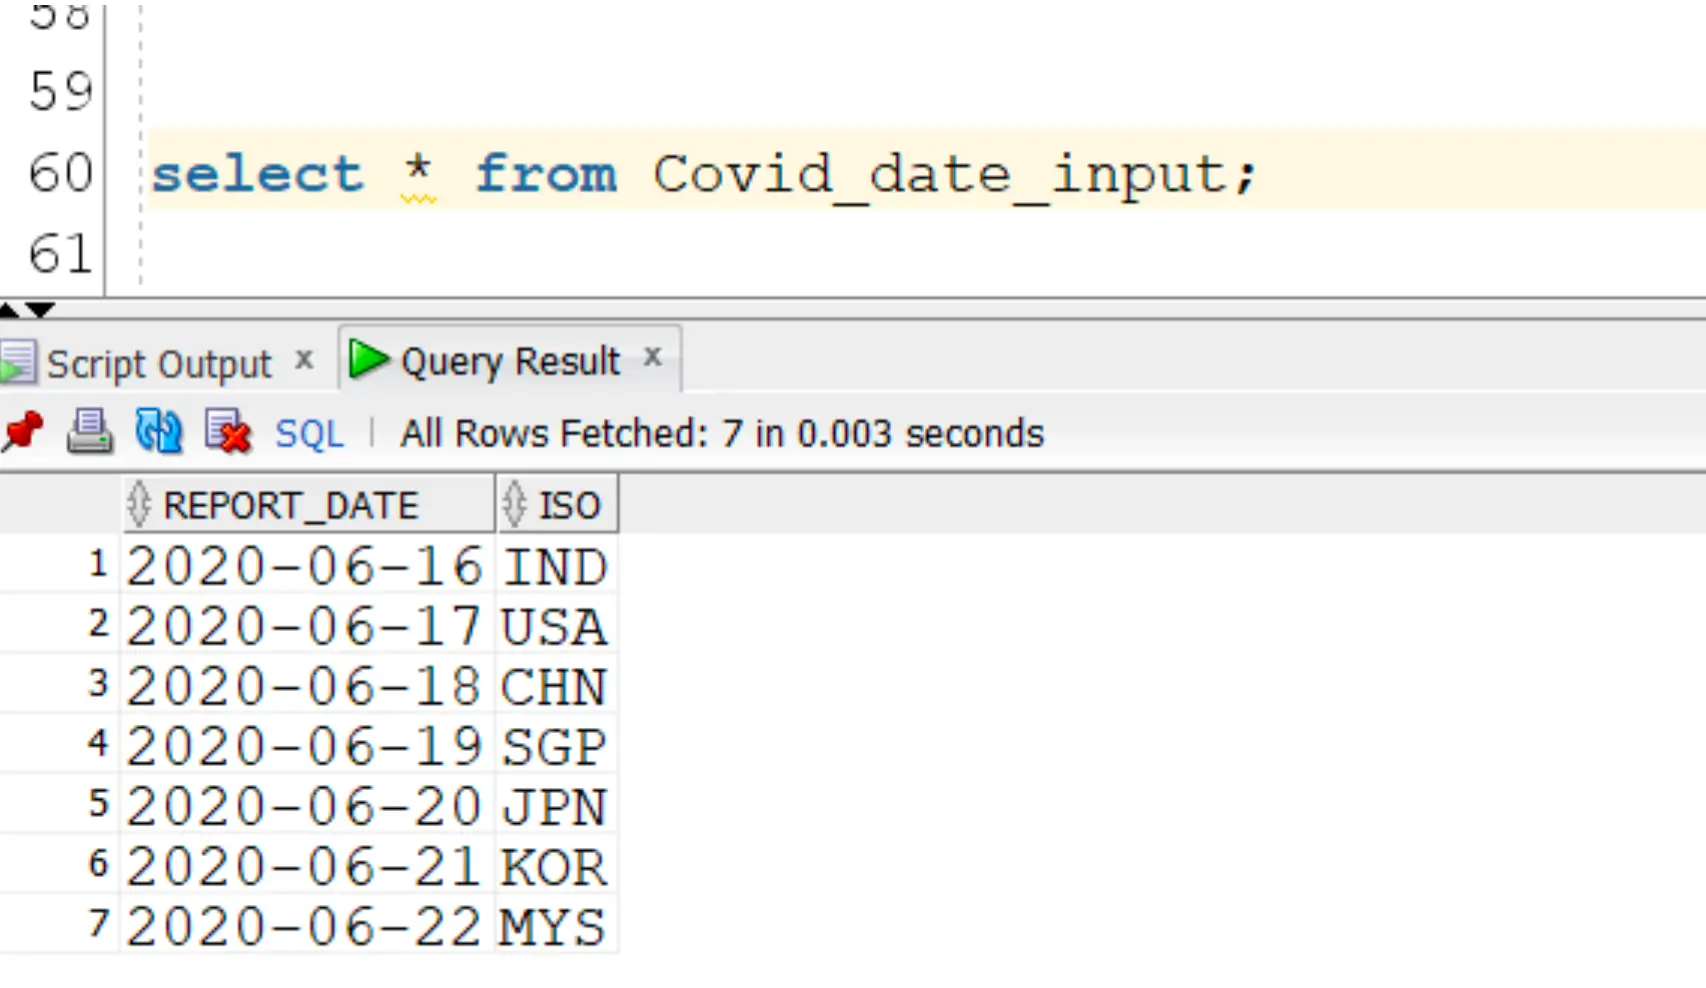
Based on the above Table results, we will Generate one file for each record. So that 7 files will be generated with particular date Covid data. - To the above task, first Take the JDBC Connections from
Administrator ->Add on Connectors -> Search with JDBC connections and add them.

- Create a App Connection to Read the data from Covid_date_input table.
Go to Application Integration, Create and new AppConnection and rename as AppConnectoin-JDBC5
Go to Type -> Select JDBC Generic cloud Adapter . Select Run on Secure Agent.
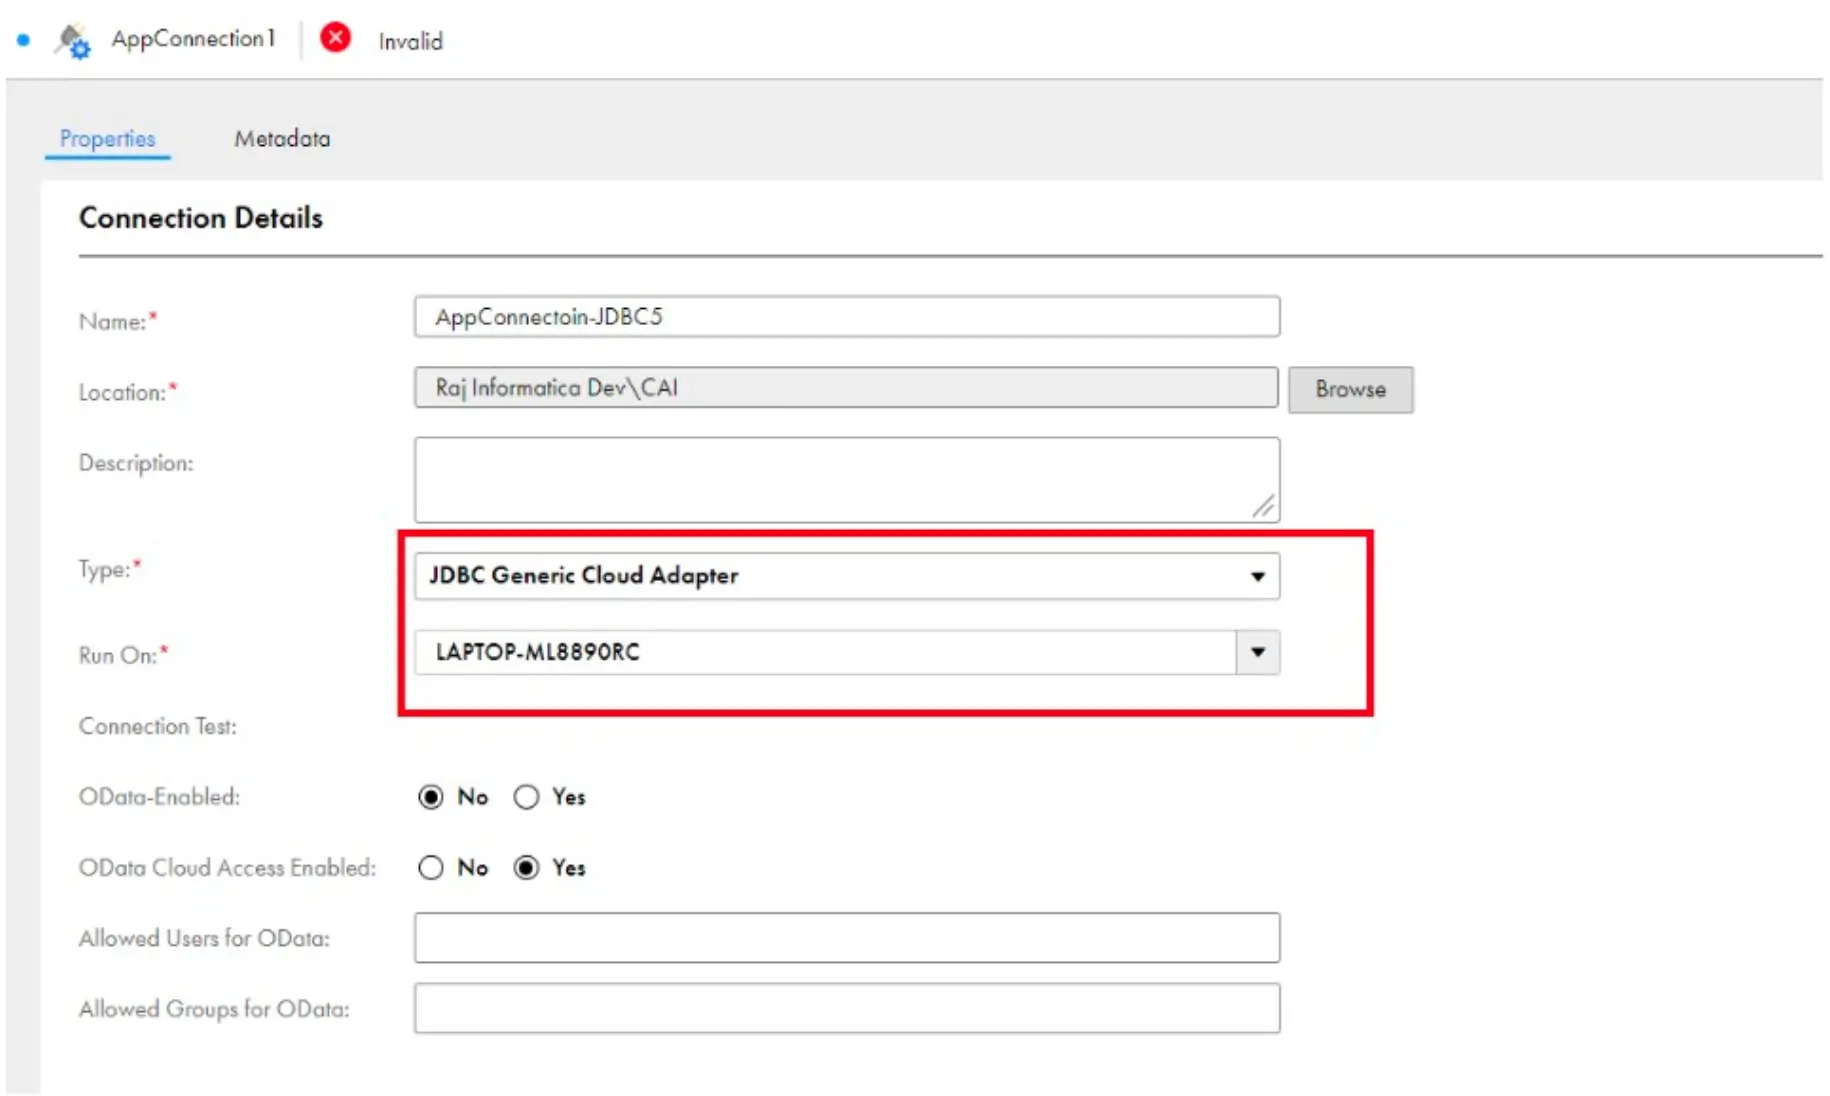
- And configure the below JDBC Properties. Search for Oracle JDBC Drivers and save the driver in the system where secure agent is installed.
JDBC Connection URL — jdbc:oracle:thin:@localhost:1521:xe
JDBC Jar Directory — C:\JDBC Drivers
JDBC Driver Class Name – oracle.jdbc.driver.OracleDriver
Schema : OT_SRC_DEV1
Username : OT_SRC_DEV1
Password : admin
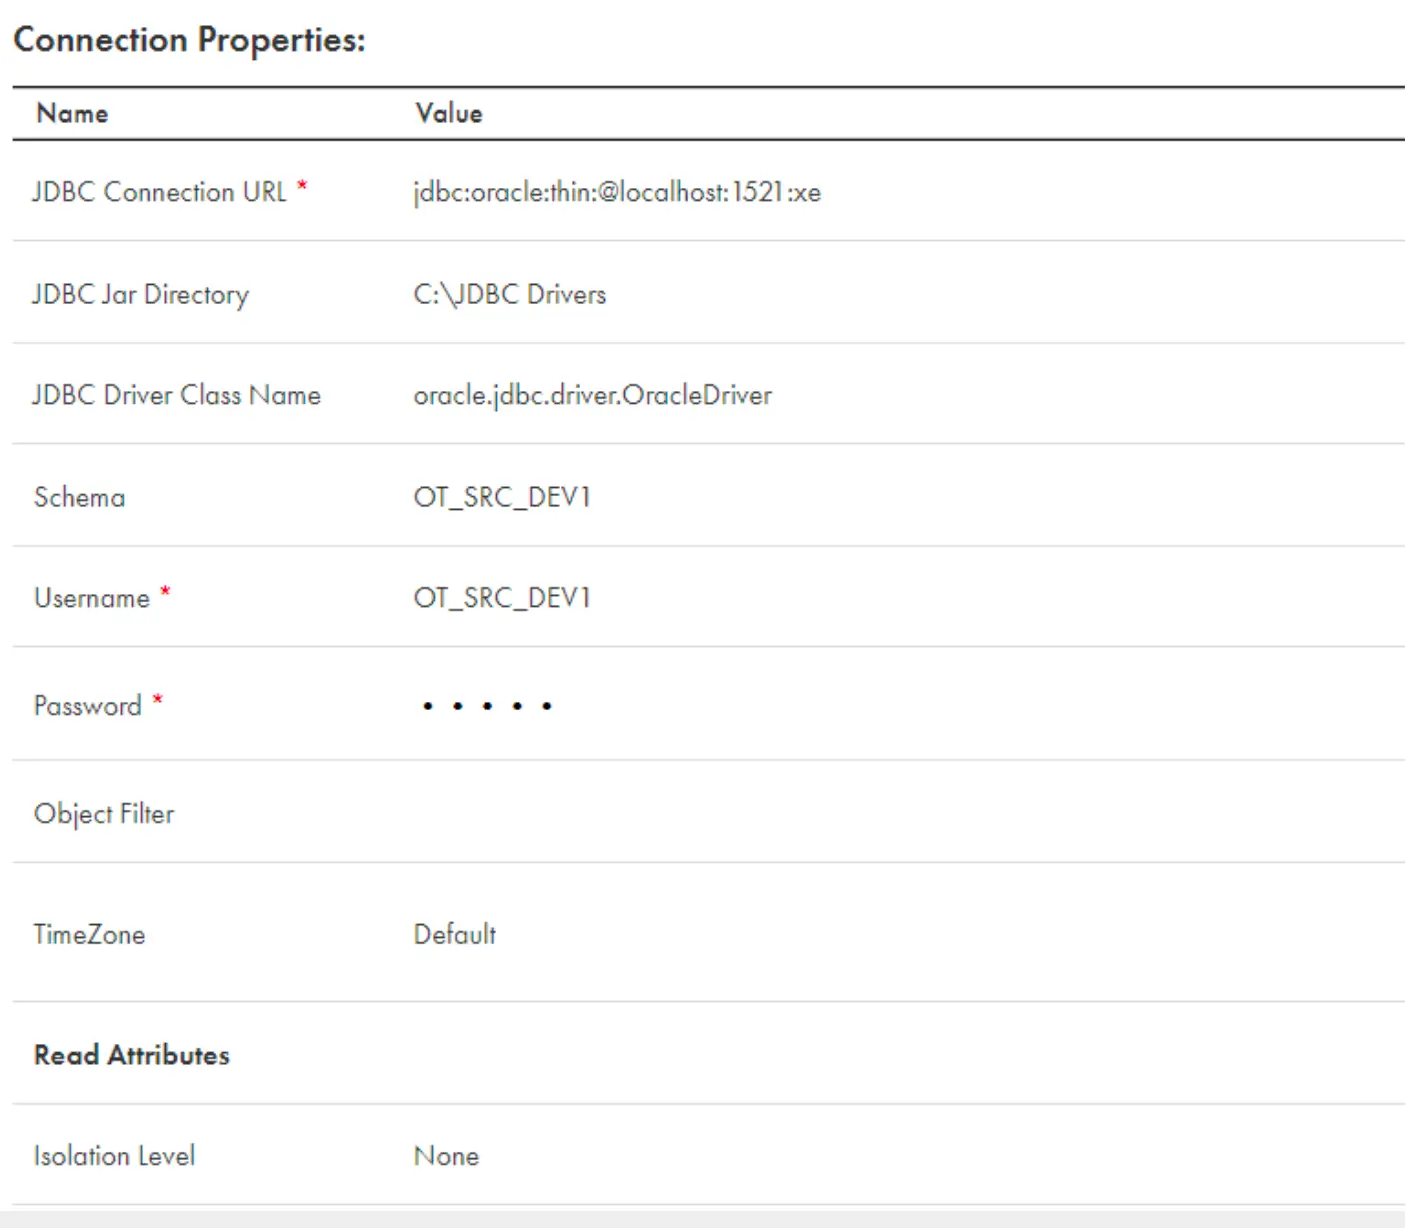
Once you Added the above steps, Go to Administrator ->Runtime Environment -> and Restart the Process server service.
Test and Publish the AppConnection-JDBC5 - We should use the Above AppConnection-JDBC5 inside the Process. To Access the table inside the process, we need to create two temp variables like below.
Go to Process -> click on Start -> Go to Temp Fields -> Add + and Temp_table
Select the Type -> More Types -> Connection Defined Types -> AppConnection-JDBC5-> select the table as Covid_date_input and then select allow the list of objects.
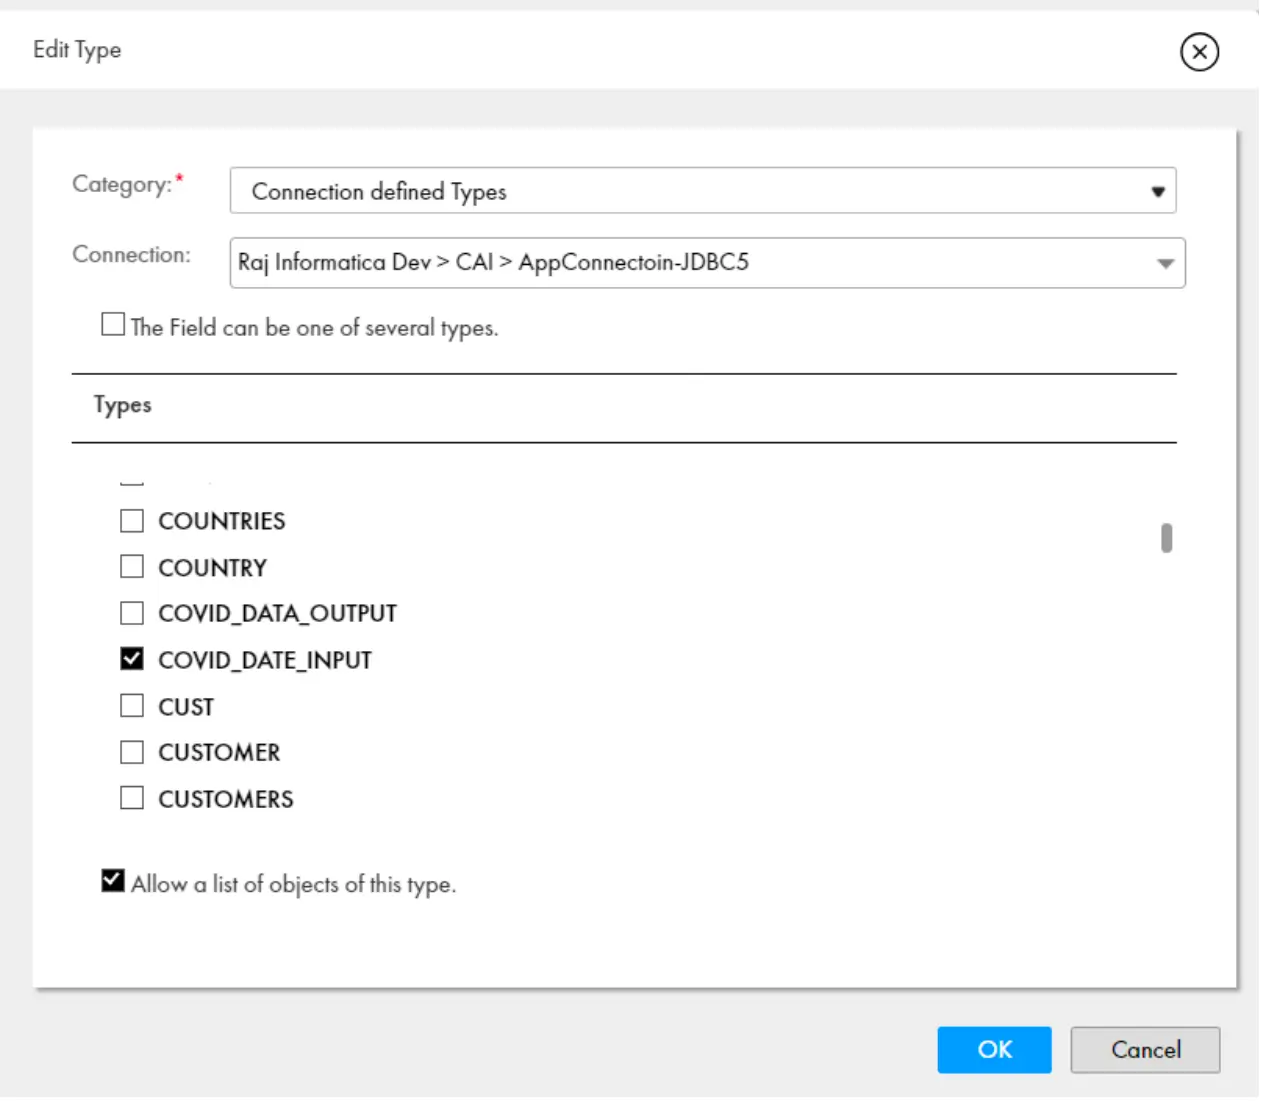
- Go to Process -> click on Start -> Go to Temp Fields -> Add + and Temp_Row
Select the Type -> More Types -> Connection Defined Types -> AppConnection-JDBC5-> select the table as Covid_date_input

- We have to initialize the above two temp variables by using assignment step. Drag an assignment step before the service step.
Go to Assignments -> Click on + and select Temp_table ->select Assigned using Query ->and given blank in From.
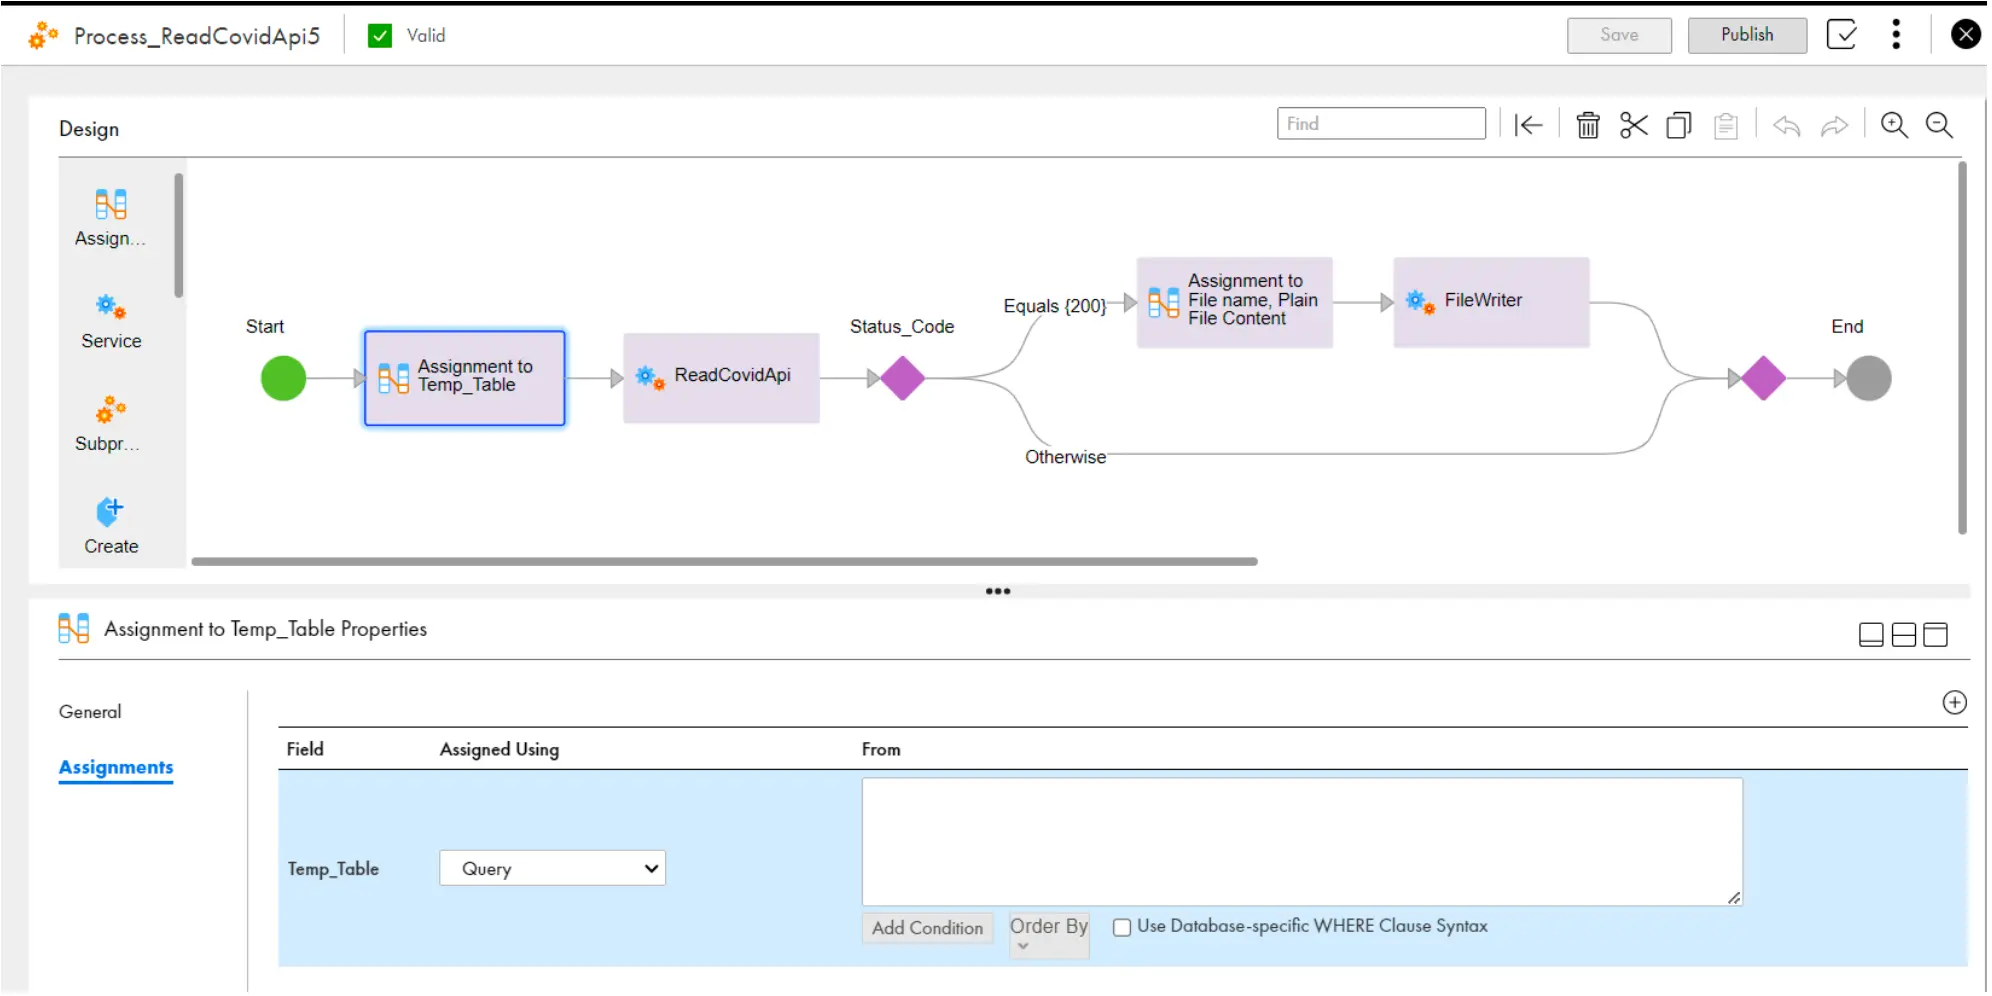
- We need to initialize the Temp_Row by using another Assignment Step.
Go to Assignments -> Click on + and select Temp_Row -> Assign using Formula ->Go to functions -> and give the function like list:head($temp.Temp_Table).
List:Head() function is used to read the first record from the table.
Click on + and select Temp_table -> select Temp_Row -> Assign using Formula ->Go to functions -> and give the function like list:tail($temp.Temp_Table)
List:Tail() function is used to skip the first row .

- Now we should pass the Table fields such as Date and ISO inside the Service step instead of hardcoding.
- Go to Service ->input fields -> Date-> Field ->Select Temp_row->report_date Service ->input fields -> Date-> Field ->Select Temp_row->ISO

- To read all the records from the table, we need loop this entire process that can be done by the below steps. Create a Decision step after File writer and select Decision and Select temp_table.

- If the Decision is not Empty, then Jump back to Second Assignment Step. Take a Jump Step under is not empty path -> and select the second assignment step.

- Save and publish. Go to Three Dots and Run the Process. The Entire Process looks like the below.
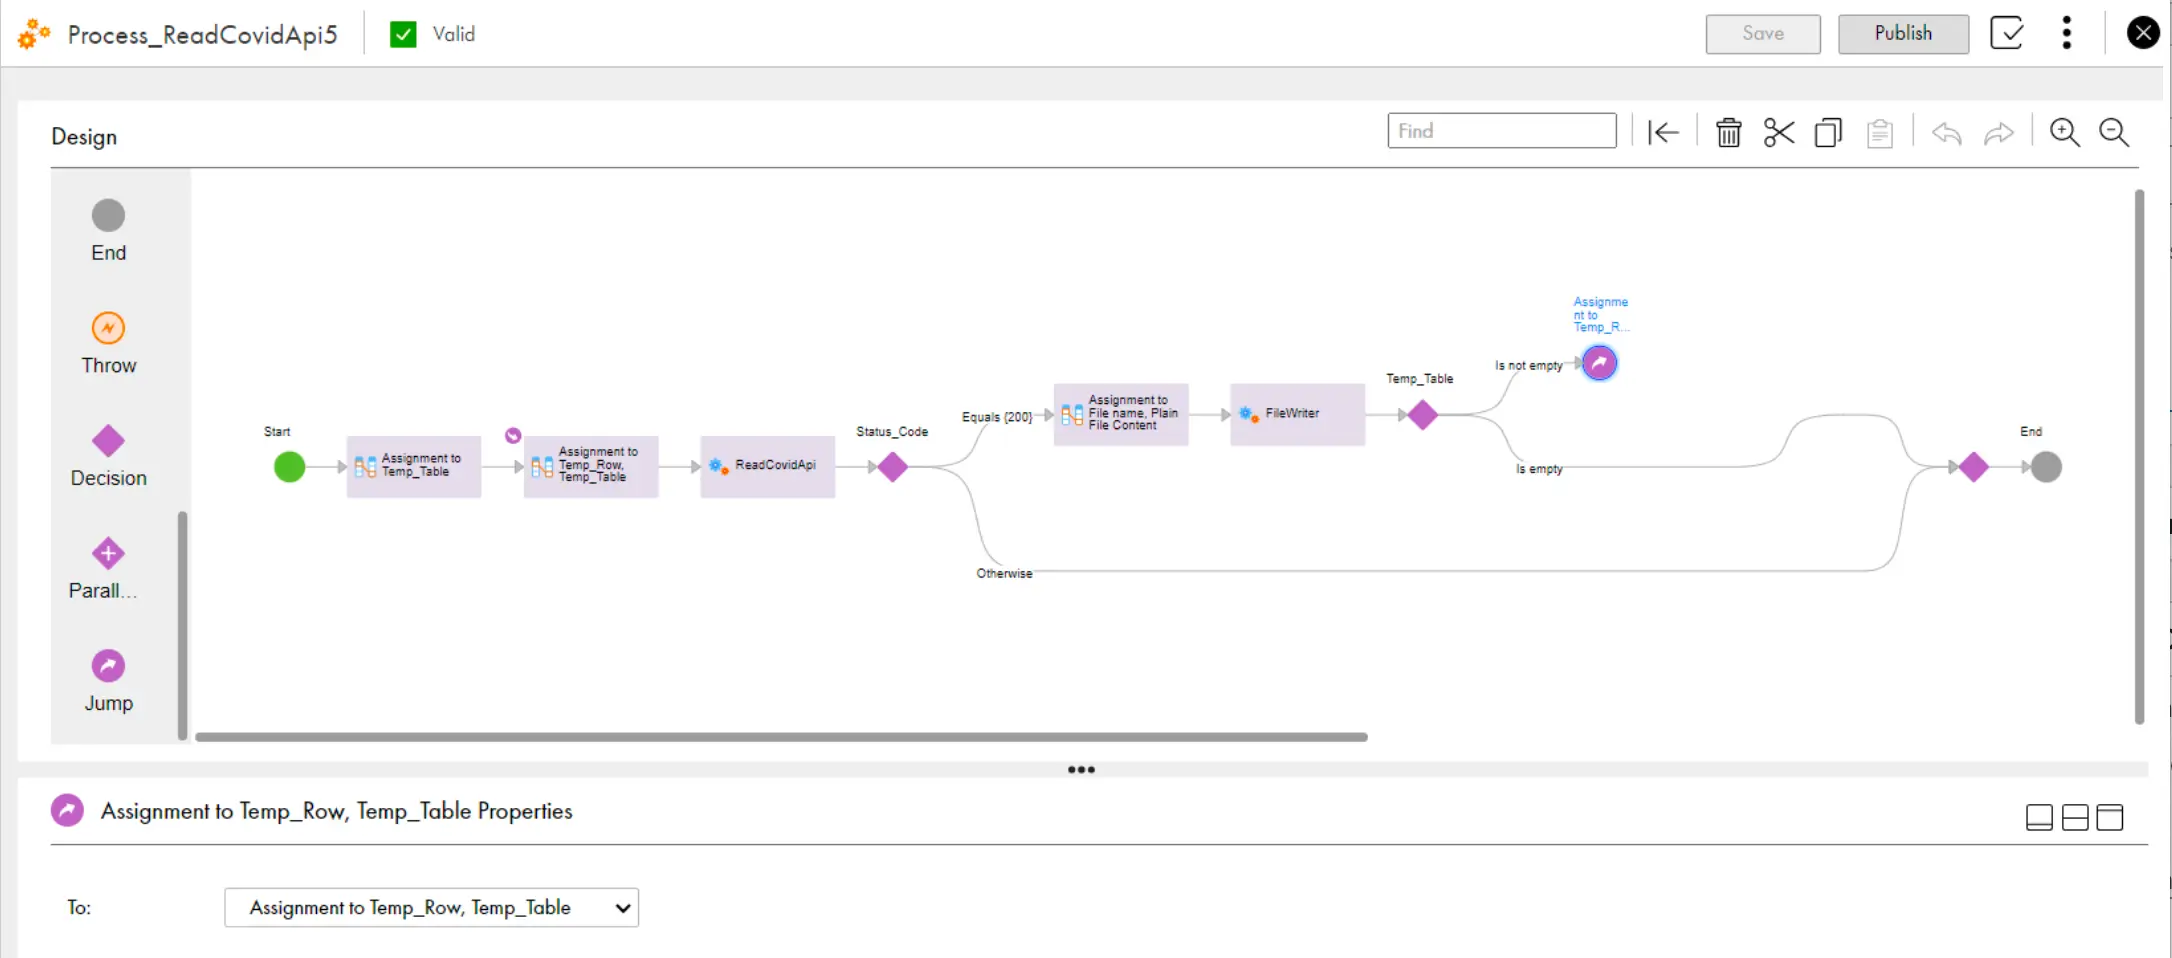
- As we have 7 Records in the Source table, Total 7 output files got generated under the target File directory as shown in the below.


Leave a comment